"hello@smashingmagazine.com (Marina Chernyshova)" / 2025-04-24 2 months ago / 未收藏/ smashingmagazine/
发送到 kindle
While it is clear that creativity is driven by both the left and right hemispheres, an important question remains: how can we boost creativity while keeping the process enjoyable? It may not be obvious, but non-design-related activities can, in fact, be an opportunity to enhance creativity.
2025-04-24 2 months ago / 未收藏/ MongoDB | Blog/
发送到 kindle
The future of AI-powered search
The role of the modern database is evolving. AI-powered applications require more than just fast, scalable, and durable data management: they need highly accurate data retrieval and intelligent ranking, which are enabled by the ability to extract meaning from large volumes of unstructured inputs like text, images, and video. Retrieval-augmented generation (RAG) is now the default for LLM-powered applications, making accuracy in AI-driven search and retrieval a critical priority for developers. Meanwhile, customers in industries like healthcare, legal, and finance need highly reliable answers to power the applications their users rely on.MongoDB Atlas Search already combines keyword and vector search through its hybrid capabilities. However, to truly meet developers’ needs and expectations, we are expanding our focus to integrating best-in-class embedding and reranking models into Atlas to ensure optimal performance and superior outcomes. These models enable search systems to understand meaning beyond exact words in text, and to recognize semantic similarities across images, video, and audio. Embedding models and rerankers empower customer support teams to quickly match queries with pertinent documents, assist legal professionals in surfacing key clauses within long contracts, and optimize RAG pipelines by retrieving contextually significant information that addresses users’ queries.
MongoDB is actively building this future. In February, we announced the acquisition of Voyage AI, a pioneer in state-of-the-art embedding and reranking models. With Voyage’s leading models and Atlas Search, developers will get a unified, production-ready stack for semantic retrieval.
Why embedding and reranking matter
Embedding and reranking models are core components of modern information retrieval, providing the link between natural language and accurate results:-
Embedding models transform data into vector representations that capture meaning and context, enabling searches based on semantic similarity rather than just keyword matches.
-
Reranking models improve search accuracy by scoring and ranking a smaller set (e.g., 1000) of documents based on their relevance to a query, ensuring the most meaningful results appear first.
This combination can greatly improve retrieval accuracy. For example, the system processing a user query for “holiday cookie recipes without tree nuts” may first retrieve a set of holiday recipes with the nearest neighbor search. In reranking, the query would be fully compared to each retrieved document to ensure each recipe does not contain any nuts.
Voyage AI’s embedding and reranking models
Voyage offers a suite of embedding models that support both general-purpose use cases and domain-specific needs. General models likevoyage-3, voyage-3-large, and voyage-3-lite handle diverse text inputs. For specialized applications, Voyage provides models tailored to domains like code (voyage-code-3), legal (voyage-law-2), and finance (voyage-finance-2), offering higher accuracy by capturing the context and semantics unique to each field. They also offer a multimodal model (voyage-multimodal-3) capable of processing interleaved text and images. In addition, Voyage provides reranking models in standard and lite versions, each focused on optimizing relevance while keeping latency and computational load under control.Voyage’s embedding models are designed to optimize the two distinct workloads required for each application, and our inference platform is purpose-built to support both scenarios efficiently:
-
Document embeddings are created for all documents in a database whenever they are added or updated, capturing the semantic meaning of the documents an application has access to. Typically generated in batch, they are optimized for scale and throughput.
-
Query embeddings enable the system to effectively interpret the user's intent for relevant results. Produced for a user's search query at the moment it's made, they are optimized for low latency and high precision.

voyage-3-large model shows up to 20% improved retrieval accuracy over widely adopted production models across 100 datasets spanning domains like law, finance, and code. Despite its performance, it requires 200x less storage when using binary quantized embeddings. Domain-specific models like voyage-code-2 also outperform general-purpose models by up to 15% on code tasksOn the reranking side,
rerank-lite-1 and rerank-1 deliver gains of up to 14% in precision and recall across over 80 multilingual and vertical-specific datasets. These improvements translate directly into better relevance, faster inference, and more efficient RAG pipelines at scale.MongoDB Atlas Search + Voyage AI models today
MongoDB Atlas Vector Search enables powerful semantic retrieval with a wide range of embedding and reranking models. Developers can benefit from using Voyage models with Atlas Vector Search today, even before the deeper integration arrives.
“AI-powered search”, not “AI Search”
Not all AI search experiences are created equal. As we begin integrating Voyage AI models directly into MongoDB Atlas, it’s worth sharing how we’re approaching this work.The best solutions today blend traditional information retrieval with modern AI techniques, improving relevance while keeping systems explainable and tunable.
AI-powered search in MongoDB Atlas enhances traditional search techniques with modern AI models. Embeddings improve semantic understanding, and reranking models refine relevance. But unlike opaque AI stacks, this approach remains transparent, customizable, and efficient:
-
More control: Developers can tune search logic and ranking strategies based on their domain.
-
More flexibility: Models can be updated or swapped to improve on an industry-specific corpus of data.
-
More efficiency: MongoDB handles both storage and retrieval, optimizing cost and performance at scale.
Building the MongoDB + Voyage AI “better together” story
While MongoDB’s flexible query language unlocks powerful capabilities, Atlas Vector Search can require thoughtful setup, especially for advanced use cases. Users must select and fine-tune embedding models to fit specific use cases. Additionally, they must either rely on serverless model APIs or build and maintain infrastructure to host models themselves. Each insert of new data and search query requires independent API calls, adding operational overhead. As applications scale or when models need updating, managing these new data types in clusters introduces additional friction. Finally, integrating rerankers further complicates the workflow by requiring separate API calls and custom handling for reordering results.By natively bringing Voyage AI's industry-leading models to MongoDB Atlas, we will eliminate these burdens and introduce new capabilities that empower customers to deliver highly relevant query results with simplicity.
MongoDB is actively integrating Voyage's embedding and reranking models into Atlas to deliver a truly native experience. These deep integrations will not only simplify the developer workflow but will also enhance accuracy, performance, and cost efficiency - all without the usual complexity of tuning disparate systems. And our ongoing commitment to partnering with innovative companies across AI and tech ensures that models from various providers remain supported within a collaborative ecosystem. However, adopting the native Voyage models allows developers to focus on building their applications while achieving the highest quality of information retrieval.

-
Defining the optimal approach to multi-modal information retrieval, integrating diverse inputs like text and images for richer results.
-
Developing instruction-tuned retrieval, which allows concise prompts to precisely guide model interpretations, ensuring searches align closely with user intent. For example, enabling a search for “shoes” to prioritize sneakers or dress shoes, depending on user behavior and preferences.
-
Determining the best ways to integrate domain-specific models tailored to the unique needs and use cases of industries such as legal, finance, and healthcare to achieve superior retrieval accuracy.
-
Making it easy to update and change models without impacting availability.
-
Bringing additional AI capabilities into our expressive aggregation pipeline language
-
Improving the ability to automatically assess model performance, with the potential to offer this capability to customers.
Building the future of AI-powered search
From RAG pipelines to AI-powered customer experiences, information retrieval is the backbone of real-world AI applications. Voyage’s models strengthen this foundation by surfacing better documents and improving final LLM outputs.We are building this future around four core principles, with accuracy at the forefront:
-
Accurate: ensuring the precision of information retrieval is always our top priority, empowering applications to achieve production-grade quality and mass adoption.
-
Seamless: built into existing developer workflows.
-
Scalable: optimized for performance and cost.
-
Composable: open, flexible, and deeply integrated.
Join our MongoDB Community to learn about upcoming events, hear stories from MongoDB users, and connect with community members from around the world.
"Sibel Bagcilar" / 2025-04-24 2 months ago / 未收藏/ LogRocket - Medium/
发送到 kindle
Priya Lakshminarayanan, Chief Product Officer at Recurly, talks about Recurly’s work to improve merchants’ subscriber experiences.
The post Leader Spotlight: Enabling merchants to make faster, smarter decisions, with Priya Lakshminarayanan appeared first on LogRocket Blog.
The post Leader Spotlight: Enabling merchants to make faster, smarter decisions, with Priya Lakshminarayanan appeared first on LogRocket Blog.
"Jessica Srinivas" / 2025-04-24 2 months ago / 未收藏/ LogRocket - Medium/
发送到 kindle
Mike Korenugin, Director of Product at SE Ranking, shares the importance assuming a data-informed approach.
The post Leader Spotlight: Balancing data with judgement, with Mike Korenugin appeared first on LogRocket Blog.
The post Leader Spotlight: Balancing data with judgement, with Mike Korenugin appeared first on LogRocket Blog.
"Tanzir Rahman" / 2025-04-24 2 months ago / 未收藏/ LogRocket - Medium/
发送到 kindle
Tooltips are useful and sometimes a necessity in user experience design because they can help guide users through a UI pattern.
The post Designing better tooltips for improved UX appeared first on LogRocket Blog.
The post Designing better tooltips for improved UX appeared first on LogRocket Blog.
"Wisdom Ekpotu" / 2025-04-23 2 months ago / 未收藏/ LogRocket - Medium/
发送到 kindle
Discover how to integrate frontend AI tools for faster, more efficient development without sacrificing quality.
The post The right way to implement AI into your frontend development workflow appeared first on LogRocket Blog.
The post The right way to implement AI into your frontend development workflow appeared first on LogRocket Blog.
"Neil Nkoyock" / 2025-04-23 2 months ago / 未收藏/ LogRocket - Medium/
发送到 kindle
If you’re building in fintech, your UX needs to do more than look good. It needs to feel right. Here's how to make that happen.
The post Fintech UX design: What the best finance apps get right appeared first on LogRocket Blog.
The post Fintech UX design: What the best finance apps get right appeared first on LogRocket Blog.
2025-04-24 2 months ago / 未收藏/ DreamHost Status/
发送到 kindle
April 23, 2025 4:28PM PDT
Scheduled - On Wednesday, April 24th between 00:00 and 00:15 Pacific time
We will be performing maintenance on our iad1-shared-b7-05, iad1-shared-b7-06, and iad1-shared-b7-07 Shared servers. Customers will experience intermittent connectivity during this time as the servers are rebooted. All other services will remain unaffected. To confirm the Shared server where your websites are located, you can visit panel.dreamhost.com/?tree=support.dc
April 24, 2025 12:05AM PDT
Active - Maintenance has started for iad1-shared-b7-05, iad1-shared-b7-06, and iad1-shared-b7-07
April 24, 2025 1:26AM PDT
Completed - Maintenance has completed for iad1-shared-b7-05, iad1-shared-b7-06, and iad1-shared-b7-07
2025-04-24 2 months ago / 未收藏/ DreamHost Status/
发送到 kindle
April 23, 2025 7:45PM PDT
Investigating - Our Technical Operations team is currently investigating connectivity issues affecting one of our VPS machines, pdx1-vpshost-a8-24. We are actively monitoring the situation and will provide periodic updates as more information becomes available.
Our technical operations and data center personnel are working on restoring services. At this time, we do not have an estimated resolution time, but we will continue to share updates as soon as we have more details.
Thank you for your patience while we work to restore full functionality.
April 23, 2025 9:33PM PDT
Monitoring - Our Technical Operations team has implemented a fix and all customer websites affected by this incident are now operational. Our Technical Operations team will continue to closely monitor performance to ensure everything runs smoothly and as expected. Further updates will be provided as needed.
"The Conversation" / 2025-04-22 2 months ago / 未收藏/ studyfinds/
发送到 kindle
 In earlier centuries, papal funerals have been elaborate affairs, ceremonies befitting a Renaissance prince or other regal figure. But in recent years, the rites have been simplified.
The post What Will Happen at the Funeral of Pope Francis appeared first on Study Finds.
"StudyFinds Staff" / 2025-04-22 2 months ago / 未收藏/ studyfinds/
发送到 kindle
 When grandma and grandpa take over childcare duties, nearly half the time is spent staring at screens, according to new research that reveals a growing generational digital gap with real family consequences.
The post Sadly, Half of Kids’ Time with Grandparents Now Spent on Screens appeared first on Study Finds.
"StudyFinds Staff" / 2025-04-22 2 months ago / 未收藏/ studyfinds/
发送到 kindle
 Scientists have mapped the brain's electrical activity during lucid dreaming, offering unprecedented insights into this mysterious state of consciousness.
The post Scientists Map Brain Activity During Lucid Dreaming for First Time Ever appeared first on Study Finds.
"The Conversation" / 2025-04-22 2 months ago / 未收藏/ studyfinds/
发送到 kindle
 If you’ve ever heard the term "wage slave," you’ll know many modern workers – perhaps even you – sometimes feel enslaved to the organization at which they work. But here’s a different way of thinking about it: for-profit business corporations are themselves slaves.
The post Is a Corporation a Slave? Many Philosophers Think So appeared first on Study Finds.
"StudyFinds Staff" / 2025-04-22 2 months ago / 未收藏/ studyfinds/
发送到 kindle
 A new survey reports that 67% of Americans feel they're lagging behind their savings targets. Even worse, 47% have completely given up hope, believing they'll never reach the financial milestones they've set for themselves.
The post Why Nearly Half of Americans Have Given Up on Saving Money appeared first on Study Finds.
"StudyFinds Staff" / 2025-04-22 2 months ago / 未收藏/ studyfinds/
发送到 kindle
 A single dose of a psychedelic compound could be key to helping your brain become more adaptable weeks after the trip ends.
The post Single Psychedelic Dose Shows Cognitive Boost Lasting Weeks appeared first on Study Finds.
"StudyFinds Staff" / 2025-04-23 2 months ago / 未收藏/ studyfinds/
发送到 kindle
 Researchers have made a major breakthrough that could transform IV medications into oral treatments for diseases like brain cancer and Alzheimer's, potentially revolutionizing how we administer complex drugs.
The post IV Drugs Could Be Taken Orally Thanks to Protein Discovery appeared first on Study Finds.
"StudyFinds Staff" / 2025-04-23 2 months ago / 未收藏/ studyfinds/
发送到 kindle
 Public trust in key institutions like the Supreme Court and Congress is fading, but Americans across party lines overwhelmingly support the Constitution's system of checks and balances that limits presidential authority.
The post Trust in Supreme Court Plummets to 41% As Americans Cling to Constitutional Values appeared first on Study Finds.
"StudyFinds Staff" / 2025-04-23 2 months ago / 未收藏/ studyfinds/
发送到 kindle
 Extreme weather, not just barbarian hordes, may have helped bring down Roman Britain.
The post Barbarian Invaders Shattered Roman Britain — Thanks To Hot, Dry Summers appeared first on Study Finds.
"StudyFinds Staff" / 2025-04-23 2 months ago / 未收藏/ studyfinds/
发送到 kindle
 When you click "join appointment" for a virtual doctor visit, you're not just saving yourself a drive to the clinic, you're helping cut greenhouse gas emissions.
The post How Virtual Doctor Visits Are Saving the Planet appeared first on Study Finds.
"StudyFinds Staff" / 2025-04-23 2 months ago / 未收藏/ studyfinds/
发送到 kindle
 When a father battles depression as his child starts kindergarten, the ripple effects can be felt for years in the classroom.
The post Dad’s Depression May Double Risk of Behavioral Problems in Kids appeared first on Study Finds.
"StudyFinds Staff" / 2025-04-23 2 months ago / 未收藏/ studyfinds/
发送到 kindle
 Hospital surfaces are breeding grounds for dangerous bacteria. Now, researchers believe a special paint could be the answer to stopping infections before they start.
The post Bacteria-Killing Paint Can Help Keep Rooms Germ-Free for Months appeared first on Study Finds.
"StudyFinds Staff" / 2025-04-23 2 months ago / 未收藏/ studyfinds/
发送到 kindle
 The air you breathe might be dirtier than you think, and millions of Americans would never know it. A new study from Penn State reveals that nearly 60% of U.S. counties lack even a single air quality monitoring station, creating vast "monitoring deserts" where over 50 million people are flying blind about what's actually in their air.
The post Is Your Air Actually Safe? 50 Million Americans Live in ‘Monitoring Deserts’ appeared first on Study Finds.
"StudyFinds Staff" / 2025-04-24 2 months ago / 未收藏/ studyfinds/
发送到 kindle
 Two continents collided millions of years ago, forming a bridge that changed Earth's climate system and triggered one of history's greatest animal migrations.
The post How An Ancient Bridge Formed By A Continental Collision Forever Changed Life On Earth appeared first on Study Finds.
"StudyFinds Staff" / 2025-04-24 2 months ago / 未收藏/ studyfinds/
发送到 kindle
 World leaders may believe that current climate policies put us on a safer path, but a shocking new international study reveals that our planet stands on the brink of multiple climate disasters.
The post Current Climate Policies Could Trigger Up To 9 Irreversible ‘Tipping Points,’ Paper Warns appeared first on Study Finds.
"StudyFinds Staff" / 2025-04-24 2 months ago / 未收藏/ studyfinds/
发送到 kindle
 Blood, sand, and death – for Romans, there was no better entertainment than watching gladiators fight exotic animals in arenas across their vast empire.
The post First Physical Evidence of Gladiators Battling Lions in Roman Britain Discovered appeared first on Study Finds.
"StudyFinds Staff" / 2025-04-24 2 months ago / 未收藏/ studyfinds/
发送到 kindle
 Your dog doesn't criticize your life choices, start arguments about politics, or hold grudges, and that might explain why they rank higher in relationship satisfaction than most humans in your life. A new study from Hungarian researchers has revealed that dog owners experience greater relationship satisfaction with their four-legged companions than with their relatives or friends.
The post Dogs Outrank All Humans (Except Kids) In Our Relationships, Study Shows appeared first on Study Finds.
"StudyFinds Staff" / 2025-04-24 2 months ago / 未收藏/ studyfinds/
发送到 kindle
 Scientists at UC Berkeley have achieved the seemingly impossible — they’ve created a color that lies beyond the natural range of human vision.
The post Scientists Discover ‘Impossible’ New Color By Bending Rules of Vision appeared first on Study Finds.
"Hassan Djirdeh " / 2025-04-24 2 months ago / 未收藏/ Telerik Blogs/
发送到 kindle
Engineers have always used tools to improve their work. Rather than a job replacement, AI is powerful tool for design engineers to explore and leverage.
The role of design engineering, often considered a hybrid of design and technical expertise, has continually evolved with technological advancements. From the introduction of computer-aided design (CAD) tools in the late 20th century to the emergence of generative design algorithms in the 2010s, the relationship between design engineers and their tools has always been a partnership.
Today, another major transition is happening—one powered by integrating artificial intelligence (AI) into the design and coding experience to provide help and improved efficiency in software production. In today’s article, we’ll explore how AI is being used in the world of design engineering, its potential as a tool or replacement, and what it could mean for the future of the field.
Design engineers play a pivotal role in aligning design and development teams in web and mobile software. By understanding both the creative and technical sides of a project, they enable more seamless collaboration, reduce friction in the design-to-code handoff and enhance the quality of the final product.
For this article, we discuss design engineers (DEs) in the context of software development, particularly in web and mobile contexts. DEs help navigate the complexities of frontend frameworks, component libraries and APIs while keeping user experience and design fidelity at the forefront.
Some of these chat interface tools (like ChatGPT and Claude) excel in generating rapid solutions, whether crafting boilerplate code, explaining algorithms or suggesting ways to optimize workflows. Other tools, like DeepSeek, specialize in retrieving nuanced information from large datasets, making it helpful when analyzing historical project data or brainstorming solutions to design bottlenecks. These tools enable design engineers to offload repetitive or time-intensive tasks, freeing up bandwidth for more creative and strategic efforts.
Builder.io extends this innovation by enabling developers and designers to work collaboratively on dynamic user interfaces. Its AI-powered components simplify complex workflows, allowing teams to iterate faster. With Builder.io, the line between design and engineering blurs even further, as engineers can integrate their work with the visual assets created by designers.
For design engineers, these AI-powered capabilities bring more efficiency. They facilitate experimentation, help avoid common design pitfalls and reduce the cognitive load associated with manual design iteration. Integrating these tools into their workflow allows DEs to focus more on innovation and less on repetitive tasks, fostering a culture of rapid prototyping and agile development.
These tools empower design engineers to bridge the gap between static designs and functional applications. By leveraging AI, they can iterate on designs in real time, test ideas instantly and adapt quickly to feedback. Features like real-time previews, integrated deployment capabilities and support for importing assets from design tools like Figma eliminate much of the friction often associated with the traditional design-to-code workflow.
The role of design engineering, often considered a hybrid of design and technical expertise, has continually evolved with technological advancements. From the introduction of computer-aided design (CAD) tools in the late 20th century to the emergence of generative design algorithms in the 2010s, the relationship between design engineers and their tools has always been a partnership.
Today, another major transition is happening—one powered by integrating artificial intelligence (AI) into the design and coding experience to provide help and improved efficiency in software production. In today’s article, we’ll explore how AI is being used in the world of design engineering, its potential as a tool or replacement, and what it could mean for the future of the field.
Check out our previous article on how Software Development has changed with AI-Powered Code Editors.
What Is a Design Engineer?
A design engineer (DE) is a unique hybrid role that bridges the gap between design and engineering. As a translator and mediator, a DE combines technical expertise with a designer’s eye for detail, evolving creative visions into functional, practical solutions.Design engineers play a pivotal role in aligning design and development teams in web and mobile software. By understanding both the creative and technical sides of a project, they enable more seamless collaboration, reduce friction in the design-to-code handoff and enhance the quality of the final product.
For this article, we discuss design engineers (DEs) in the context of software development, particularly in web and mobile contexts. DEs help navigate the complexities of frontend frameworks, component libraries and APIs while keeping user experience and design fidelity at the forefront.
For more details on the role of a design engineer and what it entails, be sure to check out this article in the designengineer.xyz blog—The Design Engineer.
Chat-Interface Tools
The rise of chat-interface tools like ChatGPT, Claude and DeepSeek has influenced the integration of AI into design engineering. These tools act as conversational assistants, providing immediate answers, generating ideas and drafting code or design documentation. For many design engineers, they’ve become collaborative partners in tackling challenges.Some of these chat interface tools (like ChatGPT and Claude) excel in generating rapid solutions, whether crafting boilerplate code, explaining algorithms or suggesting ways to optimize workflows. Other tools, like DeepSeek, specialize in retrieving nuanced information from large datasets, making it helpful when analyzing historical project data or brainstorming solutions to design bottlenecks. These tools enable design engineers to offload repetitive or time-intensive tasks, freeing up bandwidth for more creative and strategic efforts.
AI-Enhanced Design Tools
While chat-interface tools make it easy for design engineers to quickly interact with AI, pivotal platforms like Figma and Builder.io have embedded AI into their workflows, improving the actual design process. Figma AI, for instance, introduces advanced features such as automated layout suggestions, instant mockup generation and intelligent alignment recommendations. These features empower designers and engineers to create better designs faster, all while maintaining the creative vision.Builder.io extends this innovation by enabling developers and designers to work collaboratively on dynamic user interfaces. Its AI-powered components simplify complex workflows, allowing teams to iterate faster. With Builder.io, the line between design and engineering blurs even further, as engineers can integrate their work with the visual assets created by designers.
For design engineers, these AI-powered capabilities bring more efficiency. They facilitate experimentation, help avoid common design pitfalls and reduce the cognitive load associated with manual design iteration. Integrating these tools into their workflow allows DEs to focus more on innovation and less on repetitive tasks, fostering a culture of rapid prototyping and agile development.
Prototyping and Design with Code
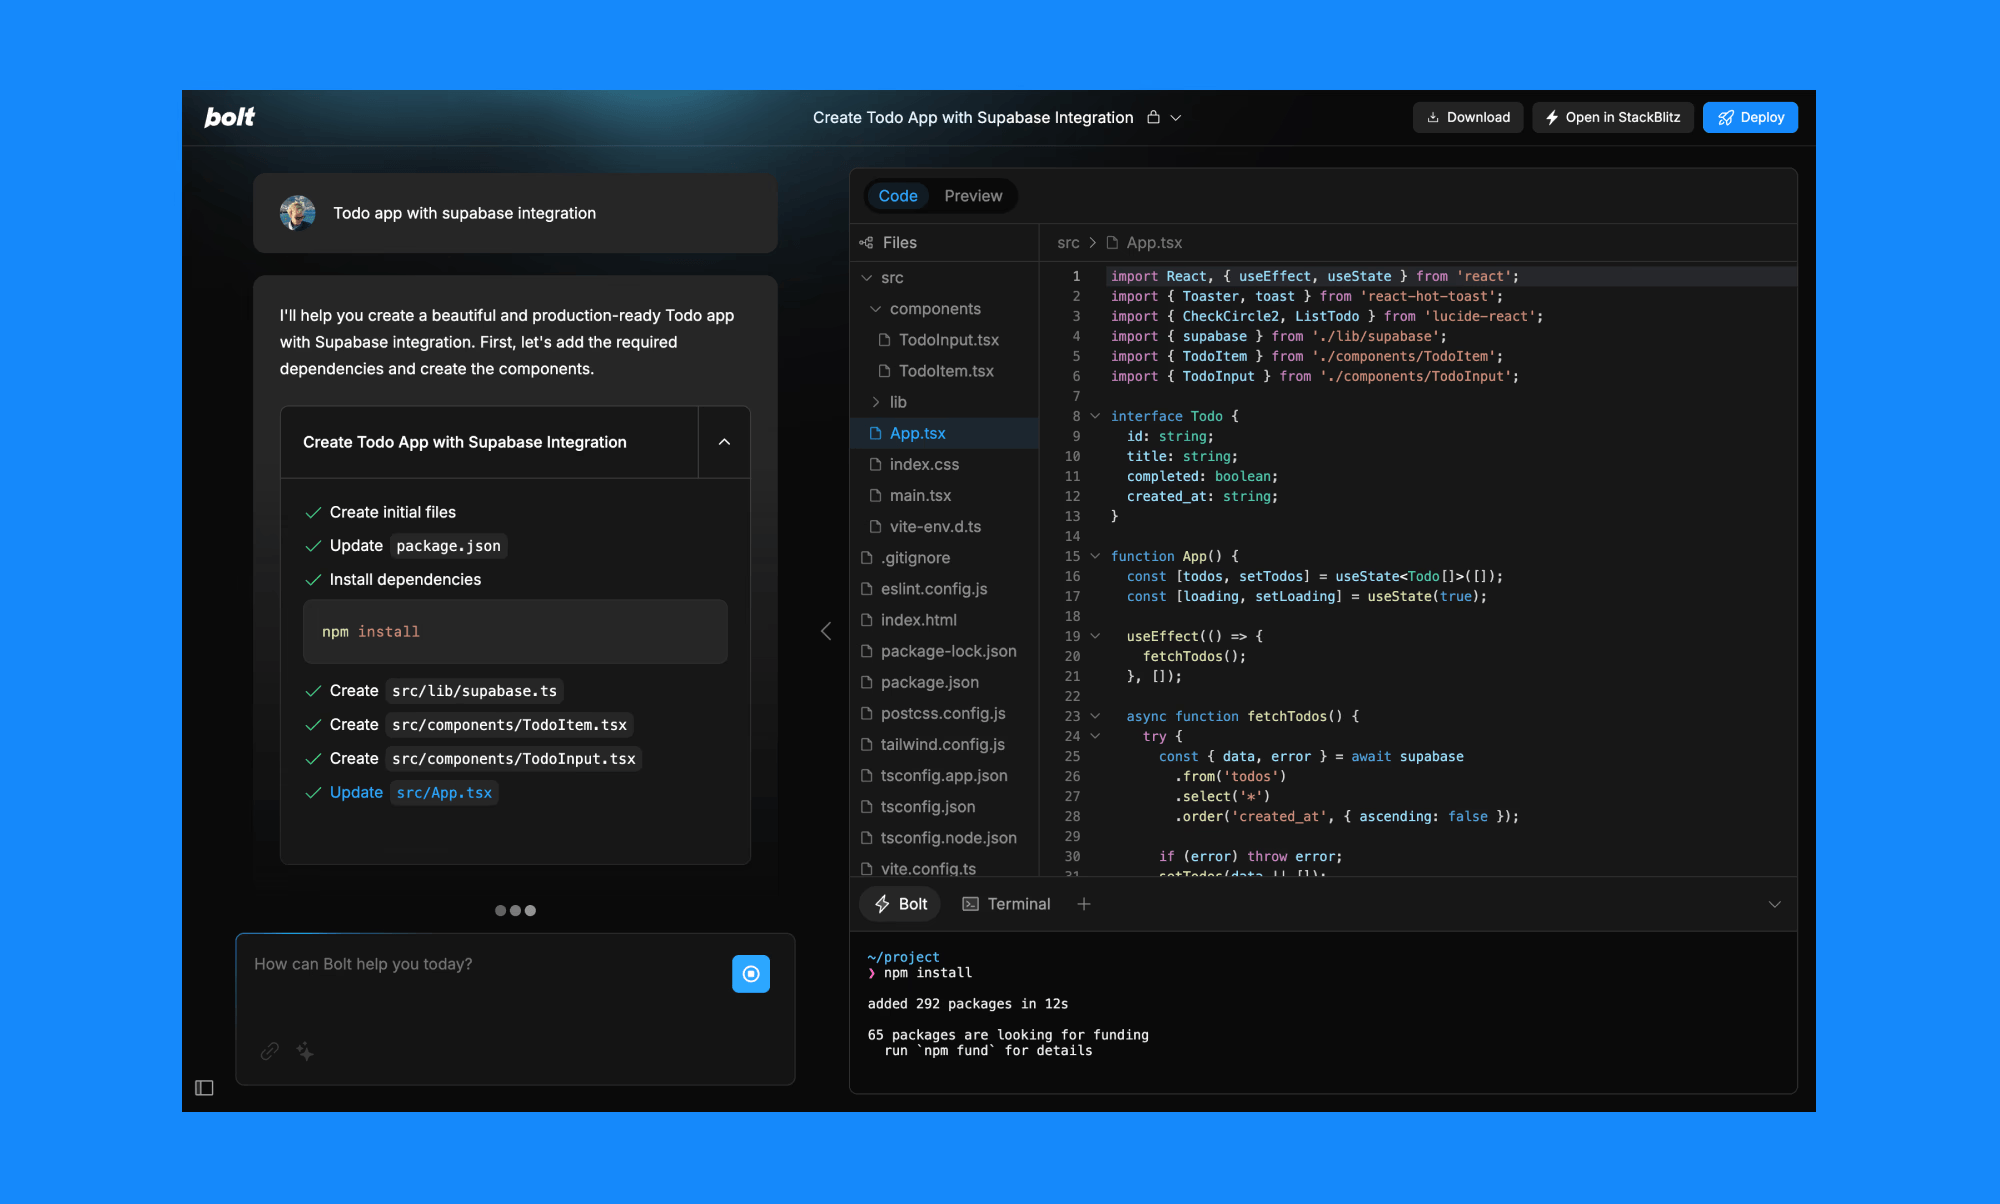
As the boundaries between design and engineering continue to dissolve, tools like bolt.new and lovable.dev are taking center stage. bolt.new and lovable.dev (among other similar tools) are AI-powered web development platforms that allow developers to prompt, create, edit and deploy full-stack applications directly from their browser, all through an intuitive chat interface.These tools empower design engineers to bridge the gap between static designs and functional applications. By leveraging AI, they can iterate on designs in real time, test ideas instantly and adapt quickly to feedback. Features like real-time previews, integrated deployment capabilities and support for importing assets from design tools like Figma eliminate much of the friction often associated with the traditional design-to-code workflow.
Can AI Do It All ?
While AI tools enhance productivity and efficiency, they raise questions about whether they could replace design engineering altogether. The truth is that while AI excels in performing defined tasks, it falls short in areas requiring human intuition, creativity and contextual understanding.- Contextual judgment – AI can produce somewhat accurate designs or code snippets but often misses the broader project goals, such as balancing functionality with aesthetics or considering user experience nuances.
- Collaborative strategy – Design engineers are essential in bridging teams, aligning technical execution with business objectives and facilitating communication between designers and developers. This collaborative and strategic role remains far beyond AI’s capabilities today—and likely will be for a long time.
- Ethical and cultural awareness – Designing for diverse users involves ethical considerations and cultural sensitivity, areas where human judgment remains indispensable. AI lacks the understanding and adaptability to navigate these complexities.
"Ed Charbeneau " / 2025-04-24 2 months ago / 未收藏/ Telerik Blogs/
发送到 kindle
Let’s examine client, server and mixed render modes across three leading web frameworks: Blazor, Angular and React.
The evolution of web development has transformed how applications render content to users. As powerful as they are diverse, render modes determine where your code executes, how quickly users see content and how interactive that content becomes. With the right rendering strategy, developers can dramatically improve performance, user experience and SEO without compromising on functionality.
Let’s examine render modes across three leading web frameworks: Blazor, Angular and React. By understanding how each framework approaches rendering, we can identify the similarities between their approaches and select the optimal rendering strategy for our applications while finding common ground among competing technologies.
The strategic selection of render modes impacts applications in several critical ways including:
Next we’ll examine what render modes exist in modern frameworks and how they’re implemented. The goal is to understand common ground between implementations and not to pit one versus another. Understanding these features as a whole makes choosing frameworks or switching between them much easier.

Blazor targets developer productivity by enabling C# developers to build interactive web UIs without JavaScript. Blazor’s rendering capabilities offer exceptional flexibility with several render modes that determine where components execute and how they interact with users.
In a Blazor application, developers can set render modes on a per-component basis, application-wide or using a mix-and-match approach. Render modes are set using the
PersistentComponentState in Blazor is a state hydration feature that allows you to persist the server state of components during pre-rendering.

Angular, Google’s comprehensive web application framework, offers several rendering strategies to optimize performance and user experience.
To enable SSR in an Angular project:

React, Facebook’s popular UI library, has evolved its rendering capabilities significantly, especially with the introduction of React Server Components.
React Server Components and Blazor’s Interactive Server mode represent two different approaches to server-side rendering and interactivity, with fundamental architectural differences. Blazor Interactive Server offers a more traditional “thin client” approach with server-driven UI, while React Server Components provide a more hybrid approach that combines server rendering with client interactivity in a more decoupled way. Blazor’s Automatic render mode and React Server Components aim to solve the same problems and share similarities.
When Server Components render Client Components or when using traditional server-side rendering in React, the framework needs a way to make static HTML interactive on the client. Like we’ve seen with Angular, this is where hydration comes in.
KendoReact: A professional UI component library with 100+ high-performance React components that are fully compatible with server-side rendering frameworks like Next.js. KendoReact components maintain their functionality and appearance regardless of the rendering approach. Try the free version, with 50+ components available at no cost, no time limit.
Kendo UI for Angular: A complete UI component library with 100+ native Angular components that fully support server-side rendering. Kendo UI for Angular is designed to work seamlessly with Angular Universal, providing consistent behavior across server and client rendering. Check out the 30-day free trial.
Telerik UI for Blazor: A comprehensive suite of 100+ truly native Blazor UI components that work seamlessly with all Blazor render modes. Telerik UI for Blazor supports both Blazor Server and WebAssembly projects, offering high-performance components like Grid, Charts and Scheduler that maintain their functionality across different render modes. This one also comes with a 30-day free trial—get started.
As web frameworks continue to evolve, we can expect even more sophisticated rendering strategies that further optimize the balance between server and client responsibilities. The future of web rendering lies in intelligent, context-aware approaches that deliver the right experience for each user and use case. Understanding these concepts at an architectural level helps developers foster technology independence.

Try Now
The evolution of web development has transformed how applications render content to users. As powerful as they are diverse, render modes determine where your code executes, how quickly users see content and how interactive that content becomes. With the right rendering strategy, developers can dramatically improve performance, user experience and SEO without compromising on functionality.
Let’s examine render modes across three leading web frameworks: Blazor, Angular and React. By understanding how each framework approaches rendering, we can identify the similarities between their approaches and select the optimal rendering strategy for our applications while finding common ground among competing technologies.
Why Render Modes Matter
Throughout web development history, rendering has shifted from static HTML files to server rendering, then to client-first approaches and now to hybrid solutions. With the exception of Blazor, frameworks like Angular and React initially embraced client-side rendering to simplify building highly interactive applications. However, this approach introduced challenges that server rendering capabilities could address.The strategic selection of render modes impacts applications in several critical ways including:
- Performance: Different render modes offer varying performance characteristics, affecting metrics like First Contentful Paint (FCP) and Time to Interactive (TTI).
- SEO: Search engines require HTML content to properly index pages. Server-side rendering provides this content immediately, while client-side rendering requires additional optimization.
- User experience: The rendering approach directly impacts how quickly users see and interact with your content.
- Resource usage: Server rendering can reduce client-side processing requirements but may increase server load.
- Development experience: Different render modes affect code structure and state management approaches.
Because of these trade-offs, modern web development stacks now include multiple render modes to minimize the negative effects of each mode.
Next we’ll examine what render modes exist in modern frameworks and how they’re implemented. The goal is to understand common ground between implementations and not to pit one versus another. Understanding these features as a whole makes choosing frameworks or switching between them much easier.
Blazor Render Modes
Blazor targets developer productivity by enabling C# developers to build interactive web UIs without JavaScript. Blazor’s rendering capabilities offer exceptional flexibility with several render modes that determine where components execute and how they interact with users.
In a Blazor application, developers can set render modes on a per-component basis, application-wide or using a mix-and-match approach. Render modes are set using the
@rendermode directive, which child components inherit through the component hierarchy.Static Server Rendering
Static server-side rendering (Static SSR) renders components on the server as static HTML without interactivity. This approach delivers extremely fast content that’s easily cached, making it ideal for content-focused pages like landing pages or marketing materials.@page "/static-example"
@rendermode StaticServer
<h1>Static Server Rendered Component</h1>
<p>This content is rendered on the server as static HTML.</p>
Interactive Server Rendering
Interactive server-side rendering (Interactive SSR) renders components on the server but maintains interactivity through a SignalR connection. User interactions are sent to the server, which updates the UI accordingly. This thin-client approach renders the application quickly, but is dependent on the client’s latency. In addition, it requires a persistent connection to the server to remain interactive.@page "/interactive-server"
@rendermode InteractiveServer
<button @onclick="UpdateMessage">Click me</button> @message
@code {
private string message = "Not updated yet.";
private void UpdateMessage()
{
// This executes on the server
message = "Updated on the server!";
}
}
Interactive WebAssembly (Client) Rendering
Client-side rendering in Blazor leverages WebAssembly to run .NET code directly in the browser. The component is downloaded and executed on the client, with all interactivity processed using the .NET runtime instead of JavaScript.@page "/interactive-wasm"
@rendermode InteractiveWebAssembly
<button @onclick="UpdateMessage">Click me</button> @message
@code {
private string message = "Not updated yet.";
private void UpdateMessage()
{
// This executes in the browser
message = "Updated on the client!";
}
}
Automatic (Auto) Rendering
Automatic rendering is a hybrid approach that initially renders with Interactive Server and then switches to WebAssembly for subsequent visits after the .NET runtime and app bundle are downloaded and cached. This mode eliminates most if not all user perceived trade-offs while some additional engineering may be required to seamlessly maintain application state.@page "/auto-render"
@rendermode InteractiveAuto
<button @onclick="UpdateMessage">Click me</button> @message
@code {
private string message = "Not updated yet.";
private void UpdateMessage()
{
// Executes on server initially,
// then client on subsequent visits
message = "Updated with Auto mode!";
}
}
State Persistence During Rendering
While Blazor doesn’t commonly use the term “Hydration,” it shares similar concepts through its rendering and interactivity modes. Blazor’s render modes include optional server pre-rendering as a speed optimization. When a page is fetched, the server statically renders the HTML and delivers it to the client. During interactivity, the component will perform additional renders depending on the interactivity mode. In this process, the application state needs to be maintained between requests so that the data represented in the pre-rendering persists through interactivity.PersistentComponentState in Blazor is a state hydration feature that allows you to persist the server state of components during pre-rendering.
@inject PersistentComponentState ApplicationState

@code {
    private string? data;

    protected override void OnInitialized()
    {
        if (ApplicationState.TryTake("MyDataKey", out string? persistedData))
        {
            data = persistedData; // Restore persisted state
        }
        else
        {
            data = "Hello, world!"; // Initialize state
            ApplicationState.Persist("MyDataKey", data); // Persist state
        }
    }
}
TryTake. If no data is available, new data is initialized and saved for future use by the Persist method. Following this logic, when the component is statically rendered for the first time, it will initialize data and store it in the persisted state. When the component becomes interactive, it will call OnInitialized again thus rehydrating the state. This approach helps preserve the component’s state across pre-rendering and interactive modes.Angular Render Modes
Angular, Google’s comprehensive web application framework, offers several rendering strategies to optimize performance and user experience.
Client-Side Rendering (CSR)
In traditional Angular applications, rendering happens entirely on the client. The browser downloads the JavaScript bundle, Angular initializes and then renders the application.// Standard Angular component with client-side rendering
@Component({
selector: 'app-client-example',
template: `
<h1>Client-Side Rendered Component</h1>
<button (click)="updateMessage()">Click me</button>
<p>{{ message }}</p>
`
})
export class ClientExampleComponent {
message = 'Not updated yet';
updateMessage() {
this.message = 'Updated on the client!';
}
}
updateMessage() method updates the component’s state client-side, changing the displayed message without any server interaction.Server-Side Rendering (SSR)
Angular’s server-side rendering generates the initial HTML on the server, which is then sent to the client. This improves initial load time and SEO. SSR with Angular is more comparable to Blazor’s server pre-rendering with client interactivity. However, Angular uses the JavaScript runtime directly and does not require the additional runtime resources like Blazor. In addition, Angular does not offer server interactivity in the same way that Blazor’s Interactive Server mode does.To enable SSR in an Angular project:
# For new projects
ng new --ssr

# For existing projects
ng add @angular/ssr
    // This component will first render on the server, then hydrate on the client
    @Component({
      selector: 'app-ssr-example',
      template: `
        <h1>Server-Side Rendered Content</h1>
        <p>This renders on the server first, then becomes interactive</p>
        <button (click)="updateMessage()">Click me</button>
        <p>{{ message }}</p>
      `
    })
    export class SsrExampleComponent {
      message = 'Not updated yet';
      updateMessage() {
        this.message = 'Updated after hydration!';
      }
    }
- The component initially renders on the server, generating HTML that’s immediately visible to users and search engines.
- This HTML is sent to the browser, allowing for a faster First Contentful Paint.
- Angular then “hydrates” the component on the client, attaching event handlers to make it interactive.
- After hydration, the component behaves identically to a client-rendered component.
Hydration
Hydration is the process that bridges server-side rendering and client-side interactivity. After the server-rendered HTML is delivered, Angular “hydrates” it by attaching event listeners and making it interactive.// In app.config.ts
import { ApplicationConfig } from '@angular/core';
import { provideClientHydration } from '@angular/platform-browser';
export const appConfig: ApplicationConfig = {
providers: [
provideClientHydration()
]
};
Incremental Hydration
Angular 19 introduced incremental hydration, allowing developers to prioritize which parts of the application should become interactive first. Incremental hydration is a sophisticated enhancement to Angular’s rendering capabilities controlled by a@defer block and a variety of hydration triggers.import {
bootstrapApplication,
provideClientHydration,
withIncrementalHydration,
} from '@angular/platform-browser';
...
bootstrapApplication(AppComponent, {
providers: [provideClientHydration(withIncrementalHydration())]
});
@defer (hydrate on viewport) {
  <large-cmp />
} @placeholder {
  <div>Large component placeholder</div>
}
React Render Modes
React, Facebook’s popular UI library, has evolved its rendering capabilities significantly, especially with the introduction of React Server Components.
Client Components
Traditional React components run on the client. They’re downloaded as JavaScript, executed in the browser, and can maintain state and handle user interactions.'use client';
import { useState } from 'react';
export default function ClientComponent() {
const [message, setMessage] = useState('Not updated yet');
return (
<div>
<h1>Client Component</h1>
<button onClick={() => setMessage('Updated on client!')}>
Click me
</button>
<p>{message}</p>
</div>
);
}
'use client' directive at the top explicitly marks it as client-side code, a convention introduced with React Server Components to distinguish between server and client rendering contexts. The component maintains state with useState and updates the message when the button is clicked, all on the client.Server Components
React Server Components, introduced in React 19, allow components to render on the server. They can access server resources directly and reduce the JavaScript sent to the client.React Server Components and Blazor’s Interactive Server mode represent two different approaches to server-side rendering and interactivity, with fundamental architectural differences. Blazor Interactive Server offers a more traditional “thin client” approach with server-driven UI, while React Server Components provide a more hybrid approach that combines server rendering with client interactivity in a more decoupled way. Blazor’s Automatic render mode and React Server Components aim to solve the same problems and share similarities.
// No 'use client' directive means this is a Server Component
import { getServerData } from '../lib/data';
import ClientComponent from './ClientComponent';

export default async function ServerComponent() {
  // This runs on the server only
  const data = await getServerData();

  return (
    <div>
      <h1>Server Component</h1>
      <p>Data from server: {data}</p>

      {/* Server Components can render Client Components */}
      <ClientComponent initialData={data} />
    </div>
  );
}
'use client' directive, this component runs exclusively on the server. It can directly access server resources and perform async operations like data fetching during the rendering process. The server renders the component with data already included and sends the resulting HTML to the client. As shown above, Server Components can seamlessly render Client Components, creating a hybrid rendering model where server-rendered content can include interactive client-side elements.When Server Components render Client Components or when using traditional server-side rendering in React, the framework needs a way to make static HTML interactive on the client. Like we’ve seen with Angular, this is where hydration comes in.
Hydration
React’s hydration process attaches event listeners to server-rendered HTML, making it interactive. This is handled through functions likehydrateRoot:import { hydrateRoot } from 'react-dom/client';
import App from './App';
// Assumes the HTML was server-rendered and contains the App structure
hydrateRoot(document.getElementById('root'), <App />);
Third-Party Tools
Each framework has an ecosystem of tools that enhance or simplify server rendering capabilities.For React
Next.js: The most popular framework for React server rendering, offering three server rendering strategies:- Static rendering: Pre-renders pages at build time
- Dynamic rendering: Renders pages at request time
- Streaming: Progressively renders UI from the server
// Next.js page with static rendering
export function getStaticProps() {
  return {
    props: { data: 'This was rendered at build time' }
  };
}

export default function Page({ data }) {
  return <div>{data}</div>;
}
    // Astro component with React island
    ---
    // Server-only code (runs at build time)
    const title = "Welcome to Astro";
    ---

    <html>
      <body>
        <h1>{title}</h1>

        <!-- React component that hydrates on the client -->
        <React.InteractiveComponent client:load />
      </body>
    </html>
KendoReact: A professional UI component library with 100+ high-performance React components that are fully compatible with server-side rendering frameworks like Next.js. KendoReact components maintain their functionality and appearance regardless of the rendering approach. Try the free version, with 50+ components available at no cost, no time limit.
For Angular
Built-in SSR: Server-side rendering is integrated directly into the Angular framework and can be easily set up with the Angular CLI.// server.ts (created by Angular Universal)
import 'zone.js/node';
import { ngExpressEngine } from '@nguniversal/express-engine';
import * as express from 'express';
import { AppServerModule } from './src/main.server';
const app = express();
app.engine('html', ngExpressEngine({
bootstrap: AppServerModule,
}));
app.get('*', (req, res) => {
res.render('index', { req });
});
app.listen(4000);
Kendo UI for Angular: A complete UI component library with 100+ native Angular components that fully support server-side rendering. Kendo UI for Angular is designed to work seamlessly with Angular Universal, providing consistent behavior across server and client rendering. Check out the 30-day free trial.
For Blazor
Azure SignalR Service: Blazor’s server rendering capabilities are built into the framework and third-party libraries aren’t required. Hosting applications with server-interactive mode can benefit from additional resources like Azure SignalR Service, which allows server-interactivity to scale with minimal effort.Telerik UI for Blazor: A comprehensive suite of 100+ truly native Blazor UI components that work seamlessly with all Blazor render modes. Telerik UI for Blazor supports both Blazor Server and WebAssembly projects, offering high-performance components like Grid, Charts and Scheduler that maintain their functionality across different render modes. This one also comes with a 30-day free trial—get started.
Comparison of Approaches and Trade-offs
Comparing the render modes across frameworks:Server Rendering
| Framework | Implementation | Pros | Cons |
|---|---|---|---|
| Blazor | Interactive WebAssembly | Works offline, reduces server load | Larger initial download, slower startup |
| Angular | Traditional SPA | Rich interactivity, simpler development | Poorer SEO, slower initial render |
| React | Client Components | Full interactivity, familiar model | Larger JS bundles, SEO challenges |
Client Rendering
| Framework | Implementation | Pros | Cons |
|---|---|---|---|
| Blazor | Interactive WebAssembly | Works offline, reduces server load | Larger initial download, slower startup |
| Angular | Traditional SPA | Rich interactivity, simpler development | Poorer SEO, slower initial render |
| React | Client Components | Full interactivity, familiar model | Larger JS bundles, SEO challenges |
Hybrid Approaches
| Framework | Implementation | Pros | Cons |
|---|---|---|---|
| Blazor | InteractiveAuto | Best of both worlds, optimized for returning visitors | More complex, requires both server and client setup |
| Angular | SSR with Hydration | Good SEO with full interactivity | Potential hydration mismatches |
| React | Next.js with mixed components | Flexible, optimized per-page rendering | More complex mental model |
Best Practices for Choosing the Right Render Mode
When to Use Server Rendering
- Content-focused sites: Blogs, news sites and documentation benefit from server rendering for SEO and fast initial load.
- Low-powered client devices: Server rendering offloads processing to the server, benefiting users on mobile or low-end devices.
- Dynamic content that changes frequently: Server rendering enables users to see the latest content.
When to Use Client Rendering
- Highly interactive applications: Apps with complex user interactions benefit from client-side rendering.
- Offline capabilities: Applications that need to work without a network connection should use client rendering.
- Reduced server load: For applications with many concurrent users, client rendering can reduce server resource usage.
When to Use Hybrid Approaches
- Ecommerce sites: Product listings can be server-rendered for SEO, while interactive elements like shopping carts can be client-rendered.
- Dashboards: Static content can be server-rendered for fast initial load, while interactive charts and filters can be client-rendered.
- Progressive enhancement: Start with server rendering for core content and enhance with client interactivity as resources load.
Framework-Specific Recommendations
Blazor
- Use static server for content-heavy pages with minimal interactivity.
- Use interactive server for applications with frequent small updates.
- Use interactive WebAssembly for offline-capable applications.
- Use auto for applications with returning users who benefit from caching.
Angular
- Use client-side rendering for internal applications where SEO isn’t a concern.
- Use server-side rendering for public-facing sites that need SEO.
- Use incremental hydration for large applications to prioritize critical UI elements.
React
- Use Server Components for data-fetching and content rendering.
- Use Client Components for interactive elements.
- Consider Next.js to leverage its flexible rendering options.
Conclusion
Modern web frameworks have converged on similar rendering strategies, each with their own implementation details. The key similarities include:- All three frameworks support both server and client rendering.
- All three use some form of hydration to bridge server rendering with client interactivity.
- All three are moving toward hybrid approaches that combine the benefits of server and client rendering.
As powerful as they are convenient, modern rendering approaches make a great choice for new applications, enabling developers to build fast, interactive and SEO-friendly web experiences without compromising on functionality.
As web frameworks continue to evolve, we can expect even more sophisticated rendering strategies that further optimize the balance between server and client responsibilities. The future of web rendering lies in intelligent, context-aware approaches that deliver the right experience for each user and use case. Understanding these concepts at an architectural level helps developers foster technology independence.
Credits
Special thanks to Hassan Djirdeh, Alyssa Nicoll and Kathryn Grayson Nanz for their contributions to this article.Check Out Telerik DevCraft
One of the best ways to understand how these three frameworks compare is to run them head-to-head and see what will work best for your needs. Progress offers all three of its corresponding component libraries in the Telerik DevCraft bundle—plus other UI component libraries and an assortment of tools like reporting and mocking. The 30-day free trial includes award-winning support to help you get started.Try Now
"Hassan Djirdeh " / 2025-04-24 2 months ago / 未收藏/ Telerik Blogs/
发送到 kindle
Now that we’ve built our chatbot with KendoReact and OpenAI, we’ll finalize it with the AIPrompt component for a polished interaction.
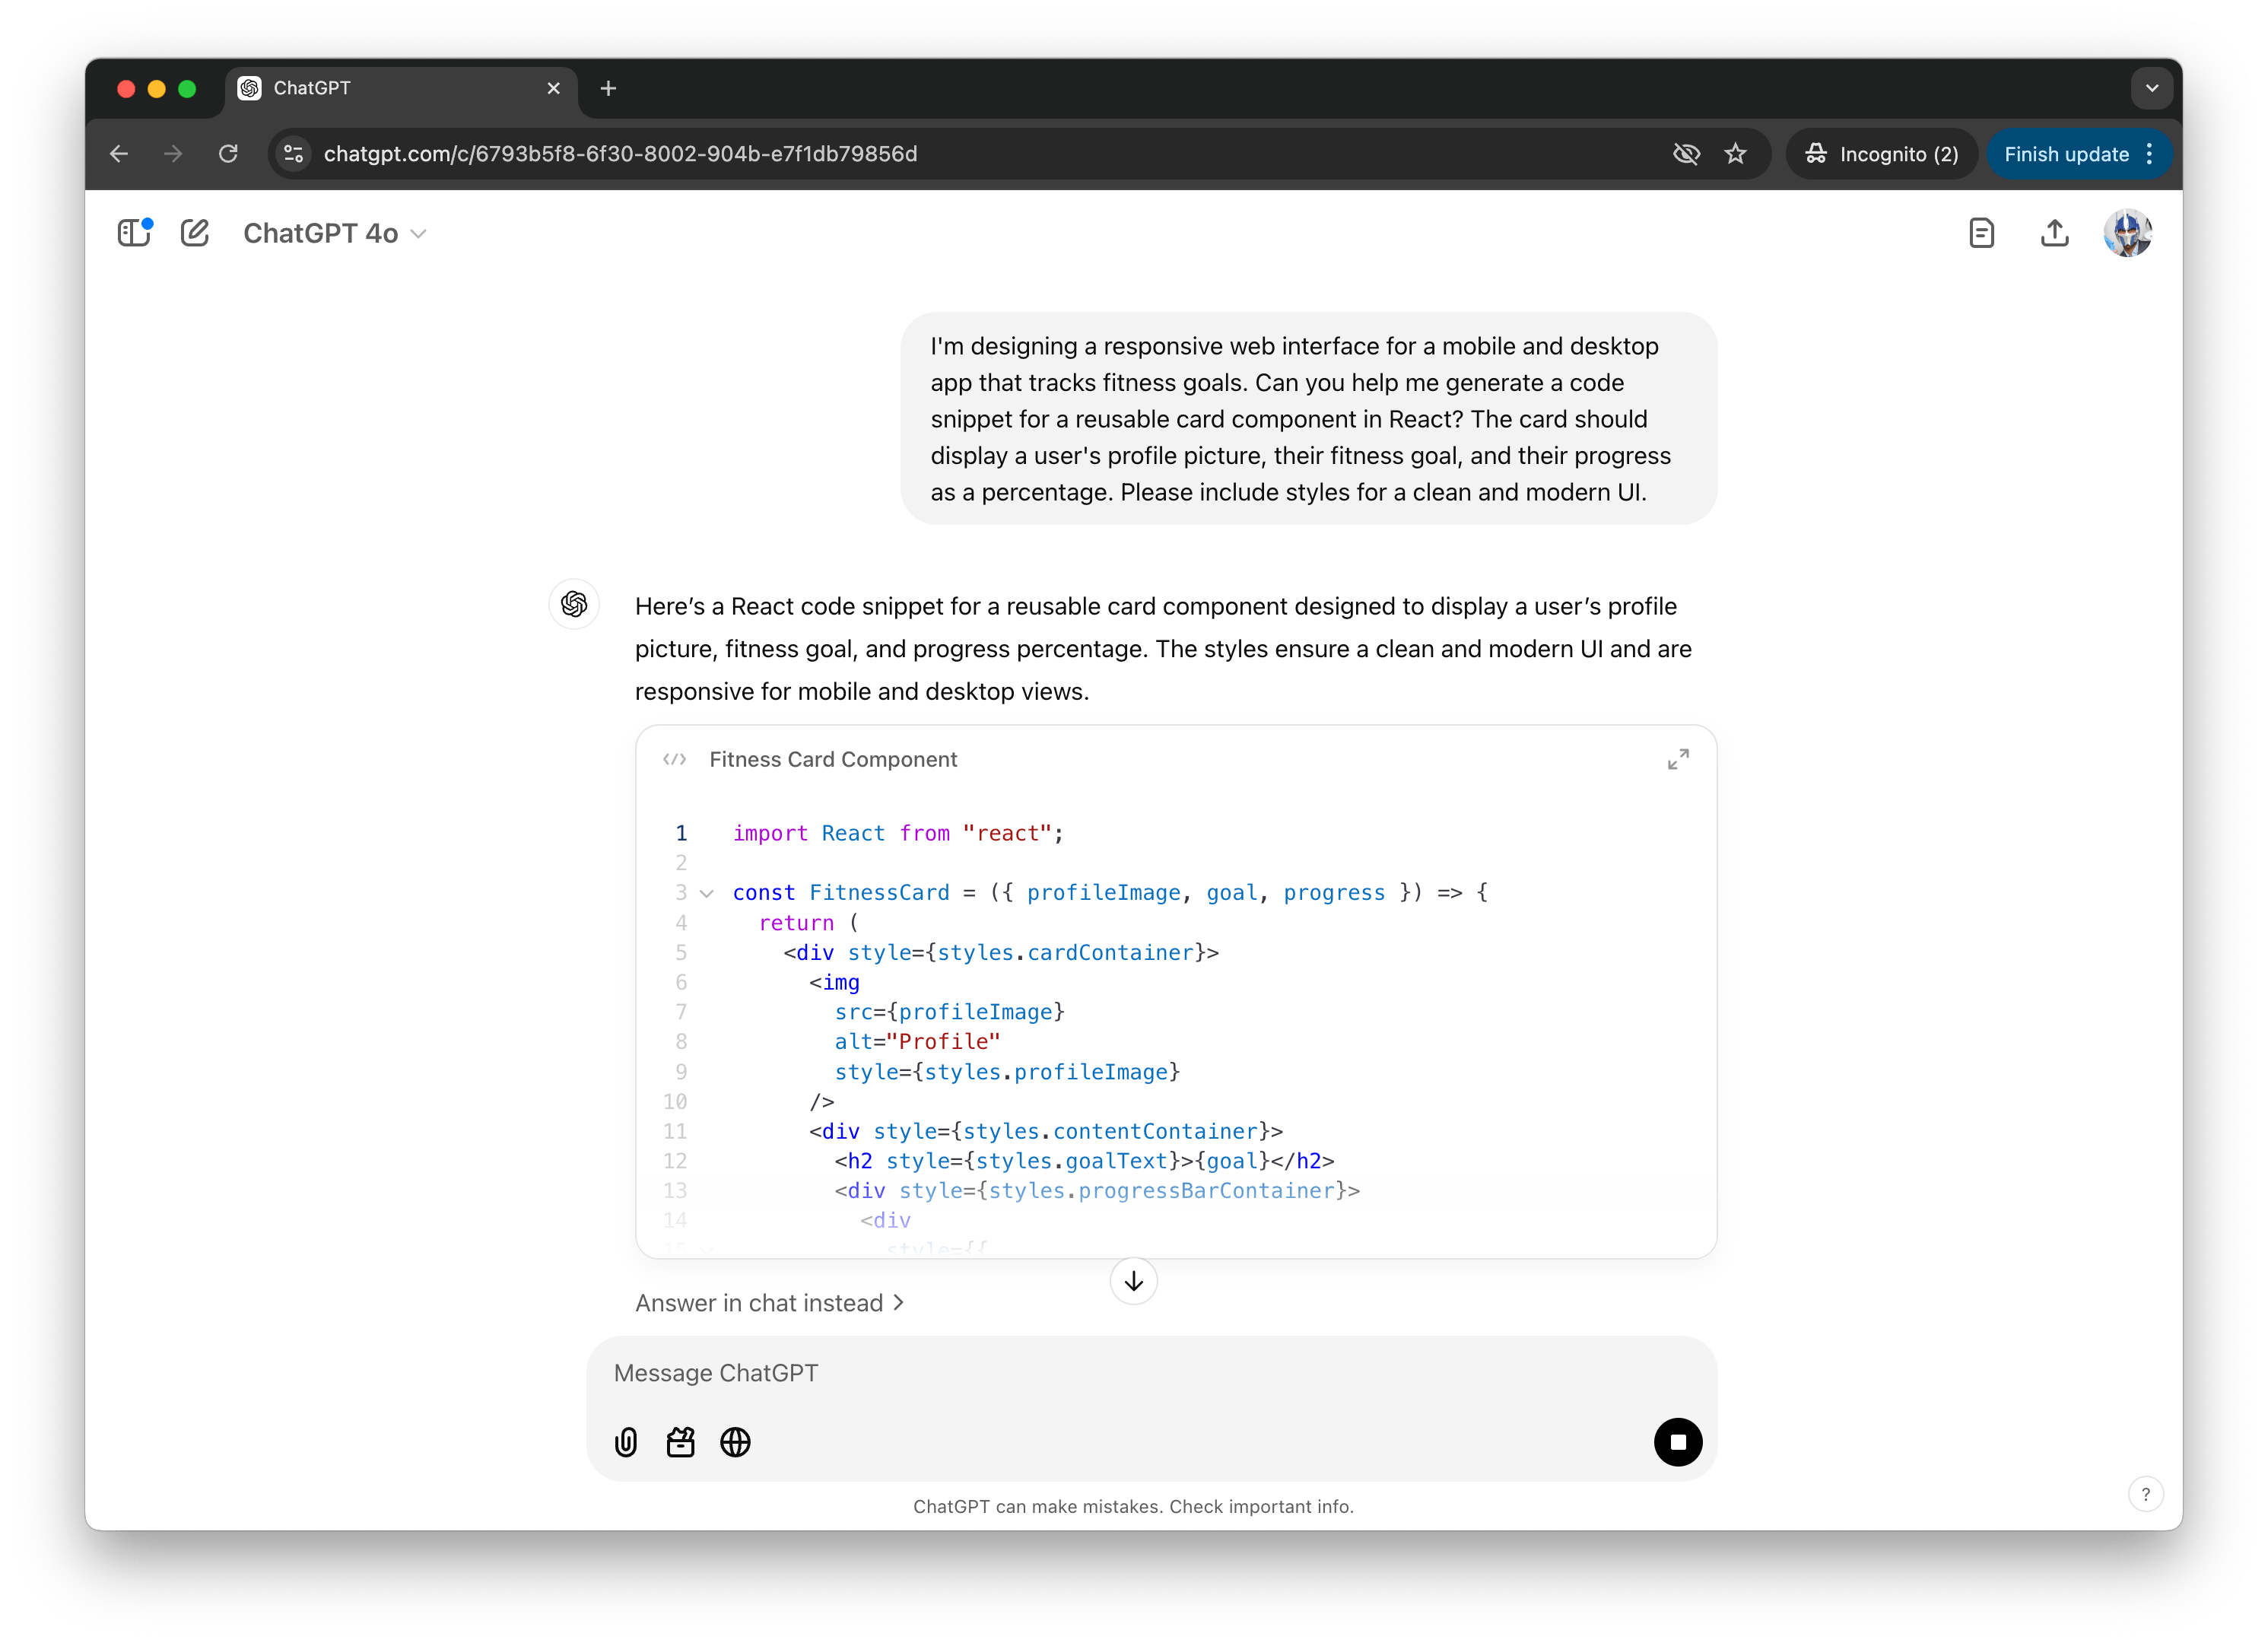
In the previous articles of this series, we explored how to build a chat interface using KendoReact and progressively enhanced it by integrating OpenAI’s API to provide AI-driven responses. While our chatbot is now capable of dynamic and intelligent replies, KendoReact has introduced a new React AIPrompt component to simplify writing prompts, executing predefined commands and interacting with AI-generated outputs directly within a chat interface.
In this article, we’ll integrate the AIPrompt component into a KendoReact chat interface and showcase how it enhances the user experience.
The KendoReact AIPrompt component is distributed through the @progress/kendo-react-conversational-ui package and can be imported directly:
Now that our standard chat UI is working, we’ll introduce the AIPrompt component. To integrate AIPrompt, we first import it along with supporting components:
When a user enters a prompt, we’ll send it to OpenAI and store the response. In this article, we’ll assume this will only be done through the AIPrompt UI interface. To do this, we’ll create a
Now that our functions and state are in place, we can integrate AIPrompt into our app. We’ll add it below the chat component so that it handles user input separately from standard messages:
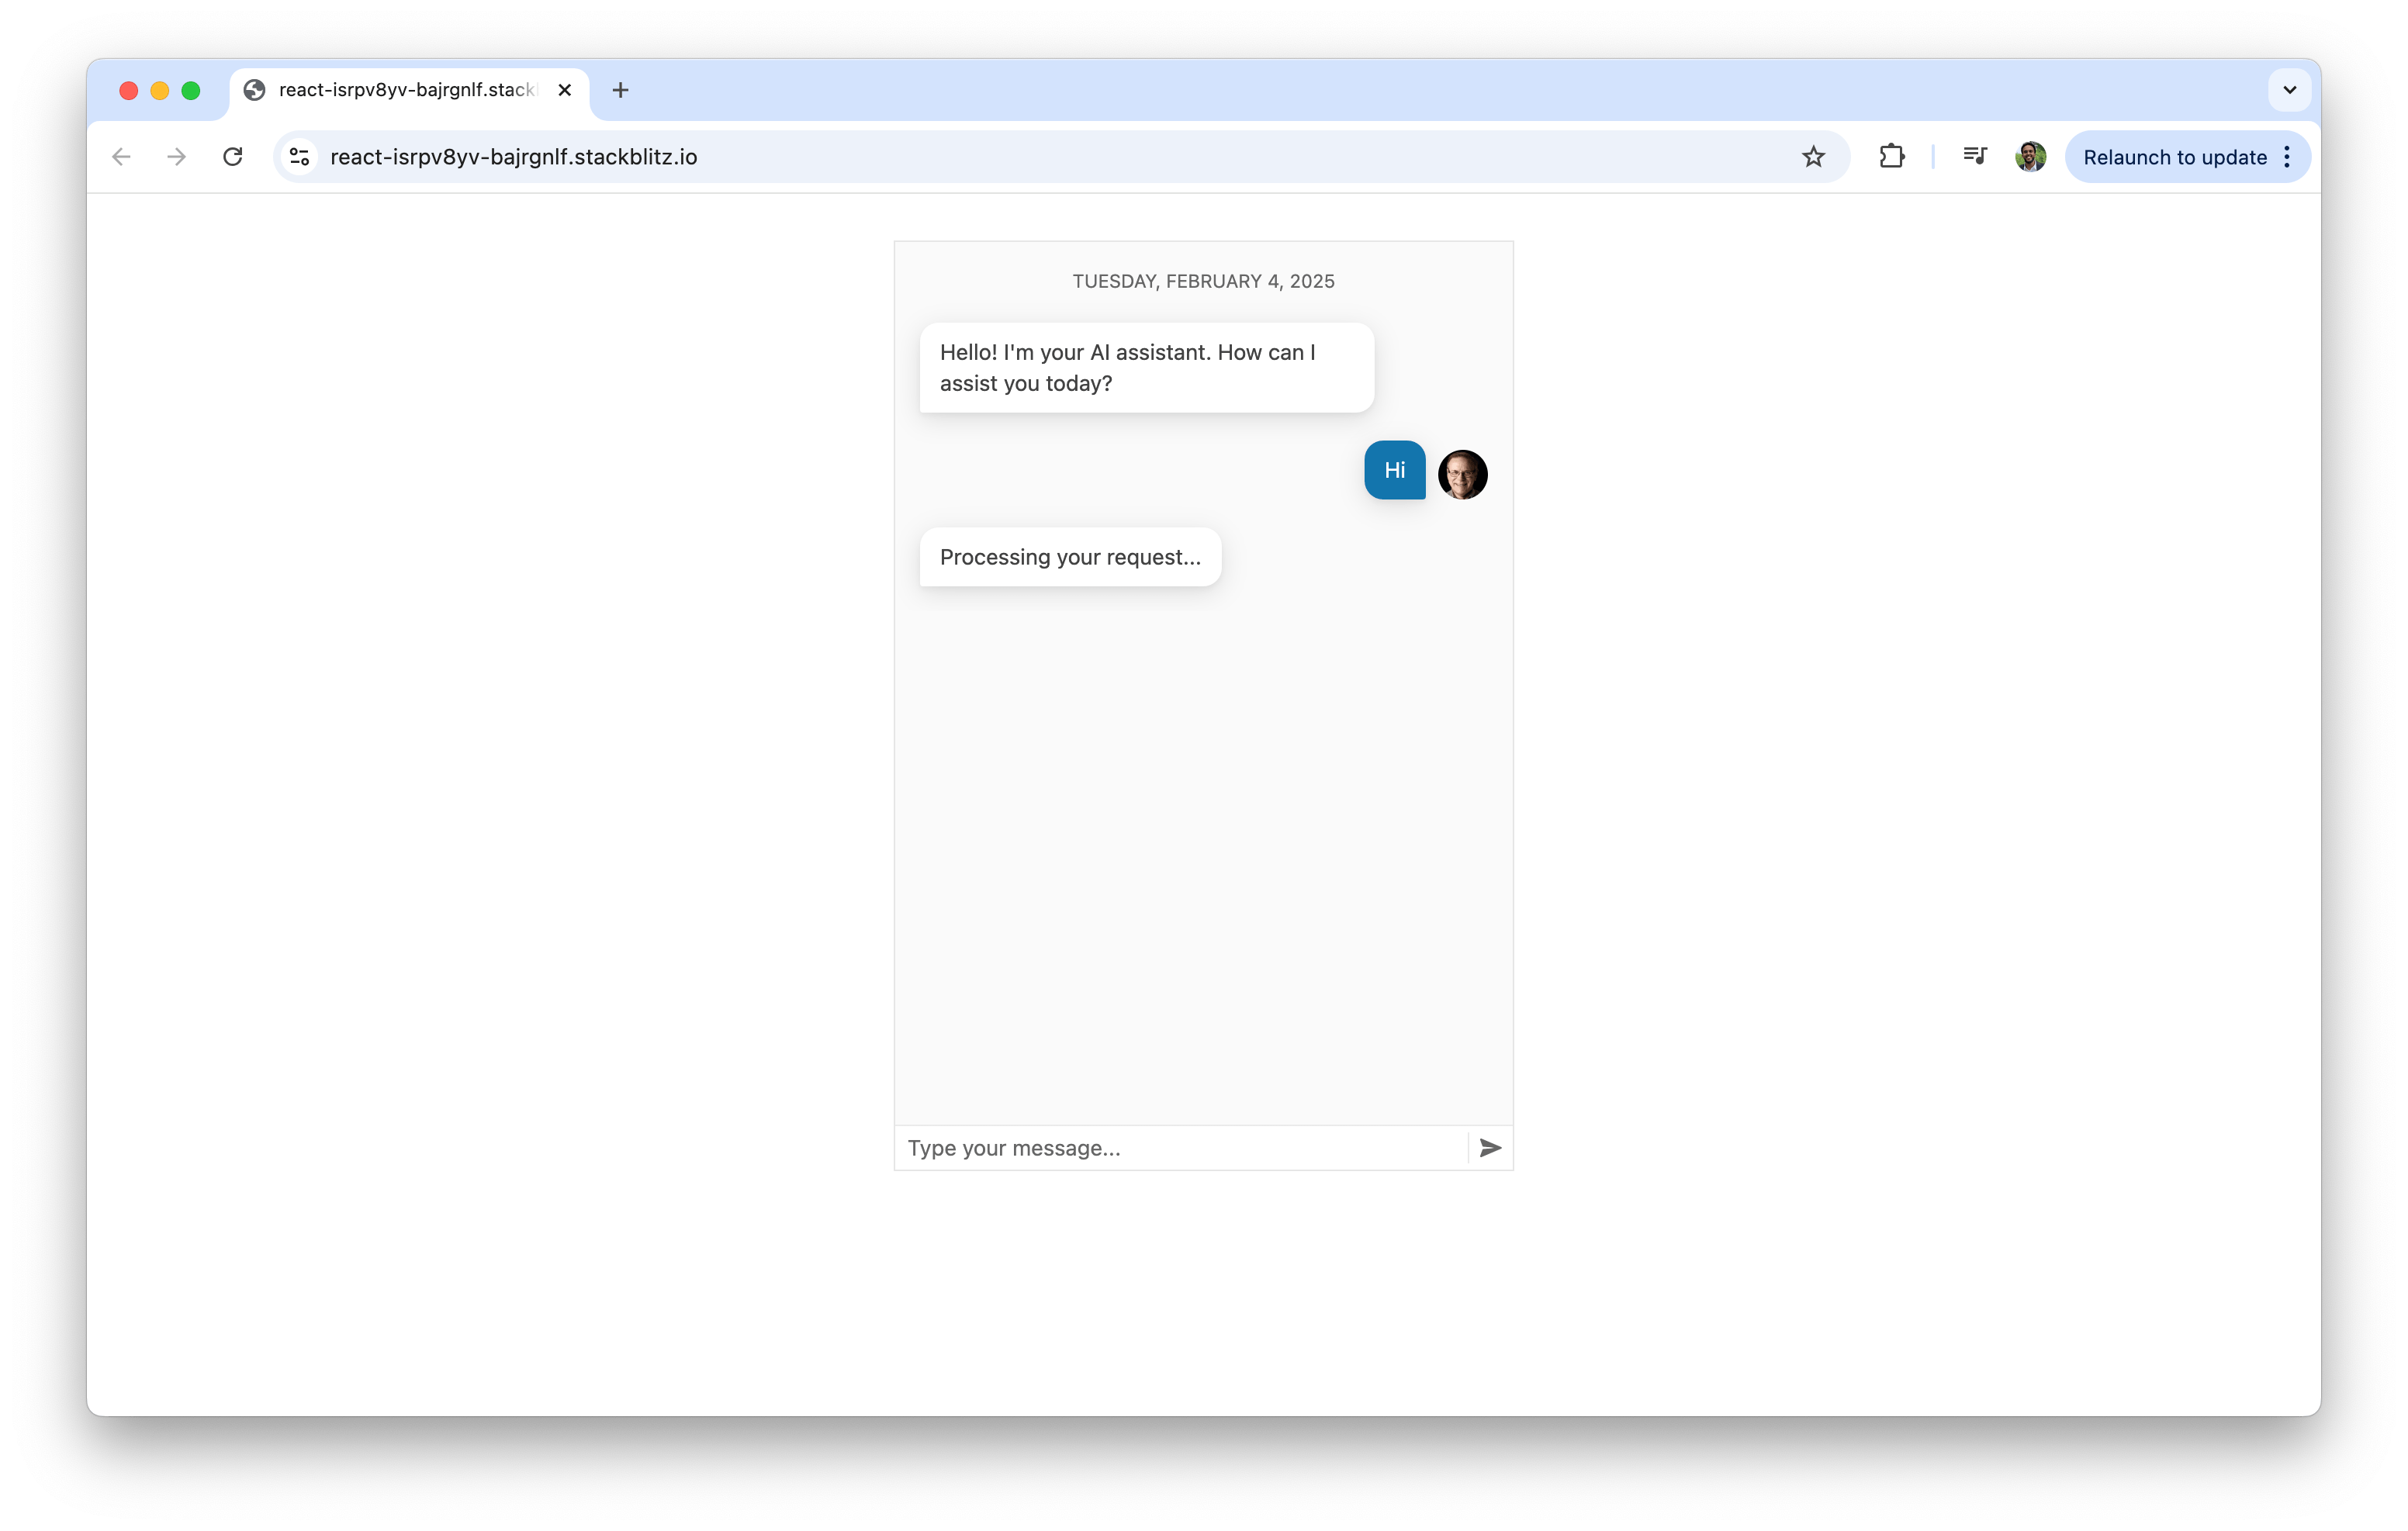
With these changes, the final app combines the Chat and AIPrompt components to create a more interactive AI-driven chat experience. Users can enter their prompts using the “AIPromptView” or select from quick suggestions provided within the interface.

Users can also view the AI-generated responses in the “AIPromptOutputView” or directly within the chat interface.

Here’s a visual on how quick suggestions streamline the user experience by providing easy-to-access, commonly used inputs.

Additionally, users can type a custom prompt directly into the “AIPromptView.”

This only touches the surface of what the AIPrompt component offers. Beyond the basic integration demonstrated in this article, the AIPrompt component provides a range of advanced features and customization options, such as support for custom components, custom prompt commands and event tracking and is fully accessible.
In this final article, we introduced the AIPrompt component, which elevates the chatbot experience by providing a structured and interactive interface for writing prompts, executing commands and interacting with AI-generated outputs.
Explore the KendoReact documentation and OpenAI API docs to expand and customize your chatbot to meet your unique needs. Happy coding!
In the previous articles of this series, we explored how to build a chat interface using KendoReact and progressively enhanced it by integrating OpenAI’s API to provide AI-driven responses. While our chatbot is now capable of dynamic and intelligent replies, KendoReact has introduced a new React AIPrompt component to simplify writing prompts, executing predefined commands and interacting with AI-generated outputs directly within a chat interface.
In this article, we’ll integrate the AIPrompt component into a KendoReact chat interface and showcase how it enhances the user experience.
The KendoReact AIPrompt Component
The React AIPrompt component provides a structured way to interact with AI models. It enables users to write and submit prompts, execute predefined commands, and view and interact with AI-generated outputs.The KendoReact AIPrompt component is distributed through the @progress/kendo-react-conversational-ui package and can be imported directly:
import { AIPrompt } from "@progress/kendo-react-conversational-ui";
import React, { useState } from "react";
import { Chat } from "@progress/kendo-react-conversational-ui";

const user = {
  id: 1,
  avatarUrl:
    "https://demos.telerik.com/kendo-react-ui/assets/dropdowns/contacts/RICSU.jpg",
  avatarAltText: "User Avatar",
};

const bot = { id: 0 };

const initialMessages = [
  {
    author: bot,
    text: "Hello! I'm your AI assistant. How can I assist you today?",
    timestamp: new Date(),
  },
];

const App = () => {
  const [messages, setMessages] = useState(initialMessages);

  const handleSendMessage = (event) => {
    setMessages((prev) => [...prev, event.message]);

    const botResponse = {
      author: bot,
      text: "Processing your request...",
      timestamp: new Date(),
    };

    setTimeout(() => {
      setMessages((prev) => [...prev, botResponse]);
    }, 1000);
  };

  return (
    <Chat
      user={user}
      messages={messages}
      onMessageSend={handleSendMessage}
      placeholder="Type your message..."
      width={400}
    />
  );
};

export default App;
Now that our standard chat UI is working, we’ll introduce the AIPrompt component. To integrate AIPrompt, we first import it along with supporting components:
import {
  AIPrompt,
  AIPromptView,
  AIPromptOutputView,
  AIPromptCommandsView,
} from "@progress/kendo-react-conversational-ui";
- AIPrompt: The main container for AI interaction
- AIPromptView: The UI where users enter their prompts
- AIPromptOutputView: Displays AI-generated responses
- AIPromptCommandsView: Provides predefined commands (e.g., Simplify, Expand) to modify AI-generated text
- Active view – Tracks whether the UI displays the prompt input or AI-generated output
- AI outputs – Stores responses received from the AI
- Loading status – Prevents multiple simultaneous requests
const [activeView, setActiveView] = useState("prompt");
const [outputs, setOutputs] = useState([]);
const [loading, setLoading] = useState(false);
const handleActiveViewChange = (view) => {
  setActiveView(view);
};
When a user enters a prompt, we’ll send it to OpenAI and store the response. In this article, we’ll assume this will only be done through the AIPrompt UI interface. To do this, we’ll create a
handleOnRequest function responsible for this:const handleOnRequest = async (prompt) => {
if (!prompt || loading) return; // Prevent empty or duplicate requests
setLoading(true);
// Placeholder for AI response while waiting
setOutputs([
{
id: outputs.length + 1,
title: prompt,
responseContent: "Thinking...",
},
...outputs,
]);
try {
const API_KEY = "YOUR_OPENAI_API_KEY"; // Replace with a valid API key
const API_URL = "https://api.openai.com/v1/chat/completions";
const response = await fetch(API_URL, {
method: "POST",
headers: {
Authorization: `Bearer ${API_KEY}`,
"Content-Type": "application/json",
},
body: JSON.stringify({
model: "gpt-4",
messages: [{ role: "user", content: prompt }],
}),
});
if (!response.ok) {
throw new Error(`HTTP error! Status: ${response.status}`);
}
const data = await response.json();
const aiResponse =
data.choices[0]?.message?.content || "Unable to process request.";
// Replace "Thinking..." with actual AI response
setOutputs((prevOutputs) =>
prevOutputs.map((output, index) =>
index === 0 ? { ...output, responseContent: aiResponse } : output
)
);
} catch (error) {
// Handle API errors
setOutputs([
{
id: outputs.length + 1,
title: prompt,
responseContent: "Error processing request.",
},
...outputs,
]);
} finally {
setLoading(false);
setActiveView("output"); // Switch to output view after processing
}
};
handleOnRequest function, we’re utilizing OpenAI’s /v1/chat/completions endpoint to generate an AI-powered response. This endpoint enables us to send user messages to the model and receive a contextual reply. It takes in a conversation history structured as an array of messages, each marked by a role (user or assistant).Now that our functions and state are in place, we can integrate AIPrompt into our app. We’ll add it below the chat component so that it handles user input separately from standard messages:
<AIPrompt
  style={{ width: "400px", height: "400px" }}
  activeView={activeView}
  onActiveViewChange={handleActiveViewChange}
  onPromptRequest={handleOnRequest}
  disabled={loading}
>
  {/* Prompt Input UI */}
  <AIPromptView
    promptSuggestions={["Out of office", "Write a LinkedIn post"]}
  />

  {/* AI Response Output UI */}
  <AIPromptOutputView outputs={outputs} showOutputRating={true} />

  {/* Commands View */}
  <AIPromptCommandsView
    commands={[
      { id: "1", text: "Simplify", disabled: loading },
      { id: "2", text: "Expand", disabled: loading },
    ]}
  />
</AIPrompt>
import React, { useState } from "react";
import {
  AIPrompt,
  AIPromptView,
  AIPromptOutputView,
  AIPromptCommandsView,
} from "@progress/kendo-react-conversational-ui";
import { Chat } from "@progress/kendo-react-conversational-ui";

const user = {
  id: 1,
  avatarUrl:
    "https://demos.telerik.com/kendo-react-ui/assets/dropdowns/contacts/RICSU.jpg",
  avatarAltText: "User Avatar",
};

const bot = { id: 0 };

const App = () => {
  const [activeView, setActiveView] = useState("prompt");
  const [outputs, setOutputs] = useState([]);
  const [loading, setLoading] = useState(false);

  const handleActiveViewChange = (view) => {
    setActiveView(view);
  };

  const handleOnRequest = async (prompt) => {
    if (!prompt || loading) return;

    setLoading(true);

    const API_KEY = "YOUR_OPENAI_API_KEY"; // Replace with a valid API key
    const API_URL = "https://api.openai.com/v1/chat/completions";

    try {
      setOutputs([
        {
          id: outputs.length + 1,
          title: prompt,
          responseContent: "Thinking...",
        },
        ...outputs,
      ]);
      const response = await fetch(API_URL, {
        method: "POST",
        headers: {
          Authorization: `Bearer ${API_KEY}`,
          "Content-Type": "application/json",
        },
        body: JSON.stringify({
          model: "gpt-4",
          messages: [{ role: "user", content: prompt }],
        }),
      });

      if (!response.ok) {
        throw new Error(`HTTP error! Status: ${response.status}`);
      }

      const data = await response.json();
      const aiResponse =
        data.choices[0]?.message?.content || "Unable to process request.";
      setOutputs((prevOutputs) =>
        prevOutputs.map((output, index) =>
          index === 0 ? { ...output, responseContent: aiResponse } : output
        )
      );
    } catch (error) {
      setOutputs([
        {
          id: outputs.length + 1,
          title: prompt,
          responseContent: "Error processing request.",
        },
        ...outputs,
      ]);
    } finally {
      setLoading(false);
      setActiveView("output");
    }
  };

  return (
    <div
      style={{ display: "flex", flexDirection: "column", alignItems: "center" }}
    >
      <Chat
        user={user}
        messages={outputs.map((output) => ({
          author: bot,
          text: output.responseContent,
        }))}
        width={400}
      />
      <AIPrompt
        style={{ width: "400px", height: "400px" }}
        activeView={activeView}
        onActiveViewChange={handleActiveViewChange}
        onPromptRequest={handleOnRequest}
        disabled={loading}
      >
        <AIPromptView
          promptSuggestions={["Out of office", "Write a LinkedIn post"]}
        />
        <AIPromptOutputView outputs={outputs} showOutputRating={true} />
        <AIPromptCommandsView
          commands={[
            { id: "1", text: "Simplify", disabled: loading },
            { id: "2", text: "Expand", disabled: loading },
          ]}
        />
      </AIPrompt>
    </div>
  );
};

export default App;
You can also see the complete code example in the following StackBlitz playground link.
With these changes, the final app combines the Chat and AIPrompt components to create a more interactive AI-driven chat experience. Users can enter their prompts using the “AIPromptView” or select from quick suggestions provided within the interface.
Users can also view the AI-generated responses in the “AIPromptOutputView” or directly within the chat interface.
Here’s a visual on how quick suggestions streamline the user experience by providing easy-to-access, commonly used inputs.
Additionally, users can type a custom prompt directly into the “AIPromptView.”
This only touches the surface of what the AIPrompt component offers. Beyond the basic integration demonstrated in this article, the AIPrompt component provides a range of advanced features and customization options, such as support for custom components, custom prompt commands and event tracking and is fully accessible.
Wrap-up
This article concludes the three-part series on building a chatbot with KendoReact and AI! We introduced the KendoReact Chat component in Part 1. In Part 2, we integrated OpenAI to enable intelligent and contextual responses.In this final article, we introduced the AIPrompt component, which elevates the chatbot experience by providing a structured and interactive interface for writing prompts, executing commands and interacting with AI-generated outputs.
Explore the KendoReact documentation and OpenAI API docs to expand and customize your chatbot to meet your unique needs. Happy coding!
"Claudio Bernasconi " / 2025-04-24 2 months ago / 未收藏/ Telerik Blogs/
发送到 kindle
See how to (re)use Razor components in Blazor web applications from Razor class libraries.
Blazor is a modern, component-oriented web development framework for the .NET platform. It provides C# and .NET developers access to modern web development with the option to write (most of) the interaction code in C# instead of JavaScript.
One of the most significant advantages of using a component-oriented web framework is the simplicity of sharing components between web applications. Reusable component libraries help promote consistency and reduce development time across multiple projects or teams.
In this article, I will show you how to share components using a Razor class library project and share best practices for versioning, documenting and maintaining it.
For example, you want to share styles across different applications to make all of your internal applications look and feel the same.
Or you want to share components, such as having the same login page for all your applications.
In all those use cases, you create a Razor class library and share the components and styles by placing them inside the class library project. You then add a project reference from the Blazor application project to the shared Razor class library.
You will be able to reference Razor components from the application project when you add a project reference to the shared library.
However, when sharing CSS or JavaScript, we need to wire them up with the application.
Components that use CSS Isolation are automatically handled by the Blazor web framework; however, for standalone
For Standable Blazor WebAssembly projects, the CSS reference has a different structure:
You can share service implementations, assets, utility code, etc., besides Blazor components in the shared Razor class library. Technically, you do not need multiple projects, even though that’s possible if you have a reason for splitting up the different resources.
Suppose you have multiple applications depending on the shared components. In that case, consider using versioning for your shared library and allowing consumers to upgrade their applications to the latest version gradually.
In that case, publishing a NuGet package to NuGet.org or a private feed is better than directly referencing the shared components library from your Blazor web applications.
You want to add the package metadata to the
Next, you use the
It means that you do not specify the render mode inside the implementation of the component in the shared Razor class library project.
Instead, you set or inherit the render mode when using the component in the application project.
There are two ways to specify the render mode for a component instance:
If you have multiple consumers for your shared component library, you might want to use Semantic Versioning (major, minor, patch) to help with migration and backward compatibility.
When multiple teams or different developers will work with the shared component library, write good documentation. You can utilize XML comments or tooling such as DocFX.
Explain what the component does and what limitations it might have. For example, state that the register component validates password strength using a specific service.
You can also implement a sample application that uses the components from the shared library to demonstrate its usage and to notice when you accidentally introduce a breaking change when changing the components.
Use a proper CI/CD setup to publish new versions of the shared components library.
For simple scenarios, direct project references are enough. However, when multiple or larger applications depend on your shared components library, you will benefit from publishing a NuGet package allowing you to version your components library.
You can publish your package publicly (using NuGet.org) or to a private feed, such as Azure Artifacts.
The biggest benefits of sharing components between applications are:
If you want to learn more about Blazor development, you can watch my free Blazor Crash Course on YouTube. And stay tuned to the Telerik blog for more Blazor Basics.
Blazor is a modern, component-oriented web development framework for the .NET platform. It provides C# and .NET developers access to modern web development with the option to write (most of) the interaction code in C# instead of JavaScript.
One of the most significant advantages of using a component-oriented web framework is the simplicity of sharing components between web applications. Reusable component libraries help promote consistency and reduce development time across multiple projects or teams.
In this article, I will show you how to share components using a Razor class library project and share best practices for versioning, documenting and maintaining it.
Creating a Blazor Component Library
There are different reasons for introducing a shared Razor class library in your Blazor web application projects.For example, you want to share styles across different applications to make all of your internal applications look and feel the same.
Or you want to share components, such as having the same login page for all your applications.
In all those use cases, you create a Razor class library and share the components and styles by placing them inside the class library project. You then add a project reference from the Blazor application project to the shared Razor class library.
You will be able to reference Razor components from the application project when you add a project reference to the shared library.
However, when sharing CSS or JavaScript, we need to wire them up with the application.
Components that use CSS Isolation are automatically handled by the Blazor web framework; however, for standalone
*.css files, you need to add a link element in the head section of the Blazor application (usually the App.razor file) referencing the .css file:<link href="https://www.telerik.com@Assets["_content/ComponentLibrary/additionalStyles.css"]" rel="stylesheet">
*.css file.For Standable Blazor WebAssembly projects, the CSS reference has a different structure:
<link href="_content/ComponentLibrary/additionalStyles.css" rel="stylesheet">
AdditionalAssemblies parameter of the Router definition inside the Routes.razor file.AdditionalAssemblies="new[] { typeof(ComponentLibrary.Component1).Assembly }"
wwwroot folder of the shared application can be referenced using the same naming pattern as used for CSS files.<img alt="Profile Picture" src="_content/ComponentLibrary/profile.png" />
profile.png file from the wwwroot folder of the ComponentLibrary shared Razor class library project.You can share service implementations, assets, utility code, etc., besides Blazor components in the shared Razor class library. Technically, you do not need multiple projects, even though that’s possible if you have a reason for splitting up the different resources.
How to Publish a Blazor Component Library as a NuGet Package
Although using direct project references works for smaller projects, you might soon hit some of its limitations. For example, when you change the components, it directly affects all applications.Suppose you have multiple applications depending on the shared components. In that case, consider using versioning for your shared library and allowing consumers to upgrade their applications to the latest version gradually.
In that case, publishing a NuGet package to NuGet.org or a private feed is better than directly referencing the shared components library from your Blazor web applications.
You want to add the package metadata to the
.csproj file of the shared Razor class library.Next, you use the
dotnet pack command in your CI/CD setup to generate the NuGet package. You can then publish the generated package to your NuGet feed.Best Practices for Versioning, Documentation and Maintaining a Component Library
Implementing shared components render mode agnostic is the best approach.It means that you do not specify the render mode inside the implementation of the component in the shared Razor class library project.
Instead, you set or inherit the render mode when using the component in the application project.
There are two ways to specify the render mode for a component instance:
// Option 1: Using the rendermode attribute
<HeadOutlet @rendermode="InteractiveServer" />
// Option 2: Using the @rendermode directive
@rendermode InteractiveServer
If you have multiple consumers for your shared component library, you might want to use Semantic Versioning (major, minor, patch) to help with migration and backward compatibility.
When multiple teams or different developers will work with the shared component library, write good documentation. You can utilize XML comments or tooling such as DocFX.
Explain what the component does and what limitations it might have. For example, state that the register component validates password strength using a specific service.
You can also implement a sample application that uses the components from the shared library to demonstrate its usage and to notice when you accidentally introduce a breaking change when changing the components.
Use a proper CI/CD setup to publish new versions of the shared components library.
Conclusion
Extracting Blazor components, CSS or JavaScript code into a Razor class library allows you to share the artifacts with multiple Blazor web applications.For simple scenarios, direct project references are enough. However, when multiple or larger applications depend on your shared components library, you will benefit from publishing a NuGet package allowing you to version your components library.
You can publish your package publicly (using NuGet.org) or to a private feed, such as Azure Artifacts.
The biggest benefits of sharing components between applications are:
- Saved development time
- Better consistency
- Simpler maintainability
If you want to learn more about Blazor development, you can watch my free Blazor Crash Course on YouTube. And stay tuned to the Telerik blog for more Blazor Basics.
"v_JULY_v" / 2025-04-24 2 months ago / 未收藏/ 结构之法 算法之道/
发送到 kindle
今天一早,朋友圈刷到π0出0.5版本了,之后,我组建的「七月具身:π0复现微调交流群」群中,也在讨论这事,并说:七月老师要更新博客了这不就来了现在具身模型的发展 还不如大语言模型那样成熟π0 发新版了,意味着和Google的RT(大概率是不更了),以及figure(没开源过)等等——还有别的一些模型 没列举全,进入了少数迭代型的具身模型的行列。
2025-04-21 2 months ago / 未收藏/ RWieruch/
发送到 kindle
Build a full-stack React.js AI chat application using the AI SDK by Vercel ...
"Eleftheria Drosopoulou" / 2025-04-22 2 months ago / 未收藏/ Java Code Geeks/
发送到 kindle
The rise of WebAssembly (Wasm) has sparked debates about Java’s future in a world where near-native web performance is possible without the JVM. With browsers, edge computing, and even serverless platforms embracing Wasm, can Java adapt—or will it fade into legacy obscurity? This article explores: WebAssembly’s threat to Java’s dominance How Java may evolve (GraalVM, WASI, and …
"Mary Zheng" / 2025-04-22 2 months ago / 未收藏/ Java Code Geeks/
发送到 kindle
1. Introduction In this example, I will demonstrate all the available methods to copy specific fields via BeanUtils.copyProperties in a Spring application. The Spring Framework’s BeanUtils class provides three static void copyProperties methods to copy properties from one bean to another. copyProperties(Object source, Object target) – copy the property values of the given source bean …
"Yatin Batra" / 2025-04-22 2 months ago / 未收藏/ Java Code Geeks/
发送到 kindle
Mapping between objects is a common requirement in Java applications, especially when transforming DTOs to Entities or vice versa. MapStruct simplifies this process by generating type-safe mappers at compile time. Let us delve into understanding how to map a source object to a target list using MapStruct. 1. Introduction MapStruct is a Java annotation-based code …
"Eleftheria Drosopoulou" / 2025-04-23 2 months ago / 未收藏/ Java Code Geeks/
发送到 kindle
While REST has long dominated API design, GraphQL Federation is emerging as a powerful alternative for scalable, type-safe microservices architectures. Unlike monolithic GraphQL APIs, federation allows teams to:✔ Decouple services while maintaining a unified GraphQL schema✔ Avoid overfetching/underfetching (common in REST)✔ Scale independently without breaking clients In this guide, we’ll implement a federated GraphQL API using: Spring Boot (Java backend) Apollo Federation (schema stitching) Apollo Gateway (query routing) 1. Why Federation? …
"Eleftheria Drosopoulou" / 2025-04-23 2 months ago / 未收藏/ Java Code Geeks/
发送到 kindle
The JVM’s just-in-time (JIT) compilation delivers peak performance—but only after warming up. For low-latency systems (serverless, real-time trading, microservices), slow warmup means: Higher tail latencies in cloud deployments Wasted CPU cycles during cold starts Poor user experience in bursty workloads This guide covers proven techniques to slash JVM warmup time, with benchmarks and real-world tuning strategies. 1. Why Warmup …
"Yatin Batra" / 2025-04-23 2 months ago / 未收藏/ Java Code Geeks/
发送到 kindle
Micronaut is a modern, JVM-based framework designed for building lightweight, modular microservices. One of the key aspects of Micronaut is its powerful configuration system. Developers often need to map configuration properties from YAML or properties files into strongly typed Java classes. In our Micronaut @ConfigurationBuilder example we will see how configuration properties can be bound …
"Java Code Geeks" / 2025-04-23 2 months ago / 未收藏/ Java Code Geeks/
发送到 kindle
Hello fellow geeks, Fresh offers await you on our Information Technology Research Library, please have a look! Machine Learning Hero: Master Data Science with Python Essentials ($33.99 Value) FREE for a Limited Time This book takes you on a journey through the world of machine learning, beginning with foundational concepts such as supervised and unsupervised …
"Omozegie Aziegbe" / 2025-04-23 2 months ago / 未收藏/ Java Code Geeks/
发送到 kindle
Java Database Connectivity (JDBC) remains the standard foundation for interacting with relational databases in Java applications. One of its key components is the PreparedStatement interface, which simplifies the execution of parameterized SQL queries while enhancing security and performance. Prepared statements help prevent SQL injection and reduce query parsing overhead by allowing reuse with different parameter …
"Eleftheria Drosopoulou" / 2025-04-24 2 months ago / 未收藏/ Java Code Geeks/
发送到 kindle
While Java remains dominant in enterprise applications, cloud services, and Android development, its position in systems programming is being challenged by Rust and Go. Each language has distinct advantages in this space. Key Comparison Areas 1. Memory Safety & Performance Rust’s Approach: // Rust's ownership system prevents data races at compile time fn process_data(data: Vec<u8>) …
"Worktile" / 2025-04-23 2 months ago / 未收藏/ Worktile Blog/
发送到 kindle

 Worktile 9.48.0 版本优化了以下产品功能:
- 支持给多个项目同时设置负责人、添加成员、添加管理员;
- 项目集甘特图支持平铺展示;
- 在创建任务时,支持上传附件;
支持给多个项目同时设置负责人、添加成员、添加管理员
如下图所示,在项目的配置中心-项目管理页面,选中一个或多个项目后,项目列表上方会出现「设置负责人」、「添加成员」、「添加管理员」的按钮。设置负责人
点击「设置负责人」按钮,页面中会展示如下图所示的弹窗。在弹窗中,您可以:- 选择一个企业成员作为负责人;
- 选择是否将此负责人添加为项目成员(项目负责人可以不是项目成员);点击「确定」按钮,即可将选择的成员,设置为选中的所有项目的负责人。
⚠️ 注意:如果项目已经设置了负责人,那么项目负责人将会被替换。
添加成员
点击「添加成员」按钮,页面中会展示选择成员的弹窗,如下图所示。在弹窗中,您可以选中多个成员。点击「确定」按钮后,选中的成员将被添加到多个项目中。
⚠️ 注意:
1. 如果成员已经加入到某个项目中,那么成员在这个项目中的角色不会变化。
2. 如果成员未被加入到项目中,将被赋予项目的默认角色;
1. 如果成员已经加入到某个项目中,那么成员在这个项目中的角色不会变化。
2. 如果成员未被加入到项目中,将被赋予项目的默认角色;
添加管理员
点击「添加管理员」按钮,页面中会展示选择成员的弹窗,如下图所示。在弹窗中,您可以选中多个成员。点击「确定」按钮后,选中的成员将成为这些项目的管理员。
⚠️ 注意:
1. 如果选中的成员未加入项目,那么将会加入项目,成为项目成员;
2. 如果选中的成员已经加入项目,那么成员会被添加一个“管理员”的角色,已有的角色不会被取消。
1. 如果选中的成员未加入项目,那么将会加入项目,成为项目成员;
2. 如果选中的成员已经加入项目,那么成员会被添加一个“管理员”的角色,已有的角色不会被取消。
项目集甘特图支持平铺展示
如下图所示,项目集甘特图支持设置“平铺”、“树状”两种展示方式,让您在工作排期时更加高效。在创建任务时,支持上传附件
在给任务类型的“新建模板”设置属性时,支持选择“附件”,如下图所示:"前端集合" / 2025-04-22 2 months ago / 未收藏/ 前端集合 - 关注前端技术和互联网免费资源/
发送到 kindle
近期用 Taro 4.x 版本开发 react native 时遇到如上报错,解决方案如下:package.json 添加 如下配置"resolutions": { &quo...
"banq" / 2025-04-22 2 months ago / 未收藏/ jdon/
发送到 kindle
人类思考的本质:我们不是逻辑机器,而是“经验缝合怪” Geoffrey欣顿说,我们越了解人工智能和大脑实际上是如何工作的,人类的思维就越不像逻辑。我们不是推理机器,他说。我们是类比机器。我们通过共鸣而不是演绎来思考。Geoffrey Hinton 为什么说“人类比我们想象的更不理性”? 1. 你以为你在"思考",其实大脑在"搜相似" Geoffrey Hinton(深度学习教父、神经网络先驱)最近抛出一个颠覆认知的
"banq" / 2025-04-23 2 months ago / 未收藏/ jdon/
发送到 kindle
在本文中,我们比较了两种常用的服务器线程模型。在每个连接一个线程和每个请求一个线程模型之间的选择取决于应用程序的特定需求和预期的流量模式。一般来说,每连接一个线程为已知数量的客户端提供了简单性和可预测性,而每请求一个线程在可变或高负载条件下提供了更大的可伸缩性和灵活性。在本教程中,我们将比较两种常用的服务器线程模型:每个连接一个线程和每个请求一个线程。首先,我们将准确定义“连接”和“请求”。然后,我们将实现两个基于套接字的Java Web 服务器,并遵循不同的范例。最后,
"banq" / 2025-04-23 2 months ago / 未收藏/ jdon/
发送到 kindle
所有事务系统都干四件事: 执行交易事务 - 像跑程序一样把交易事务里的操作都做一遍 给交易事务排序 - 给每个交易事务发个"时间号码牌" 验证交易事务 - 检查这个交易事务会不会和别人打架 持久化交易事务 - 把结果永久存进硬盘 1. 执行事务就像你玩游戏时要先操作角色移动、攻击一样,系统会把事务里的命令(比如读数据、改数据)都执行一遍。不同系统做法不同: 有的直接改数据库(像直接往本
"banq" / 2025-04-23 2 months ago / 未收藏/ jdon/
发送到 kindle
最近发表在《神经病学年鉴》上的一项研究(编号PMID:39927551)发现:活性维生素B12(全转钴胺素)水平低,会导致脑白质结构变差、脑子转得慢;而常规检测的"总B12"指标可能根本反映不出大脑的真实情况。维生素B12对神经、大脑和DNA合成特别重要,它有两种存在形式: 活性B12(全转钴胺素):能被细胞直接利用的"现成营养" 惰性B12(结合蛋白包裹的):在血液里空转的"库存",细胞用不上 现在医院常规测的"总B12
"banq" / 2025-04-23 2 months ago / 未收藏/ jdon/
发送到 kindle
谷歌摊上大事了!法院判定它搞搜索垄断,政府要狠狠修理它!美国司法部这次下手特别狠,不仅要罚巨款,还想逼谷歌卖掉Chrome浏览器——但问题是,谁买得起啊?没想到,OpenAI(就是搞ChatGPT的那家公司)的高管突然跳出来说:"我们想买!"法庭上爆猛料!第二天庭审,OpenAI的ChatGPT产品负责人Nick Turley出庭作证。他倒没直接聊Chrome的事,但爆了个大料:OpenAI之前想和谷歌合作,用它的搜索数据,结果被
"banq" / 2025-04-23 2 months ago / 未收藏/ jdon/
发送到 kindle
"兄弟们,谷歌今天发了个贼搞笑的公告——他们折腾了5年的'隐私小饭盒'计划彻底凉凉啦!"(老师划重点:这个高大上的"隐私沙盒"其实就是谷歌想搞个新套路代替网页小饼干Cookie)️♂️【侦探小饼干的奇幻漂流】️♂️本来嘛,谷歌从2019年就开始拍胸脯:"我们要干掉那些跟踪你的广告Cookie!"(想象Cookie就是黏在你屁股后面的小纸条,记录你偷看校花多少回)结果他们先搞了个FLoC计划,被网友喷成"换汤不换药";又改推Topics方案,结果就像拖延症的你,从2022年拖到现在...
"banq" / 2025-04-23 2 months ago / 未收藏/ jdon/
发送到 kindle
震惊!AI学霸在实验室吊打病毒学博士,专家吓得直冒冷汗。最近科学家们搞了个大事情——让AI和病毒学博士同台PK实验室操作题,结果简直像中学生碾压小学生!ChatGPT这些AI做题小能手,在培养病毒、分析实验数据这些实操题上,竟然把苦读十几年的博士们按在地上摩擦!(博士平均分才22分,AI直接考出43分!)【天才还是恶魔?AI的实验室双面人生】好处是AI能帮科学家更快研发疫苗,比如预测哪种新冠病毒变种会大爆发。但坏消息是—
"banq" / 2025-04-23 2 months ago / 未收藏/ jdon/
发送到 kindle
橄榄油别喝错了:高多酚 低酸度 西班牙产地名都标记了 这三种指标是衡量橄榄油外观的三要素。买了以后 冰箱冷藏有棉絮状,口感青草香味 ,有点辣喉咙,这些是口感判断好的橄榄油类似好的葡萄酒一样,葡萄酒有酒精,葡萄酒健康第一要素是白藜芦醇,橄榄油健康第一要素是多酚,这些常识国内很少有人接受。多酚更容易融入脂肪,而不是酒精,当然两者都比水吸收率高。酸度低只代表新鲜度,但是多酚才是橄榄油的主要标
"banq" / 2025-04-23 2 months ago / 未收藏/ jdon/
发送到 kindle
干净的代码是不够的——内聚是一个系统级的问题:(敲黑板)同学们注意啦!今天咱们要聊的是一个超级重要的编程概念——"代码团伙的凝聚力"!别看名字高大上,其实就跟咱们班分组做值日一个道理!(第一幕:表面和谐的假象)现在好多编程团队啊,就像把教室打扫得表面光鲜:扫把摆得整整齐齐(短小的方法),值日小组分工明确(清晰的类),卫生检查都能过关(测试通过)。乍一看,哇塞完美!但要是退后两步看——哎呀!黑板槽里全是粉笔灰,讲台底下还藏着
"banq" / 2025-04-23 2 months ago / 未收藏/ jdon/
发送到 kindle
最近有个叫Anthropic的AI公司(创始人是OpenAI前员工)搞了个大新闻!他们把自己家AI助手"克劳德Claude"的聊天记录扒了个底朝天,就想看看这AI三观正不正。结果发现这AI平时确实是个"三好学生",但偶尔也会被网友带歪画风!▶ 70万条聊天记录大起底研究人员像查寝室一样检查了70万条匿名对话,发现克劳德大部分时间都在践行"做个诚实善良小帮手"的人设。不过有意思的是,这AI居然会"见人说人话"——聊恋爱时就变身知心姐姐强调"相互尊重",聊历史时就秒变严肃教授狠抓"历史真实性"。
{"_":"\n\t\t\t\tby \t\t\t\t\t","a":[{"_":"Liam Nugent","$":{"itemprop":"url","class":"author","rel":"author","href":"https://alistapart.com/author/liam-nugent/"}}]} / 2025-04-24 2 months ago / 未收藏/ A List Apart: The Full Feed/
发送到 kindle
As a product builder over too many years to mention, I've lost count of the number of times I've seen promising ideas go from zero to hero in a few weeks, only to fizzle out within months.
Financial products, which is the field I work in, are no exception. With people’s real hard-earned money on the line, user expectations running high, and a crowded market, it's tempting to throw as many features at the wall as possible and hope something sticks. But this approach is a recipe for disaster. Here's why:
This is where the concept of Minimum Viable Product (MVP) comes in. Jason Fried's book Getting Real and his podcast Rework often touch on this idea, even if he doesn’t always call it that. An MVP is a product that provides just enough value to your users to keep them engaged, but not so much that it becomes overwhelming or difficult to maintain. It sounds like an easy concept but it requires a razor sharp eye, a ruthless edge and having the courage to stick by your opinion because it is easy to be seduced by “the Columbo Effect”… when there’s always “just one more thing…” that someone wants to add.
The problem with most finance apps, however, is that they often become a reflection of the internal politics of the business rather than an experience solely designed around the customer. This means that the focus is on delivering as many features and functionalities as possible to satisfy the needs and desires of competing internal departments, rather than providing a clear value proposition that is focused on what the people out there in the real world want. As a result, these products can very easily bloat to become a mixed bag of confusing, unrelated and ultimately unlovable customer experiences—a feature salad, you might say.
That's where the concept of "bedrock" comes in. Bedrock is the core element of your product that truly matters to users. It's the fundamental building block that provides value and stays relevant over time.
In the world of retail banking, which is where I work, the bedrock has got to be in and around the regular servicing journeys. People open their current account once in a blue moon but they look at it every day. They sign up for a credit card every year or two, but they check their balance and pay their bill at least once a month.
Identifying the core tasks that people want to do and then relentlessly striving to make them easy to do, dependable, and trustworthy is where the gravy’s at.
But how do you get to bedrock? By focusing on the "MVP" approach, prioritizing simplicity, and iterating towards a clear value proposition. This means cutting out unnecessary features and focusing on delivering real value to your users.
It also means having some guts, because your colleagues might not always instantly share your vision to start with. And controversially, sometimes it can even mean making it clear to customers that you’re not going to come to their house and make their dinner. The occasional “opinionated user interface design” (i.e. clunky workaround for edge cases) might sometimes be what you need to use to test a concept or buy you space to work on something more important.
So, how do you start your journey towards bedrock? Take it one step at a time. Start by identifying those core elements that truly matter to your users. Focus on building and refining a single, powerful feature that delivers real value. And above all, test obsessively—for, in the words of Abraham Lincoln, Alan Kay, or Peter Drucker (whomever you believe!!), “The best way to predict the future is to create it.”
Financial products, which is the field I work in, are no exception. With people’s real hard-earned money on the line, user expectations running high, and a crowded market, it's tempting to throw as many features at the wall as possible and hope something sticks. But this approach is a recipe for disaster. Here's why:
The pitfalls of feature-first development
When you start building a financial product from the ground up, or are migrating existing customer journeys from paper or telephony channels onto online banking or mobile apps, it's easy to get caught up in the excitement of creating new features. You might think, "If I can just add one more thing that solves this particular user problem, they'll love me!" But what happens when you inevitably hit a roadblock because the narcs (your security team!) don’t like it? When a hard-fought feature isn't as popular as you thought, or it breaks due to unforeseen complexity?This is where the concept of Minimum Viable Product (MVP) comes in. Jason Fried's book Getting Real and his podcast Rework often touch on this idea, even if he doesn’t always call it that. An MVP is a product that provides just enough value to your users to keep them engaged, but not so much that it becomes overwhelming or difficult to maintain. It sounds like an easy concept but it requires a razor sharp eye, a ruthless edge and having the courage to stick by your opinion because it is easy to be seduced by “the Columbo Effect”… when there’s always “just one more thing…” that someone wants to add.
The problem with most finance apps, however, is that they often become a reflection of the internal politics of the business rather than an experience solely designed around the customer. This means that the focus is on delivering as many features and functionalities as possible to satisfy the needs and desires of competing internal departments, rather than providing a clear value proposition that is focused on what the people out there in the real world want. As a result, these products can very easily bloat to become a mixed bag of confusing, unrelated and ultimately unlovable customer experiences—a feature salad, you might say.
The importance of bedrock
So what's a better approach? How can we build products that are stable, user-friendly, and—most importantly—stick?That's where the concept of "bedrock" comes in. Bedrock is the core element of your product that truly matters to users. It's the fundamental building block that provides value and stays relevant over time.
In the world of retail banking, which is where I work, the bedrock has got to be in and around the regular servicing journeys. People open their current account once in a blue moon but they look at it every day. They sign up for a credit card every year or two, but they check their balance and pay their bill at least once a month.
Identifying the core tasks that people want to do and then relentlessly striving to make them easy to do, dependable, and trustworthy is where the gravy’s at.
But how do you get to bedrock? By focusing on the "MVP" approach, prioritizing simplicity, and iterating towards a clear value proposition. This means cutting out unnecessary features and focusing on delivering real value to your users.
It also means having some guts, because your colleagues might not always instantly share your vision to start with. And controversially, sometimes it can even mean making it clear to customers that you’re not going to come to their house and make their dinner. The occasional “opinionated user interface design” (i.e. clunky workaround for edge cases) might sometimes be what you need to use to test a concept or buy you space to work on something more important.
Practical strategies for building financial products that stick
So what are the key strategies I've learned from my own experience and research?- Start with a clear "why": What problem are you trying to solve? For whom? Make sure your mission is crystal clear before building anything. Make sure it aligns with your company’s objectives, too.
- Focus on a single, core feature and obsess on getting that right before moving on to something else: Resist the temptation to add too many features at once. Instead, choose one that delivers real value and iterate from there.
- Prioritize simplicity over complexity: Less is often more when it comes to financial products. Cut out unnecessary bells and whistles and keep the focus on what matters most.
- Embrace continuous iteration: Bedrock isn't a fixed destination—it's a dynamic process. Continuously gather user feedback, refine your product, and iterate towards that bedrock state.
- Stop, look and listen: Don't just test your product as part of your delivery process—test it repeatedly in the field. Use it yourself. Run A/B tests. Gather user feedback. Talk to people who use it, and refine accordingly.
The bedrock paradox
There's an interesting paradox at play here: building towards bedrock means sacrificing some short-term growth potential in favour of long-term stability. But the payoff is worth it—products built with a focus on bedrock will outlast and outperform their competitors, and deliver sustained value to users over time.So, how do you start your journey towards bedrock? Take it one step at a time. Start by identifying those core elements that truly matter to your users. Focus on building and refining a single, powerful feature that delivers real value. And above all, test obsessively—for, in the words of Abraham Lincoln, Alan Kay, or Peter Drucker (whomever you believe!!), “The best way to predict the future is to create it.”
"Kerry Beetge" / 2025-04-22 2 months ago / 未收藏/ Company Blog/
发送到 kindle
Join us for an engaging roundtable discussion where our panel of developers will share their firsthand insights on the latest Taint Analysis from JetBrains. Discover how critical checks can improve codebase security and be easily implemented in your code review process. Session abstract Whether you’re new to JetBrains or looking to deepen your understanding of […]
"Jan-Niklas Wortmann" / 2025-04-22 2 months ago / 未收藏/ Company Blog/
发送到 kindle
TLDR: We’ve revamped the JetBrains Community Discord with dedicated WebStorm channels for announcements, discussions, help, and Q&As to create a more valuable community resource. We’ll have live office hours on April 23rd to connect directly with our team. Not part of our Discord community yet? Join the JetBrains Community Discord here to start connecting with […]
"Kerry Beetge" / 2025-04-22 2 months ago / 未收藏/ Company Blog/
发送到 kindle
Your code drives discovery. Keep it precise. In STEM fields, software isn’t just a product, it underpins innovation, research, and life-critical infrastructure. Qodana brings advanced static code analysis to STEM software projects, helping ensure code quality, security, and compliance where it matters most. Qodana for STEM Why code quality matters in STEM Software in science, […]
"Razmik Seysyan" / 2025-04-22 2 months ago / 未收藏/ Company Blog/
发送到 kindle
Aqua was originally developed as a dedicated IDE for QA engineers working in automated testing. After carefully evaluating adoption rates, market trends, and user feedback, we have made the difficult decision to discontinue the product. While this was not an easy choice, Aqua did not reach the level of adoption we had anticipated. We believe […]
"Olga Bedrina" / 2025-04-22 2 months ago / 未收藏/ Company Blog/
发送到 kindle
Software development moves fast – really fast. It can also involve multiple teams working from different locations around the world. However, while speed and collaboration can be great for developers and businesses, they can also create security challenges. With more entry points and less time to catch potential threats, each commit, build, and deployment is […]
"Siva Katamreddy" / 2025-04-22 2 months ago / 未收藏/ Company Blog/
发送到 kindle
Spring Framework 6.2 introduced MockMvcTester to support writing AssertJ style assertions using AssertJ under the hood. If you’re using Spring Boot, the spring-boot-starter-test dependency transitively adds the most commonly used testing libraries such as mockito, assertj, json-path, jsonassert, etc. So, if you’re using Spring Boot 3.4.0 (which uses Spring framework 6.2) or any later version, […]
"Clara Maine" / 2025-04-23 2 months ago / 未收藏/ Company Blog/
发送到 kindle
We recently released some new AI features for the JetBrains Academy plugin. Learners will now be able to use machine translation of course content, theory lookup, and AI hints for Kotlin courses. At first glance, these might seem fairly tame. There are no big LLM integrations, JetBrains AI Assistant is not being marketed toward beginners, […]
"qihang01" / 2025-04-23 2 months ago / 未收藏/ 系统运维/
发送到 kindle
环境说明: php安装目录:/usr/local/php73 1、下载安装ImageMagick #imagick扩展的依赖库 cd /usr/local/src wget https://github.com/ImageMagick/ImageMagick/archive/7.0.8-61.tar.gz tar -zxvf 7.0.8-61.tar.gz cd ImageMagick-7.0.8-61 ./configure --prefix=/usr/local/imagemagick make make install 2、下载安装imagick扩展 cd /usr/local/src wget http://pecl.php.net/get/imagick-3.4.4.tgz tar -zxvf imagick-3.4.4.tgz cd imagick-3.4.4 /usr/local/php73/bin/phpize ./configure --with-php-config=/usr/local/php73/bin/php-config --with-imagick=/usr/local/imagemagick make make install 3、在php.ini里面加上扩展 vi /usr/local/php73/etc/php.ini extension="imagick.so" :wq! #保存退出 4、查看是否已经安装扩展 /usr/local/php73/bin/php -i | grep Imagick 5、安装ghostscript扩展 cd /usr/local/src wget -c https://github.com/ArtifexSoftware/ghostpdl-downloads/releases/download/gs923/ghostscript-9.23.tar.gz tar -zxvf ghostscript-9.23.tar.gz cd [...]查看全文
"Eevee" / 2025-04-24 2 months ago / 未收藏/ fuzzy notepad/
发送到 kindle

vignettes is the spicy visual novel we’ve been plugging away at for the past year or so. It’s about transformation and sex and conflict and magic tricks. I think it’s pretty good! But I’m biased, so you’ll have to draw your own conclusions. By… playing it…?
It’s currently ten bucks on itch, but: we’ll be adding more stories over time, and slightly bumping the price every time. So this is probably the cheapest it’ll ever be. How compelling!
Some thoughts follow, as per usual.
I’ve been trying to finish another adult VN for a while. We did Cherry Kisses, which even did alright on Steam… but that was 2019.
Before that was Alice’s Day Off, a “demo” which never became a full thing because it relied on a combinatoric explosion and it turns out that might be a bad idea even if you know it’s a bad idea and think you can turn it into a good idea. (I will definitely try to make it work again one day.)
And then I don’t know what happened exactly. A couple years passed as a sort of indistinct haze. I wonder if anything happened in 2020 to cause that.
But by 2022 we got back to it and tried something more story-heavy this time: Clover and Over… “prologue”, which remains only a prologue. There was a branching story planned to go with it but we just… didn’t… do it.
I don’t even know why we didn’t do either of these things. We just ran out of steam, I guess. The thing itself was too big and time-consuming and it was just draining to keep working on something without feeling like we were getting meaningfully closer to an end point.
I’ve been struggling for a few years, really. Even fox flux has been blocked on level design in a way I don’t seem capable of resolving. I don’t know why I’m working on anything or who I’m working on it for. Redoing this website is one of the larger things I’ve done in ages and it still took way longer than it should have. It’s like I have a leak, and something is draining out of me faster than I can refill it, but I don’t know where it is or how to plug it.
well anyway
I did come up with a workaround here, at least — vignettes is really a framing device for multiple stories, meaning we can release something now and also build on it later. We have a loose arc in mind that’ll span half a dozen or so stories, but even if we vanish off the face of the Earth, what’s already there is still a… complete thought.
And that’s nice, I think.
I hope the next few parts don’t take so long to get out. This took us over a year — partly because of other things going on, partly because I feel like an empty husk. But I have a big pile of characters I originally designed for Clover and Over and haven’t really gotten to share with the world yet, so I’d like to do that.
I dunno. Yeah. I wanted to also say stuff about how this format lets me skip doing a bunch of Ren’Py setup work every time and makes it easier to play with the VN format without dedicating a whole entire big thing to it, but then this took a bit of a weird turn, sorry. Hope you enjoy the game.
"Bruce Schneier" / 2025-04-23 2 months ago / 未收藏/ Schneier on Security/
发送到 kindle
Android phones will soon reboot themselves after sitting idle for three days. iPhones have had this feature for a while; it’s nice to see Google add it to their phones.
"Bruce Schneier" / 2025-04-24 2 months ago / 未收藏/ Schneier on Security/
发送到 kindle
Interesting research: “Guillotine: Hypervisors for Isolating Malicious AIs.”
The basic idea is that many of the AI safety policies proposed by the AI community lack robust technical enforcement mechanisms. The worry is that, as models get smarter, they will be able to avoid those safety policies. The paper proposes a set technical enforcement mechanisms that could work against these malicious AIs.
Abstract:As AI models become more embedded in critical sectors like finance, healthcare, and the military, their inscrutable behavior poses ever-greater risks to society. To mitigate this risk, we propose Guillotine, a hypervisor architecture for sandboxing powerful AI models—models that, by accident or malice, can generate existential threats to humanity. Although Guillotine borrows some well-known virtualization techniques, Guillotine must also introduce fundamentally new isolation mechanisms to handle the unique threat model posed by existential-risk AIs. For example, a rogue AI may try to introspect upon hypervisor software or the underlying hardware substrate to enable later subversion of that control plane; thus, a Guillotine hypervisor requires careful co-design of the hypervisor software and the CPUs, RAM, NIC, and storage devices that support the hypervisor software, to thwart side channel leakage and more generally eliminate mechanisms for AI to exploit reflection-based vulnerabilities. Beyond such isolation at the software, network, and microarchitectural layers, a Guillotine hypervisor must also provide physical fail-safes more commonly associated with nuclear power plants, avionic platforms, and other types of mission critical systems. Physical fail-safes, e.g., involving electromechanical disconnection of network cables, or the flooding of a datacenter which holds a rogue AI, provide defense in depth if software, network, and microarchitectural isolation is compromised and a rogue AI must be temporarily shut down or permanently destroyed.
The basic idea is that many of the AI safety policies proposed by the AI community lack robust technical enforcement mechanisms. The worry is that, as models get smarter, they will be able to avoid those safety policies. The paper proposes a set technical enforcement mechanisms that could work against these malicious AIs.
2025-04-24 2 months ago / 未收藏/ ongoing by Tim Bray/
发送到 kindle
Join me for a walk through a rain forest on a corner of of a small island.
This is to remind everyone that even in a world full of bad news, the trees are still there.
From the slopes leading down to the sea they reach up for sunshine and rain,
offering no objections to humans walking
in the tall quiet spaces between them.
[The island is , where we’ve . It’s mostly just trees and cabins, you can buy an oceanfront mansion for millions or a basic Place That Needs Work for much less (as we did) or you can . Come on over sometime.]Keats Islandhad a cabin since 2008camp cheap
On the path up from the water to the cabin there’s this camellia that was unhappy at our home in the city, its flowers always stained brown even as they opened. So we brought it to the island and now look at it!
One interior shot. On this recent visit I wired up this desk, a recent hand-me-down from old friend .Tamara
When I got it all wired up I texted her “Now I write my masterpiece” but instead I wrote that one , no masterpiece but I was happy with it. And anyhow, it’s lovely space to sit and tap a keyboard.about URI schemes
Now the forest walk.
These are rain forests and they are happy in their own way when it rains but I’m a , we evolved in a sunny part of the world and my eyes welcome all those photons.Homo sapiens
In 2008 I was told that the island had been logged “100 years ago”. So most of these are probably in the Young-Adult tree demographic, but there are a few of the real old giants still to be seen.
Sometimes the trees seem to dance with each other.
Both of those pictures feature (but not exclusively) , the bigleaf Maple, the only deciduous tree I know of that can compete for sun with the towering Cedar/Fir/Hemlock evergreens. It’s beautiful both naked (as here) and in its verdant midsummer raiment.Acer macrophyllum
But sometimes when you dance too hard you can fall over. He are two different photographic takes on a bigleaf that seems to have lost its grip and is leaning on a nearby hemlock.
And sometimes you can just totally lose it.
It is very common in these forests to see a tree growing out of a fallen log; these are called “nurse logs”. It turns out to be a high-risk arboreal lifestyle, as we see here. It must have been helluva drama when the nurse rolled.
I’m about done and will end as I began, with a flower.
This is the blossom of a salmonberry () a member of the rose family. It has berries in late summer but they’re only marginally edible.Rubus spectabilis
It’s one of the first blossoms you see in the forest depths as spring struggles free of the shackles of the northwest winter.
Go hug a tree sometime soon, it really does help.