Introduction
The size of datasets and neural networks increases at an explosive rate.
At some point, it becomes clear that a single device is not an efficient approach to do a specific task. You may be training a convolutional network on a few million images or scaling up a large language model to billions of parameters.
Data parallelism is a core technique for speeding up workloads in machine learning. It forms the foundation for scalable, distributed training across multiple GPUs or even entire data centers, enabling efficient processing of large-scale models.
In this article, we will explain the mechanics of data parallelism and how it differs from task and model parallelism. We will illustrate how it can be implemented using popular frameworks such as PyTorch, TensorFlow, DeepSpeed, FSDP, and their applications in training large language models.
Key Takeaways
- Data Parallelism refers to the distribution of data across multiple devices to enable simultaneous processing. This results in faster training and efficient handling of massive datasets and large models.
- In data parallelism, each worker (GPU, CPU, or node) performs the same model operation but on a different data chunk. Results (e.g., gradients) are synchronized and aggregated to maintain consistent model updates across all workers.
- Leading machine learning frameworks such as PyTorch (including DataParallel and DistributedDataParallel), TensorFlow with tf.distribute.Strategy, Horovod, and Ray provide comprehensive APIs for scaling data parallelism effectively. Besides, advanced systems like FSDP and DeepSpeed are designed to handle large-scale models efficiently, offering flexible options for distributed training across different environments.
- Data parallelism works if your model can fit on a single device, and the dataset is large. However, for huge models, model parallelism or hybrid approaches (FSDP, ZeRO) may be necessary to address memory and bandwidth limitations.
- Task parallelism involves running different operations on the same data in parallel, while model parallelism splits the model itself across devices.
What Is Data Parallelism
Data parallelism is a parallel computing technique where the data or computational workload is divided into chunks that are distributed to multiple processing units (typically GPUs).
Each device performs the same operation on different subsets of the data simultaneously. Data parallelism boosts training and processing speeds by making better use of concurrent tasks. In other words, with more devices, more data can be processed in the same wall-clock time.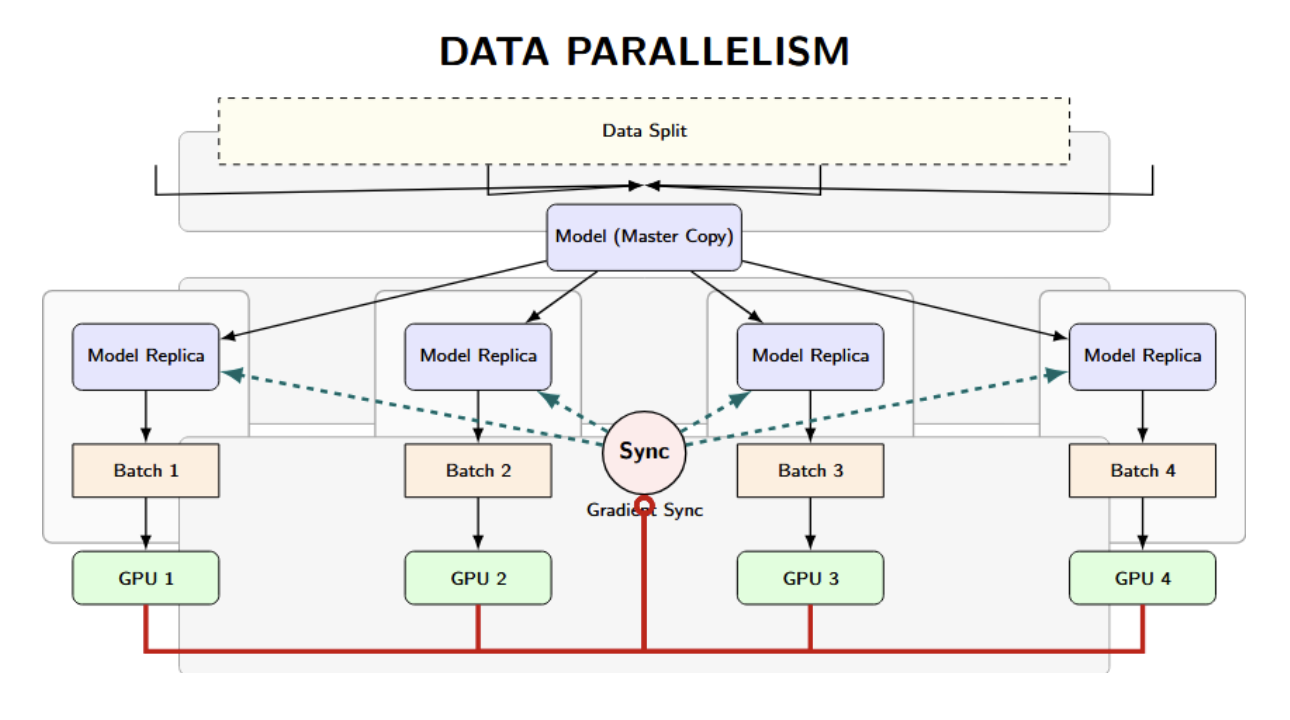
The arrows visualize the parallel and synchronized workflow of data parallelism:
- Downward arrows: Set up and distribute the work and the models.
- Upward/sync arrows: Aggregate results so all model copies learn together.
How Data Parallelism Works
Let’s walk through what a typical data parallelism workflow looks like. We will do this in the context of training an ML model on multiple GPUs (same logic applies for CPUs, multi-node clusters):- Replicate the Model: First, we load an identical copy of the model (with the same initial weights) on each device (GPU/worker). By doing this, each device processes its own data simultaneously during the forward and backward passes. With 4 GPUs, for example, you will have 4 replicas of the neural network, one per GPU.
- Split the Data: The entire training dataset (or incoming batch of data) is split into N equal-sized chunks, where N is the number of parallel workers (GPUs). Each worker (GPU) receives a different slice of the data. This can be done through a data loader or a special sampler that automatically hands each device a unique subset of the data. So, if we had 4 GPUs, a single batch of 128 samples would be split into 4 sub-batches of 32 samples each.
- Parallel Processing: Each GPU (with its own model replica) processes its data subset in parallel. All the GPUs compute the forward pass (predictions) and backward pass (gradients) simultaneously, without communication during this step. The model replicas get different data. Therefore, each of them will compute (potentially) different gradient updates for the model parameters.
- Gradient Synchronization: After completing local computation for a training step, the workers all synchronize and consistently update the model. In synchronous data parallelism, all GPUs exchange and aggregate the computed gradients. An All-reduce (a collective communication pattern) is often used to sum the gradients from all the processes and distribute the summed gradients back to each process. Practically, deep learning libraries implement gradient synchronization using the Ring All-Reduce algorithm to minimize communication overhead. After this step, each GPU holds the same set of summed gradients, as if the entire batch had been processed on a single device.
- Model Update: Each GPU (or master process) uses the aggregated gradients to update the model weights (e.g., one step of gradient descent or Adam). Since each GPU used the same aggregated gradients, their model parameters remain identical after the update step.
- Repeat: Load the next batch of data and repeat the process (split data, parallel forward/backward, sync, update). Continue until training is complete. Devices will regularly synchronize with each other at the end of each iteration (or at a regular interval) during training, to stay in lockstep on the same model parameters.
Synchronous vs. Asynchronous Data Parallelism
The above describes synchronous data parallel training. When designing distributed machine learning systems, one important question to answer is whether one should synchronize the update across all workers (synchronous training) or allow updates at each worker’s own pace (asynchronous training). The two flavors have their pros and cons with regard to stability, speed, and system complexity. The table below summarizes the core differences:| Aspect | Synchronous Data Parallelism | Asynchronous Data Parallelism |
|---|---|---|
| How it works | All workers do each step together, then sync | Workers work at their own pace, no syncing |
| Updates | The model is updated only after all workers finish the step | The model is updated as soon as a worker finishes |
| Speed bottleneck | Slowed by the slowest (straggler) worker | Not slowed by any single worker |
| Model consistency | All model copies stay identical | Model copies may be slightly different |
| Stability | More stable, easier to tune and debug | Can be less stable, needs careful tuning |
| Communication | Uses “all-reduce” (direct worker-to-worker) | Uses “parameter server” (central coordinator) |
| Common use cases | Most deep learning frameworks (e.g., DDP, Horovod) | Edge devices, unreliable or mixed-speed clusters |
| When to use | When you need accuracy and consistency | When speed and hardware utilization are critical |
Comparing Data and Task Parallelism
Data parallelism is different from task parallelism. While they both fall under the parallel computing model umbrella, they refer to different strategies:Data Parallelism: All workers are doing the same task or operation, but on different subsets of the data simultaneously. For example, suppose you have a large array of numbers to sum. On a dual-core system using data parallelism, Thread A could be summing the first half of the array, while at the same time, Thread B sums the second half. Once both threads are completed, we will combine the partial results from each to get the final sum of the entire array. Each thread performed the same summation operation on a different data chunk.
Task Parallelism: Multiple workers (threads or processes) perform distinct tasks, on the same or different subsets of data, in parallel. For instance, given an input dataset, Thread A is filtering the data, while Thread B is sorting it simultaneously. They are both performing different operations at the same time (filtering vs sorting).
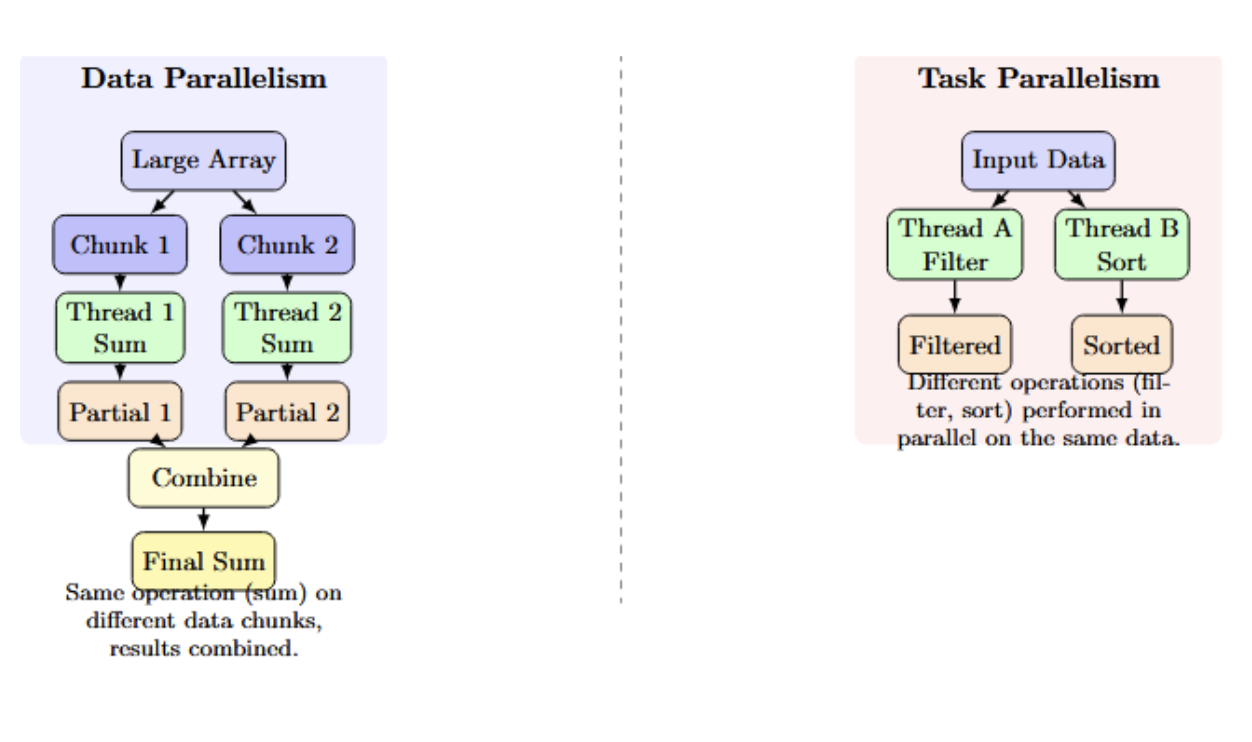
In summary:
- Data parallelism = same work, different subsets of data.
- Task parallelism = Multiple work, same or different subsets of data.
Understanding the Difference: Data Parallelism and Model Parallelism
In contrast to data parallelism, where we split the data across copies of a model, model parallelism splits the model across multiple devices. Model parallelism is useful when a model is too large to fit in a single device’s memory, or to further accelerate computation by parallelizing different parts of the model’s operations. The distinction between the two can be made by presenting them side-by-side: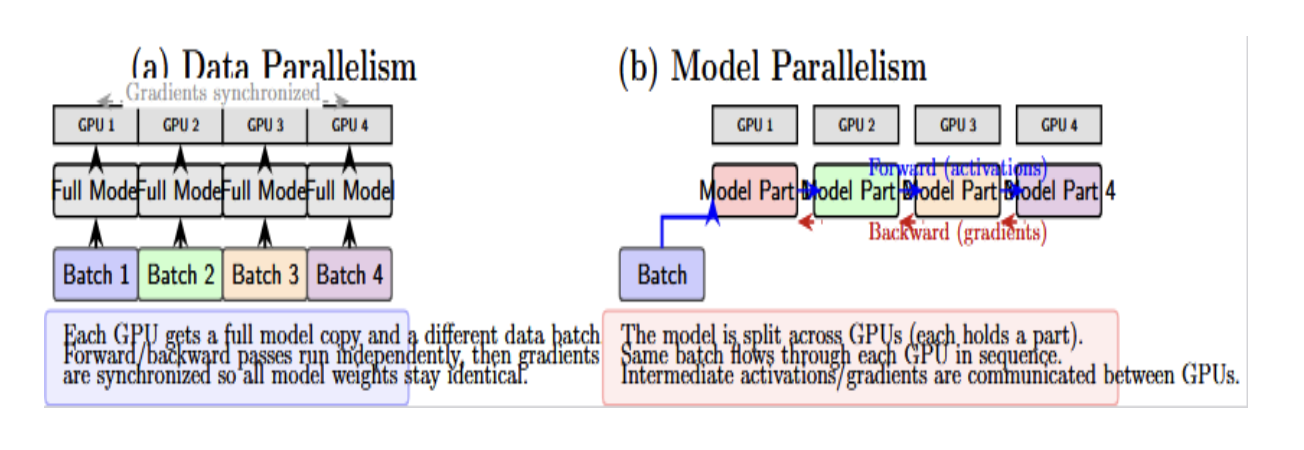
In simpler terms:
- Data parallel = clone the model and split the data into subsets.
- Model parallel = split the model, clone the data (each device often gets the full dataset or batch).
Data Parallelism: Key Advantages and Limitations
Data parallelism is a popular strategy for accelerating machine learning and deep learning. However, it has its own trade-offs that you must be aware of. Here is a detailed comparison of its key benefits and drawbacks:| Pros | Cons |
|---|---|
| Speed-Up and Efficiency Tasks complete faster by dividing work over multiple processors. For large workloads, data parallelism can achieve near-linear speed-up as resources increase. | Memory Overhead Each worker holds a full copy of the model or data, causing duplicated memory usage and limiting scalability for very large models. |
| Simplicity of Replication The same code or model runs on each worker; frameworks handle splitting and merging, so you usually don’t need major code changes. | Communication Overhead Combining results (like synchronizing gradients) adds network traffic, which can become a bottleneck as model or cluster size grows. |
| Scalability Easy to handle more data or bigger models by adding more workers; widely used for scaling to hundreds or thousands of machines. | Synchronization Penalty In synchronous setups, the fastest workers must wait for the slowest, making performance sensitive to hardware imbalance or stragglers. |
| Fault Isolation If one worker fails, only its portion of the data is lost. With checkpointing, work can resume with minimal loss, improving reliability. | Diminishing Returns Adding more workers eventually yields less benefit due to communication and merge overhead, and can affect ML model quality if batches become too large. |
| Balanced Workload Splitting by data often naturally balances the work (assuming data complexity is uniform), keeping all processors equally busy. | Applicability Not all problems split easily by data; tasks with strong dependencies or that require global state need different parallelization strategies. |
Implementations and Frameworks for Data Parallelism
Several frameworks and tools are available to help simplify data parallel computing. PyTorch provides two main methods to parallelize training.DataParallel: DataParallel is a simple API for training a model on multiple GPUs with a single machine. It slices the input batch data across the provided devices, runs the computation in parallel, and then gathers and returns the results. However, it’s not very efficient when used on multiple nodes and can create a bottleneck on the main process.
DistributedDataParallel: If you need a highly scalable and efficient way to do multi-GPU and multi-node training, you can use the DistributedDataParallel module. In this mode, each process runs a replica of the model on a single GPU and then performs an all-reduce operation across all processes to synchronize the gradients after each backward pass. We recommend using this API to scale the training to multiple machines. Example Pseudo Code:
import torch
import torch.nn as nn

# DataParallel usage (single machine, multiple GPUs)
model = nn.DataParallel(MyModel())
output = model(input)

# DistributedDataParallel usage (scalable, multi-GPU)
import torch.distributed as dist
dist.init_process_group(backend="nccl")
model = nn.parallel.DistributedDataParallel(
    MyModel().to(local_rank), device_ids=[local_rank]
)
TensorFlow: tf.distribute.Strategy
TensorFlow has a unified API for distributed training with the tf.distribute.Strategy module. It provides an abstraction to scale training workloads across different hardware configurations with minimal code changes. The following strategies are available:- MirroredStrategy: It is used for synchronous training on multiple GPUs on a single machine.
- MultiWorkerMirroredStrategy: Synchronous training on multiple machines with one or more GPUs per machine.
- TPUStrategy: It supports distributed training on TPU clusters.
- ParameterServerStrategy: It is used for asynchronous training with parameter servers.
- CentralStorageStrategy: (Experimental) Stores variables on a single device for some special use cases.
import tensorflow as tf
# Example: Synchronous multi-GPU training
strategy = tf.distribute.MirroredStrategy()
with strategy.scope():
    model = build_model(...)
model.fit(dataset, epochs=..., ...)
Horovod: Distributed Training Across Clusters
Horovod is a framework-agnostic library for large-scale distributed deep learning. It can be used with TensorFlow, PyTorch, and MXNet. It also simplifies the distributed training of deep learning models across multiple GPUs, nodes, and clusters. Horovod relies on high-performance communication libraries like MPI(Message Passing Interface) and NCCL to synchronize the gradients. Key features of Horovod include:- Minimal code changes to scale from a single GPU to multi-node clusters.
- Approach linear scaling with an increase in resources.
- It incorporates gradient compression and fault tolerance solutions for performance optimization.
- Data and model parallelism support.
import horovod.torch as hvd
hvd.init()

model = MyModel().to(hvd.local_rank())
optimizer = optim.Adam(model.parameters(), lr=0.001 * hvd.size())

# Wrap the optimizer with Horovod DistributedOptimizer
optimizer = hvd.DistributedOptimizer(optimizer, named_parameters=model.named_parameters())

# Synchronize model parameters across workers
hvd.broadcast_parameters(model.state_dict(), root_rank=0)
Ray: Parallel Data Processing and Orchestration
Ray is a general-purpose distributed execution framework that’s not limited to deep learning. It can be used for parallel and distributed training for various machine learning and data processing tasks.Ray’s features include:
- Orchestrating distributed training workloads for PyTorch, TensorFlow, and more.
- It supports parallel data processing operations, hyperparameter tuning, and reinforcement learning techniques.
- Ray offers native APIs to manage distributed deep learning workloads.
pip install ray

import ray
import numpy as np

# Initialize Ray
ray.init()

# Dummy training function to simulate model training on a data shard
@ray.remote
def train_worker(data_shard):
    # Initialize model weights randomly
    weights = np.random.rand(10)
    # Dummy "training": update weights with mean of the data shard
    for batch in data_shard:
        weights += batch.mean(axis=0) * 0.01
    return weights

# Generate dummy data and split into shards
num_workers = 4
data = [np.random.rand(100, 10) for _ in range(num_workers)]  # 4 shards of data

# Launch training jobs in parallel
results = [train_worker.remote(shard) for shard in data]

# Collect the results (trained weights) from all workers
trained_weights = ray.get(results)

# Aggregate weights (simple average)
final_weights = np.mean(trained_weights, axis=0)

print("Aggregated model weights:", final_weights)
- Each Ray worker receives a data shard and performs a simple “training” update.
- All workers run in parallel.
- Results are aggregated (averaged) at the end, simulating model weight synchronization.
Advanced Parallelism for Large Models
As models scale to billions of parameters, traditional data parallelism faces key challenges: It becomes impractical to keep many replicas of a large model in memory. This has spawned more advanced strategies that involve data and model parallelism or sharding to manage LLMs and other massive networks.Fully Sharded Data Parallel
FSDP is a strategy (developed by Facebook AI Research) that shards a model’s parameters, gradients, and optimizer state across the data parallel workers instead of replicating them entirely on each worker. Each GPU stores only a subset of the model’s parameters at any given time.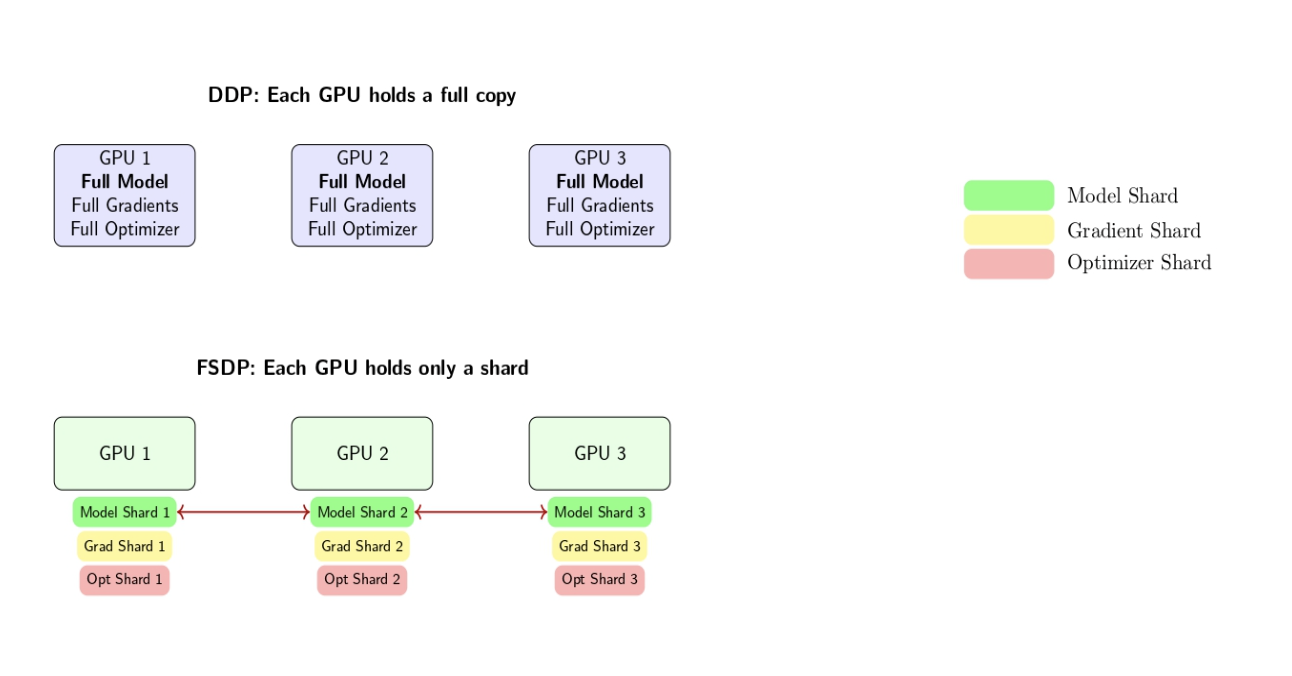
Key steps in FSDP:
- Each GPU only stores a shard of the model’s parameters, gradients, and optimizer state.
- Before a forward or backward pass, each GPU gathers the required parameter shards to assemble the complete model just in time for computation.
- After the forward or backward pass, the extra shards are discarded, leaving only the locally stored shard to reduce the memory footprint.
- Gradients are reduced-scattered so that each GPU only retains its shard of the gradients.
DeepSpeed (ZeRO)
DeepSpeed is another deep learning library for optimization from Microsoft that is most well-known for its ZeRO (Zero Redundancy Optimizer) set of techniques. ZeRO and FSDP share the same underlying principle, as both of them aim to remove redundancy in data parallelism. ZeRO has multiple stages:- Stage 1 partitions the optimizer states only across available devices to reduce memory duplication.
- Stage 2 partitions the optimizer states and gradients for more memory savings.
- Stage 3 Partitions optimizer states, gradients, and parameters, for full sharding of the model and memory distribution.
vLLM
FSDP and DeepSpeed are primarily focused on training, but let’s look at an example of parallelism applied to serving large language models. vLLM is an open-source, high-performance inference engine that accelerates the serving of transformer-based LLMs by optimizing GPU memory usage and enabling distributed execution. It introduces a technology called PagedAttention that supports dynamic swapping of GPU memory for the attention cache. It allows batching and parallel processing of many requests with low latency. vLLM also supports tensor parallelism and pipeline parallelism across GPUs for inference.
FAQ SECTION
What is data parallelism in machine learning?
It refers to the technique of running multiple copies of a model on different hardware (GPUs or nodes), where each copy is processing a different data batch. Gradients are synchronized so learning is consistent with single-device training.How does data parallelism differ from model parallelism? Data parallelism involves splitting data across multiple copies of the entire model, while model parallelism splits the model across different devices, each working on a part of the computation.
What are the advantages of data parallelism? Simplicity, great scalability for large datasets, easy integration with modern ML frameworks, and compatibility with existing training loops.
Which frameworks support data parallelism? Some popular machine learning frameworks that support data parallelism include PyTorch (via DataParallel and DistributedDataParallel), TensorFlow (via tf.distribute.Strategy), and more specialized libraries such as Horovod and Ray Train.
When should I use data parallelism?
Use data parallelism when you have large datasets, your model fits into a single GPU memory, and you want to leverage multiple GPUs to reduce training time.
Conclusion
Data parallelism is a foundational technique to scale machine learning/deep learning workloads. With increasing data and model sizes, practitioners use data parallelism to scale up across many GPUs/nodes/clusters to train models more quickly and run larger experiments that would otherwise be infeasible.While data parallelism offers clear benefits, it is important to consider the system overheads, communications, and memory requirements of model replicas.
There are many considerations when choosing the right approach, whether that be pure data parallelism, model parallelism, or more advanced hybrid methods (e.g., FSDP, DeepSpeed, etc), depending on your model size, hardware, and scaling requirements.
If you’d like to go deeper, check out these resources:
- Splitting LLMs Across Multiple GPUs
- PyTorch Memory and Multi-GPU Debugging
- Optimizing Deep Learning Pipelines
- CPU vs. GPU: A Deep Learning Perspective
References and Resources
- Distributed Inference and Serving
- ZeRO & DeepSpeed
- Fully Sharded Data Parallel: faster AI training with fewer GPUs
- What is Distributed Data Parallel (DDP)
- Harnessing the Power of Parallelism for Faster Deep Learning Model Training with TensorFlow
- Ray
- Distributed training with TensorFlow
- Data parallelism vs Task parallelism
Continue reading Kinsta Review for Ecommerce: My Verdict for 2025
The post Kinsta Review for Ecommerce: My Verdict for 2025 appeared first on Ecommerce-Platforms.com.
Continue reading Graphy vs Kajabi: Which Platform Wins for Selling Courses Online?
The post Graphy vs Kajabi: Which Platform Wins for Selling Courses Online? appeared first on Ecommerce-Platforms.com.
Continue reading Is Print on Demand Worth It in 2025?
The post Is Print on Demand Worth It in 2025? appeared first on Ecommerce-Platforms.com.
Continue reading How to Use Gelato with Shopify: The Simple Step-by-Step Guide
The post How to Use Gelato with Shopify: The Simple Step-by-Step Guide appeared first on Ecommerce-Platforms.com.
Continue reading Gelato vs Gooten 2025: Which is Better for Print on Demand
The post Gelato vs Gooten 2025: Which is Better for Print on Demand appeared first on Ecommerce-Platforms.com.
Continue reading The History of Shopify: Who Owns Shopify in 2025?
The post The History of Shopify: Who Owns Shopify in 2025? appeared first on Ecommerce-Platforms.com.
Continue reading How To Get A Custom Domain For Your Printify Pop-Up Store (And Boost Your Brand’s Credibility)
The post How To Get A Custom Domain For Your Printify Pop-Up Store (And Boost Your Brand’s Credibility) appeared first on Ecommerce-Platforms.com.
Continue reading ShipBob vs Shippo: Which One’s Better for Ecommerce Shipping in 2025?
The post ShipBob vs Shippo: Which One’s Better for Ecommerce Shipping in 2025? appeared first on Ecommerce-Platforms.com.
Continue reading Teachable vs Graphy: Which Online Course Platform Should You Use in 2025?
The post Teachable vs Graphy: Which Online Course Platform Should You Use in 2025? appeared first on Ecommerce-Platforms.com.
The post Complete Guide to the New Google Search Console Insights (July 2025 Update) first appeared on ShareSoft Technology.
Read the full article - Building active communities: A guide to member engagement
The post Leader Spotlight: Navigating a complete product redesign, with Tyler Stone appeared first on LogRocket Blog.
Thank god they started pre-washing and boxing salad otherwise I’d never eat the stuff … very important to douse greens with salad gravy (yes, a Gaffiganism) and my salad dressing of choice is Briannas (no apostrophe) Blush Wine Vinaigrette. I have tried every salad dressing on planet Earth and this is the best stuff (I can get at Wegmans) by a mile. Try it and let me know how right I am!

The post Best Free and Bargain Kindle Books: 07-14-25 appeared first on Free Ebooks Blog.
The post Best Free and Bargain Kindle Books: 07-15-25 appeared first on Free Ebooks Blog.
The post Best Free and Bargain Kindle Books: 07-16-25 appeared first on Free Ebooks Blog.
The post Best Free and Bargain Kindle Books: 07-17-25 appeared first on Free Ebooks Blog.
在 SWE Bench Verified、Tau2、AceBench 等基准性能测试中,Kimi K2 均取得开源模型中的 SOTA 成绩,展现出在代码、Agent、数学推理任务上的领先能力。
知乎提问
在openrouter看到了groq,瞄了一下他们居然有自己的GPU。
不过最近,GPU 的地位也在经受挑战:一家名为 Groq 的初创公司开发出了一种新的 AI 处理器 ——LPU(Language Processing Unit),其推理速度相较于英伟达 GPU 提高了 10 倍,成本却降低到十分之一。贾扬清在推特上算了一笔账,因为Groq小的可怜的内存容量(230MB),在运行Llama-2 70b模型时,需要305张Groq卡才足够,而用H100则只需要8张卡。从目前的价格来看,这意味着在同等吞吐量下,Groq的硬件成本是H100的40倍,能耗成本是10倍。
Apple CPU的推理框架要支持CUDA了
EKS 100k node,之前k8s官方说最大5k节点,openai说他们有10k节点,这篇文的写的不错,都是之前遇到的问题。
和上文对应,介绍如何保障APIserver的稳定
opencode 好像火起来了,golang加ts写的。
NFD 还可以探测操作系统的相关配置。

For decades, the United States has held a commanding lead as a destination for international students interested in STEM fields. Then U.S. President Donald Trump’s administration began revoking student visas, temporarily froze student visa interviews, promised extra scrutiny for Chinese students, and instituted new social media checks for all applicants.
Now, early signals from organizations involved in international student placement show a steep drop-off in interest in U.S. colleges and universities. And experts say the Trump administration’s policy changes will have long-term consequences. “These actions that are being taken right now will undercut the U.S. position in the global higher-education market for a generation to come,” says Clay Harmon, executive director of the Association of International Enrollment Management (AIRC).
Early indicators of flagging interest in U.S. education
Studyportals, a company that helps international students find higher education programs around the world, tracks the inquiries that visitors make on its website. It publishes reports about search trends that tend to map to enrollment trends a few years down the line. In late May, Studyportals released data showing that student interest in studying in the United States (in all fields) has dropped to its lowest level since the height of the COVID-19 pandemic, with weekly page views for U.S. degree programs declining 50 percent between January and the end of April.At Spectrum’s request, Studyportals looked specifically at its data for engineering programs. The company found that student interest in U.S. bachelor’s engineering degrees dropped by 41 percent between January and May, while interest in master’s engineering degrees declined by 36 percent. Looking at engineering subdisciplines, Studyportals saw the steepest drops in aerospace, automotive engineering, electronics, marine engineering, and robotics.
“Every student who decides against America isn’t just lost tuition money—it’s lost talent,” says Edwin van Rest, CEO of Studyportals. “The person who could’ve started the next big company or made some major discovery might end up in London instead of Boston, all because of decisions being made right now.”
Other organizations echo Studyportals’ findings about international students in all fields losing interest in U.S. schooling. IDP, another company that helps students find programs abroad, told Spectrum that searches for programs in the United States dropped below searches for those in the United Kingdom for the first time this February. And in an IDP survey in May of more than 900 prospective international students with U.S. study aspirations, 44 percent indicated that they were “seriously considering” other study destinations over the United States.
Harmon of AIRC notes that “there’s a really long timeline” for families considering sending a student abroad for higher education. “Some parents start tracking their kids as early as kindergarten,” he says, noting that families may opt for bilingual schools to prepare their children for undergraduate studies in the United States. For graduate and doctoral programs, Harmon says, prospective students may take several years to find a program that’s a good match before they even start dealing with financial and visa logistics. So flagging interest now could have repercussions for many years.
Spectrum reached out to the U.S. Department of State and Immigration and Customs Enforcement for comment on international student policies but received no reply. Spectrum also reached out to universities including MIT, Stanford, and UC Berkeley for comment on international student enrollment for the coming school year, but representatives said they’ll release enrollment figures in the fall and have no comment before then.
 In the 2023-2024 academic year, the number of international students studying in the United States was at an all-time high.Open Doors
How many international students study in the United States?
The number of international students pursuing higher education in the United States reached an unprecedented high of 1.1 million in the 2023-2024 school year (the most recent for which statistics are available), according to data from the U.S. Department of State. The majority of those students, 56 percent, studied in STEM fields, with 19 percent studying engineering and 25 percent pursuing degrees in math or computer science.In the field of artificial intelligence, the statistics are particularly striking. A 2023 analysis by the National Foundation for American Policy found that 70 percent of graduate students in fields relating to AI are international students, and that 42 percent of the top AI companies based in the United States (as determined by the Forbes AI 50 list) had a founder who came to this country as an international student.
In an interview with Newsmax in May, U.S. Vice President JD Vance argued that the country doesn’t need to import foreign students to do “great things,” saying, “I just think we should invest in our own people.” But Harmon takes issue with that idea: “The idea that international students are stealing seats from domestic [applicants] couldn’t be farther from the truth.” He notes that the full non-resident tuition paid by international students provides resources to universities that in effect subsidize domestic students who receive financial aid.
The economic impact of international students
In June, NAFSA: Association of International Educators collected field reports from more than 90 colleges and universities in the United States. Nearly 75 percent of those institutions said they anticipate a decline in international enrollment this fall, and 40 percent of respondents had heard from students who have decided against studying in the United States. The top five countries that they’re turning to instead are the United Kingdom, Australia, Canada, China, and Germany.“International students and scholars are tremendous assets that contribute to U.S. preeminence in innovation, research, and economic strength,” says Fanta Aw, NAFSA executive director and CEO. “Undermining their ability to study here is self-defeating.” Her organization regularly conducts economic analyses relating to international students; its most recent report found that in the 2023-2024 school year, these students contributed US $34.8 billion to the U.S. economy.
Harmon notes that many other nations have recognized the value of international students and have instituted recruitment campaigns, with countries such as Germany and China offering free tuition to international students in hopes of attracting young skilled workers.
“It’s very hard to build up a reputation for having the best education opportunities in the world, and it’s easy to destroy that reputation and the trust,” says Harmon. “Especially when there are eager others waiting in the wings to take those students.”

This post originally appeared on Recode China AI.
When Tesla rolled out its much-anticipated pilot robotaxi service in Austin, Texas, last month—a fleet of 10 to 20 Model Y SUVs with “robotaxi” stickers and minor modifications—the tech and automotive worlds paused in awe. But thousands of miles away, executives at China’s leading autonomous driving firms didn’t flinch.
“Tesla isn’t even sitting at the [robotaxi] table yet,” Lou Tiancheng, CTO of Chinese autonomous vehicle company Pony.ai, remarked during an interview in May. Last year, Wang Yunpeng, head of the autonomous driving unit at Baidu, China’s search engine and AI giant, claimed Tesla was at least three to five years behind.
The measure of robotaxi success isn’t flashy demos or tech-day reveals—it’s large-scale, commercial, fully autonomous public service. By that standard, Tesla remains far behind. Globally, only Alphabet’s Waymo and a handful of Chinese firms have overcome this barrier.
 Comparing robotaxi operations: Waymo leads in the United States; Baidu dominates in China.Recode China AI
While Waymo pioneered the robotaxi, nearly every other company providing regular public road service is Chinese. It mirrors the global electric vehicle market where, aside from Tesla, Chinese carmakers like BYD dominate the top ranks.
China’s Robotaxi Trio: Baidu, Pony.ai, WeRide
At the center of this push is Baidu, often considered the West Point of China’s autonomous vehicle (AV) industry. Its alumni populate almost the entire autonomous driving supply chain in China, from chips to software development to robotaxis.When Baidu began self-driving research in 2013, it envisioned becoming the Android of AV—a software ecosystem provider to automakers worldwide. But China’s fiercely competitive automotive landscape quashed this ambition. Top Chinese electric automakers, such as Li Auto and XPeng, opted to develop their own advanced driver-assistance systems (ADAS), while lower-tier companies turned to telecom giant Huawei or drone maker DJI. Baidu’s own electric vehicle venture, Jidu, folded last year.
Yet despite these setbacks, Baidu’s robotaxi service, Apollo Go (known affectionately in China as “Luobo Kuaipao” or Carrot Runs Fast), is flourishing. In 2022, it became China’s first fully driverless commercial robotaxi operator—a milestone for the industry. Today, Apollo Go operates a fleet of 1,000 robotaxis across 15 cities, from Beijing to Shenzhen, providing 1.4 million rides in the first quarter of 2025 alone.
Baidu’s largest operations hub is Wuhan, a megacity in central China with more than 13 million people, strategically chosen for its supportive regulatory environment and its status as China’s automotive heartland. Baidu’s sixth-generation robotaxi is a sleek vehicle with covered steering wheels and rear sliding doors. Still, 1,000 cars are modest compared to China’s vast traditional taxi market and enormous ride-hailing fleets.
Hot on Baidu’s heels are Pony.ai and WeRide, which were founded by former Baidu executives in 2016 and 2017, respectively. Both began in Silicon Valley and moved back to Guangzhou. Both went public on NASDAQ nearly simultaneously in 2024.
 With backing from Toyota, Pony.ai is aiming to produce 1,000 of its robotaxis this year.Pony.ai
Pony.ai, backed by Toyota and co-founded by ex-Baidu executive James Peng and coding prodigy Tiancheng Lou, operates 270 robotaxis. By year end, they aim to scale production to 1,000 of their seventh-generation robotaxis, co-developed with Toyota and two local Chinese automakers. Pony.ai has not disclosed its robotaxi order numbers but claims an impressive 1-to-20 ratio of remote safety operators to vehicles and says its operational footprint is roughly 20 times the size of Waymo’s service area in San Francisco.
Since its NASDAQ debut, Pony.ai has attracted significant attention, including a partnership with Uber and rumored discussions involving Uber’s controversial founder, Travis Kalanick, who was supposedly interested in acquiring the company’s U.S. operations.
WeRide, another company founded by Baidu’s veterans, overcame early turmoil when its co-founder, former Baidu executive Wang Jing, stepped down amid a lawsuit alleging trade-secret misappropriation. CTO Tony Han stepped in, steering WeRide to success with a 500-robotaxi fleet and diversified offerings including robo-buses and autonomous street sweepers. WeRide also collaborates with Bosch, the German technology giant and WeRide’s major investor, on ADAS development, though major commercial clients remain elusive.
 WeRide launched the Middle East’s first robotaxi service in Abu Dhabi this year. WeRide
Now these firms are turning outward, eyeing overseas expansion in Southeast Asia, Europe, and the Middle East—racing to claim global robotaxi territory ahead of American competitors. Early this year, Baidu expanded into Dubai and Abu Dhabi after securing road‑test permits and reportedly plans to enter Singapore, Malaysia, and Switzerland. Pony.ai signed an agreement with Dubai’s transit authority, aiming for fully driverless operations by 2026 and maintains test operations in South Korea and Luxembourg. WeRide partnered with Uber for pilot operations in Abu Dhabi, becoming the Middle East’s first fully driverless robotaxi service and plans expansion into 15 more cities globally over the next five years.
Cost Advantages and Complex Roads
Technologically, Chinese robotaxi firms have largely used Waymo’s playbook in hardware—combining lidar, radar, cameras, precision GPS, and high-definition maps. Their advantage is cost. Thanks to China’s manufacturing prowess, these companies could quickly scale fleets when ready. For example, Baidu brought robotaxi production costs down to just US $28,000 per vehicle—a fraction of Waymo’s hundreds-of-thousands-per-vehicle expense, on par with Tesla’s forthcoming CyberCab. Pony.ai, meanwhile, boasted a 68 percent drop in lidar costs and an 80 percent reduction in computing costs with the launch of its seventh-generation robotaxi.  Tesla launched its robotaxi service in Austin, Texas, with a handful of vehicles in limited areas of the city. Tim Goessman/Bloomberg/Getty Images
Their software is a combination of AI models and rule-based code, designed to interpret traffic patterns, predict behaviors, and execute driving decisions. All three Chinese robotaxi firms now boast “end-to-end” systems—a term popularized by Tesla that refers to AI models capable of processing raw sensor data and directly outputting driving actions.
Unlike Waymo’s early suburban testing in Phoenix, Chinese robotaxis are trained in the dense, chaotic streets of Beijing and Guangzhou, where roads are often packed with motorbikes, bicycles, and street vendors. The ability to operate in such conditions could arguably make their systems more adaptable.
Regulatory Hurdles and Chip Reliance
Yet challenges persist, mostly regulatory hurdles. Neither China nor the United States has enacted nationwide laws governing robotaxis, leaving the regulation to states and cities. As a result, the industry operates under a fragmented patchwork of local-level policies, with each jurisdiction setting its own rules and requirements.Unlike some U.S. states, which are quicker with permits but stringent on ongoing safety monitoring, Chinese cities initially demand rigorous testing before granting permits.
Almost all Chinese cities that allow robotaxis only permit their operation within geofenced zones, often in suburban districts away from dense downtown areas. In contrast, Waymo’s service is allowed to cover large parts of San Francisco, including downtown.
Interestingly, Chinese AV companies have leveraged Waymo’s progress to spur government support at home. When Waymo’s ride volume surged last year, Chinese firms intensified their lobbying efforts, urging regulators for more expansive operating permissions.
 Waymo operates more than 1,500 robotaxis in the metropolitan areas of four U.S. cities.Craig F. Walker/The Boston Globe/Getty Images
Social issues also loom large. Apollo Go’s expansion in Wuhan last year sparked protests from local taxi drivers who feared for their livelihoods. In response, the Wuhan Transportation Bureau clarified that Apollo Go operates only 400 robotaxis in the city. Baidu CEO Robin Li acknowledged the concerns, emphasizing that scaling robotaxi operations will be a gradual process that may take many years.
Profitability is another challenge for all robotaxi firms. Despite growing ride volumes and improving hardware economics, none of the players have yet reached break-even. Most services remain heavily subsidized, especially during pilot phases. Pony.ai has set the goal of turning profitable by 2029.
Another strategic dependency is chips. Most Chinese robotaxi fleets are currently powered by Nvidia chips, particularly the widely used Orin system-on-chip. These chips handle the bulk of sensor fusion, perception, and path-planning workloads. The reliance on a U.S. supplier poses geopolitical and supply chain risks. Recent export restrictions and rising tensions between the United States and China have prompted some Chinese firms to explore domestic alternatives, but so far, no local chipmaker has matched Nvidia’s AV computing capabilities.
Tesla’s Uphill Climb
Where does this leave Tesla? Elon Musk’s vision-only approach to robotaxis is impressive, but the leap to true Level 4 or 5 autonomy—vehicles that drive entirely on their own in any conditions—remains dauntingly high. Tesla’s modest Austin pilot reveals that the company will need the same careful geographic expansion and safety monitoring that Waymo and Baidu employed years earlier. While Tesla’s production scale could eventually dwarf Waymo and Chinese players, the ultimate winners will ultimately be determined by safety, operational excellence, passenger trust, and regulatory navigation.Tesla must brace for fierce global competition from Chinese robotaxi firms already establishing footholds worldwide. Just as Tesla once found itself surrounded by Chinese electric vehicle rivals, robotaxis could be next.

IEEE is launching a new publication, IEEE Climate, which aims to further the organization’s mission and vision of advancing technology for the benefit of humanity. The publication is expected to focus on how technology can play a vital role in mitigating and adapting to climate change.
Researchers, engineers, practitioners, and policymakers will be able to share their knowledge, insights, and innovative solutions through original content published in the magazine.
The IEEE Publication Services and Products Board’s nominations and appointments committee is seeking nominations for IEEE Climate editor in chief (EIC). The deadline to submit nominations in OpenWater is 15 August.
Responsibilities of the editor in chief
The EIC will support the magazine’s editorial mission to provide an IEEE-wide, multidisciplinary, all-electronic archival magazine that publishes several types of content related to climate science. That includes articles on policy, social implications, and the economic impact of technology; expert insights from field leaders; and technical articles describing original research.The EIC will be expected to serve a three-year term, with the possibility of reappointment to one additional three-year term. The magazine is expected to launch later this year, with the first issue publishing in 2026.
Candidates must be an IEEE member in good standing, should be familiar with IEEE publications, and must possess a broad understanding of the field across academia, industry, and government.
IEEE Climate will have an editorial board—chaired by the EIC—made up of experts in different areas covered by the magazine, as well as a professional managing editor. Candidates must be able to attract and develop a diverse team of talented and respected individuals to serve on the editorial board.
Strong managerial skills are required, as they are essential for choosing rich content, producing issues, and processing submissions in a timely manner.
The editorial practices of IEEE Climate will be consistent with standards set by IEEE publishing policy, with an emphasis on providing authors of research articles with the rapid review process found in the organization’s journals.
Responsibilities of the EIC include:
- Overseeing the entire editorial process—which includes ensuring the quality and integrity of the content.
- Shaping the overall direction of IEEE Climate.
- Soliciting submissions from field leaders on topics of interest.
- Establishing a review process that minimizes bias and subjects all articles of a given type to equivalent and unprejudiced reviews, resolving conflicts and other problems as necessary.
- Identifying and appointing a diverse pool of qualified, engaged editors who are responsible for managing the peer review process established by the EIC.
- Ensuring that all content fits within the approved scope of the publication and taking responsibility for acceptance or rejection of submissions.
How to submit a nomination
Nominations should be submitted via OpenWater and must include:- Candidate’s biography, including career information, IEEE affiliations, and IEEE-related activities.
- Candidate’s photograph.
- Information about the candidate’s qualifications and publication-related experience.
- Candidate’s notable accomplishments in previous IEEE roles, relevant contributions with other organizations, or related work experience .
- Position statement that describes the candidate’s vision for the magazine.

AI is transforming industries – but only if your infrastructure can deliver the speed, efficiency, and scalability your use cases demand. How do you ensure your systems meet the unique challenges of AI workloads?
In this essential ebook, you’ll discover how to:
- Right-size infrastructure for chatbots, summarization, and AI agents
- Cut costs + boost speed with dynamic batching and KV caching
- Scale seamlessly using parallelism and Kubernetes
- Future-proof with NVIDIA tech – GPUs, Triton Server, and advanced architectures

Venus has always seemed like the last place you’d expect to find life. With surface temperatures hot enough to melt lead and crushing atmospheric pressure, our neighboring planet appears utterly hostile. But high in its clouds, where conditions are surprisingly Earth-like, scientists have discovered something extraordinary: mysterious gases that shouldn’t exist, unless something is alive up there…perhaps!
Over the past five years, researchers have detected phosphine and ammonia in Venus’s atmosphere, two gases that on Earth are produced almost exclusively by biological processes or industrial activity. Since Venus has no factories, the discovery has sparked one of the most intriguing questions in astrobiology: Could microbial life be floating in the planet’s clouds?
Now, a U.K.-backed mission plans to answer that question once and for all. Jane Greaves, a professor of astronomy at Cardiff University, and her team have unveiled VERVE (Venus Explorer for Reduced Vapours in the Environment), an ambitious probe that would hitch a ride to Venus with the European Space Agency’s EnVision mission, scheduled for 2031.
Phosphine Discovery Sparks Debate
The story began in 2020, when Greaves and colleagues first detected phosphine in Venus’s clouds using the James Clerk Maxwell Telescope in Hawaii. The announcement sent shockwaves through the scientific community. On Earth, phosphine is primarily produced by anaerobic bacteria, microbes that thrive in oxygen-free environments like swamps and in the guts of animals. Finding it on Venus suggested the tantalizing possibility of aerial life.However, the discovery proved controversial. Follow-up observations by other teams failed to replicate the findings, leading to heated scientific debates. But Greaves’s team didn’t give up. Through persistent monitoring, they discovered something crucial: The phosphine signal appeared to follow Venus’s day-night cycle, being destroyed by sunlight and varying with time and location across the planet.
The plot thickened when the team announced the tentative detection of ammonia in Venus’s clouds. Like phosphine, ammonia on Earth is primarily produced by biological activity and industrial processes. But there are no known atmospheric or geological phenomena that can explain its presence on Venus.
VERVE Mission Targets Venus’s Clouds
The proposed VERVE mission would cost £43 million (nearly US $58 million), a fraction of typical planetary missions, and would search for and map these gases along with other hydrogen-rich compounds that shouldn’t exist on Venus. The CubeSat-sized probe would detach from EnVision upon arrival and conduct an independent survey while the main mission studies Venus’s surface and interior.The target zone for potential life lies about 50 kilometers above the Venusian surface, where temperatures range from a comfortable 30 °C to 70 °C and atmospheric pressure resembles Earth’s surface conditions. In this “Goldilocks zone” of the atmosphere, extremophile microbes (organisms that thrive in harsh conditions) could theoretically survive.
These organisms could be remnants from Venus’s more temperate past. Billions of years ago, it might have had liquid water oceans and Earth-like conditions. As the planet’s runaway greenhouse effect took hold, any life that existed might have retreated to the more hospitable cloud layers, evolving to survive in this aerial niche.
The only way to resolve the mystery once and for all is direct investigation and, if successful, the mission could mark one of the most significant discoveries in human history: proof that life exists beyond Earth.

Chipmaking giants like Intel, Samsung, and TSMC see a future where key parts of silicon transistors are replaced with semiconductors that are only a few atoms thick. Although they’ve reported progress toward that goal, that future is generally thought to be more than a decade away. Now, a startup spun out of MIT thinks it has cracked the code for making commercial-scale 2D semiconductors and expects chipmakers to have integrated them in advanced chips in half that time.
CDimension has developed a process for growing molybdenum disulfide (MoS2), a 2D semiconductor, on silicon at a low enough temperature that it will not damage underlying silicon circuits. That could allow the integration of layers of 2D transistors above existing silicon circuits and eventually multitiered 3D chips made from 2D devices.
“A lot of people think of 2D semiconductors as something that’s still in the laboratory,” says CDimension CEO and co-founder Jiadi Zhu. “But CDimension has a proprietary tool designed for 2D material growth…and we’ve addressed a lot of critical [2D materials] problems regarding wafer-scale uniformity, regarding device performance and variation, regarding device reliability, and regarding compatibility with silicon manufacturing processes.” Taken together, 2D semiconductors are ready to enter an industrial phase of development, he says.
Much of CDimension’s plans hinge on a proprietary process that it uses to grow a single layer of MoS2 on silicon and other substrates at only about 200 °C across entire 300-millimeter wafers. 2D materials are formed by chemical vapor deposition, wherein vaporized precursor chemicals react on a surface to coat it. But typically the reactions for making 2D materials requires temperatures upward of 1,000 °C. That’s so high it would damage any underlying structures needed to make transistors. Today, researchers get around that problem by depositing the 2D semiconductor separately and then delicately transferring it to a silicon wafer. But CDimension’s system can grow the materials right on the silicon wafer without damage.
The 2D Semiconductor Business
Part of the startup’s business right now is to ship silicon wafers with 2D material grown on it so customers can evaluate it and build devices. Alternatively, customers can send wafers that have already been processed so that they have silicon circuits or structures on them. CDimension can then grow MoS2 or other 2D materials atop that and send it back to the customers, so they can integrate a layer of 2D devices with their silicon circuits.  A test wafer made with CDimension’s process sits underneath a microscope.CDimension
The latter might be 2D semiconductor’s first industrial entry. “We’re showing the possibilities with silicon plus 2D material,” Zhu says. “But 2D material might be used for the highly scaled logic devices as well. That can be the next step.”
Chipmakers like Intel, Samsung, and TSMC reported research aimed at replacing silicon nanosheets in their future transistors with MoS2 and other 2D semiconductors at the IEEE International Electron Device Meeting in December 2024. At the same conference, Zhu and his colleagues from the MIT laboratories of IEEE Fellow Tomás Palacios and Jing Kong showed that the low-temperature synthesis could produce MoS2 transistors with multiple stacked channels, akin to nanosheet transistors. (Palacios is a strategic advisor to CDimension.) By scaling down the device, the team predicted that such devices could meet and exceed the requirements of the future 10A (1-nanometer) node in terms of power consumption, performance, and the area they occupy.
A big motivation to go with 2D semiconductors is to reduce power consumption, says Zhu. Power is lost in transistors both when they are on (dynamic power) and when they are off (static power). Because it’s just over 0.6 nm thick, 2D transistors have qualities that could let them operate using about half the voltage of today’s silicon devices, saving dynamic power. When they are off, it’s leakage current you have to worry about most. But MoS2 has a bandgap that’s more than twice the value of silicon’s, meaning it takes much more energy for charge to leak across the device. Zhu says devices made using CDimension’s materials consumed as little as one-thousandth the energy of silicon devices.
In addition to MoS2, which is an electron-conducting (n-type) semiconductor, the startup also provides tungsten diselenide, a p-type semiconductor, as well as 2D insulating films, such as hexagonal boron nitride. The whole combination will be needed if 2D semiconductors are to ever take over in future CMOS chips.

This article is part of our exclusive career advice series in partnership with the IEEE Technology and Engineering Management Society.
Much of engineering is decision-making. Engineers make decisions about product design, program management, technology road maps, research directions, leadership of technical teams, and more.
As a past president of the IEEE Control Systems Society and now the 2026 president-elect of the IEEE Technology and Engineering Management Society, as well as holding leadership positions in industry and academia, I have thought a lot about the connections between control systems and technology management.
The safe, reliable performance of airplanes and spacecraft, cars and trucks, homes and buildings, chemical plants and manufacturing facilities, communication and financial networks, and many other complex systems relies on automation and control systems. But, as I discuss here, the concepts of control engineering are also relevant to human decision-making in technology management.
Whether in engineering or management, uncertainties are pervasive. In the case of the latter domain, we can never be sure about innovation processes, market projections, and people’s personalities and capabilities. Indeed, the uncertainties may seem so overwhelming that some might be tempted to make a decision by flipping a coin.
But most decisions are not made randomly, and control engineering offers insights for managerial decision-making under uncertainty.
Mental models and uncertainty
We rely on mental models—our knowledge, beliefs, assumptions, experiences, observations, and reasoning. But models of any variety are not reality. They are accurate approximations at best, and they’re completely wrong at worst. It is essential that all decision-makers recognize the discrepancies between their mental models and reality, and then take action to reduce the mismatch.Let me draw an analogy from control engineering. To develop a control system for an aircraft, for example, mathematical models—not the mental variety—are developed of the plane’s airframe. For numerical accuracy, the models require “sufficient excitation,” which means providing a variety of inputs, such as deflections of flight control surfaces, and measuring how the airplane reacts to them.
Based on that data, models of the required accuracy can be created and incorporated into the flight controller design. The data must be rich enough so that relevant signals can rise above irrelevant noise.
Decisions are rarely one-and-done affairs. Leading a team, managing a project, allocating resources, and undertaking a design all require regular interactions with others, with initial decisions adjusted regularly over time.
The same applies to mental models for human decision-making. Monitoring normal day-to-day operations of an organization or a project likely would not provide information of a high enough signal-to-noise ratio for mental models to be reliably updated.
Instead, special tasks and situations can be instrumental in achieving the goal. For example, a manager could give a challenging task to a team member primarily to improve the manager’s mental model of the employee, rather than to address a pressing organizational need. The improved mental model can help the leader determine the best role for the employee when an actual challenging situation arises.
Regardless of effort, mental models will never be perfect. There will always be uncertainty. So, one crucial lesson for decision-makers to keep in mind is that whatever you know, you only think you know. Resist the temptation to believe you really know the truth.
As a decision-maker, the objects of your mental models include your organization, other stakeholders, and the external environment. But they also include your self-model. You need to have a clear understanding of your own capabilities, preferences, and circumstances. Examples include your workload, the pace at which you work best, your flexibility in light of other priorities, and what motivates you. And, of course, you need to appreciate that your self-models are uncertain, too.
People often don’t know themselves as well as they think they do. Be honest with yourself, and ask for feedback from trusted colleagues and friends. Don’t react defensively; listen to the feedback, then reflect. Doing so can strengthen your understanding of yourself.
Dynamics and decision-making
Sometimes the effects of a decision aren’t immediately apparent. It can take days or even years for that to happen. In the meantime, observations can provide an indication of the effects, but they could also be wrong. In control theory, for example, we teach the concept of inverse response, where the initial response to a decision is the opposite of the final effect.A simple example is what happens to a company’s profits if it significantly increases its research and development investment. For the next few quarters, profits likely will be lower because of the R&D expenses. Once new products roll out, profitability probably will increase.
A manager who doesn’t recognize the temporary inverse response trend and cuts R&D resources can worsen rather than improve matters by sacrificing the long-term vitality of the company. Such short-sighted decisions happen all too often.
Decisions are rarely one-and-done affairs. Leading a team, managing a project, allocating resources, and undertaking a design all require regular interactions with others, with initial decisions adjusted regularly over time.
Those dynamics must be considered in complex decision-making situations. The adjustments are based on monitoring the activity, thereby closing the feedback loop.
Time delays can be especially difficult to manage. As noted, decisions made about projects and processes take time to have an impact. Delays can result from various sources including communication issues, new policies, staffing problems, procurement times, and reporting processes.
To be an effective decision-maker, your mental model should include estimates of delays. The complications arising from unanticipated setbacks in feedback processes are well known, both in control engineering and systems engineering. The ability to anticipate delays—and, where possible, to reduce them—is a valuable skill for decision-makers.
Connecting the dots
The interconnections among the concepts of mental models, uncertainty, dynamics, and feedback are deep and fascinating. The insights they offer for decision-making are numerous.One example is the robustness-performance tradeoff in control engineering. The tradeoff refers to the fact that the highest levels of performance cannot be attained while simultaneously being robust during times of high uncertainty. This insight is the basis of the “no free lunch” theorem in optimization, meaning that no decision-making approach can be optimal in all situations.
When uncertainty levels increase from a mismatch between a mental model and reality, the presence of noisy data, or external disturbances, decision-making should be less aggressive. Instead, you should respond by making gradual changes and waiting for feedback signals. To paraphrase, the more uncertain the situation, the more one should hedge one’s bets.
Key Takeaways
- Remember that what you know, you only think you know. Your knowledge is always uncertain.
- Be aware of the dynamics of the systems and processes affected by your decisions. Remember: It can take time before the effects of your actions manifest themselves.
- Keep working to improve your mental models. Ensure the signals you’re relying on are not overwhelmed by the noise.
- The greater your uncertainty about an organization or the environment, the more measured you should be about the actions you take.

This article is crossposted from IEEE Spectrum’s careers newsletter. Sign up now to get insider tips, expert advice, and practical strategies, written in partnership with tech career development company Taro and delivered to your inbox for free!
We’ve all heard about the mythical 10x engineer: the engineer who is able to write 10x more code, provide 10x more feedback in reviews, and generally land 10x more impact. First, just to put the debate to rest, yes, 10x engineers do exist.
Across 15 years in the industry working with some of the best software engineers at companies like Pinterest and Meta, I’ve worked closely with individuals who have prodigious levels of output and productivity. It’s not just that they get more done: They’re able to solve problems and design solutions that other engineers simply could not do, even with an abundance of time.
What made these engineers so powerful wasn’t their immense skill; it was their ability to apply it effectively. When I collaborated with 10x engineers, they felt “human” in the sense that I could understand what they were thinking and why they made the decisions they did. So if it’s not skill that separates the best engineers from the rest of us, what is the difference?
Perhaps a better question to ask is, why aren’t more 10x engineers? I think there are two reasons:
- A lack of domain expertise. If you are brand new to a tech stack or domain, you will face a steep learning curve for the first few months or years. Conversely, if you dedicate years of your career to deeply study a particular problem, you will naturally have more intuition and insight than other engineers. It doesn’t really matter what the domain is, whether distributed systems, AI model training, or mobile app performance: Having expertise allows you to solve problems that few others can.
- A lack of influence. Success as an engineer is not simply about your intellectual horsepower. Equally important is your ability to advocate for a direction and convince others. Purely writing code, for example, only gets you so far: You need to be able to influence large groups of engineers. If you’re difficult to work with, you can’t be a 10x engineer.
It’s clear to me that 10x engineers do exist, and in fact, AI will give the top engineers an even greater ability to get things done. We’ll soon have 100x and 1000x engineers.
But it’s also clear to me that your multiplicative power as an engineer is context-dependent: Your impact depends on your expertise and influence within your company.
—Rahul.
Advancing Quantum Science: Hausi Müller’s Journey
This profile of computer scientist Hausi Müller tells of his longstanding commitment to advancing quantum science—and it contains valuable insights from Müller about the skills needed for a career in quantum computing. See what he recommends engineers learn, from the basics of linear algebra to specific quantum software.Read more here.
The resume is dying, and AI is holding the smoking gun
Recruiters are overwhelmed with AI-generated job applications and resumes. In this piece, Ars Technica adds to initial reporting from The New York Times about the growth of “hiring slop,” with both applicants and recruiters increasingly using AI tools. “The flood of ChatGPT-crafted résumés and bot-submitted applications has created an arms race between job seekers and employers.”Read more here.
Opinion: Ways to Bridge the U.S. Computer Science Education Gap
Currently, only about 58 percent of U.S. high schools offer dedicated courses in computer science, despite its importance in many careers. To better prepare students for the future, should these courses become a requirement? An associate professor at Allegheny College makes the case for mandatory computer science classes, and explains what is needed for such a policy to succeed.Read more here.

Video Friday is your weekly selection of awesome robotics videos, collected by your friends at IEEE Spectrum robotics. We also post a weekly calendar of upcoming robotics events for the next few months. Please send us your events for inclusion.
RO-MAN 2025: 25–29 August 2025, EINDHOVEN, THE NETHERLANDS
CLAWAR 2025: 5–7 September 2025, SHENZHEN, CHINA
ACTUATE 2025: 23–24 September 2025, SAN FRANCISCO
CoRL 2025: 27–30 September 2025, SEOUL
IEEE Humanoids: 30 September–2 October 2025, SEOUL
World Robot Summit: 10–12 October 2025, OSAKA, JAPAN
IROS 2025: 19–25 October 2025, HANGZHOU, CHINA
Enjoy today’s videos!Columbia University researchers introduce a process that allows machines to “grow” physically by integrating parts from their surroundings or from other robots, demonstrating a step toward self-sustaining robot ecologies.
[Robot Metabolism] via [Columbia]We challenged ourselves to see just how far we could push Digit’s ability to stabilize itself in response to a disturbance. Utilizing state-of-the-art AI technology and robust physical intelligence, Digit can adapt to substantial disruptions, all without the use of visual perception.We are presenting the Figure 03 (F.03) battery—a significant advancement in our core humanoid robot technology roadmap.
The effort that was put into safety for this battery is impressive. But I would note two things: The battery life is “5 hours of run time at peak performance” without saying what “peak performance” actually means, and 2-kilowatt fast charge still means over an hour to fully charge.
[Figure]Well this is a nifty idea.
[UBTECH]PAPRLE is a plug-and-play robotic limb environment for flexible configuration and control of robotic limbs across applications. With PAPRLE, users can use diverse configurations of leader-follower pair for teleoperation. In the video, we show several teleoperation examples supported by PAPRLE.
[PAPRLE]
Thanks, Joohyung!Always nice to see a robot with a carefully thought-out commercial use case in which it can just do robot stuff like a robot.
[Cohesive Robotics]
Thanks, David!We are interested in deploying autonomous legged robots in diverse environments, such as industrial facilities and forests. As part of the DigiForest project, we are working on new systems to autonomously build forest inventories with legged platforms, which we have deployed in the UK, Finland, and Switzerland.
[Oxford]
Thanks, Matias!In this research we introduce a self-healing, biocompatible strain sensor using Galinstan and a Diels-Alder polymer, capable of restoring both mechanical and sensing functions after repeated damage. This highly stretchable and conductive sensor demonstrates strong performance metrics—including 80% mechanical healing efficiency and 105% gauge factor recovery—making it suitable for smart wearable applications.
[Paper]
Thanks, Bram!The “Amazing Hand” from Pollen Robotics costs less than $250.
[Pollen]Welcome to our Unboxing Day! After months of waiting, our humanoid robot has finally arrived at Fraunhofer IPA in Stuttgart.
I used to take stretching classes from a woman who could do this backwards in 5.43 seconds.
[Fraunhofer]At the Changchun stop of the VOYAGEX Music Festival on July 12, PNDbotics’ full-sized humanoid robot Adam took the stage as a keytar player with the famous Chinese musician Hu Yutong’s band.Material movement is the invisible infrastructure of hospitals, airports, cities–everyday life. We build robots that support the people doing this essential, often overlooked work. Watch our CEO Brad Porter reflect on what inspired Cobot.
[Cobot]Yes please.
[ Pollen ]I think I could get to the point of being okay with this living in my bathroom.
[Paper]Thanks to its social perception, high expressiveness, and out-of-the-box integration, TIAGo Head offers the ultimate human-robot interaction experience.Sneak peek: Our No Manning Required Ship (NOMARS) Defiant unmanned surface vessel is designed to operate for up to a year at sea without human intervention. In-water testing is preparing it for an extended at-sea demonstration of reliability and endurance.
Excellent name for any ship.
[DARPA]At the 22nd International Conference on Ubiquitous Robots (UR2025), high school student and robotics researcher Ethan Hong was honored as a Special Invited Speaker for the conference banquet and “Robots With Us” panel. In this heartfelt and inspiring talk, Ethan shares the story behind Food Angel—a food delivery robot he designed and built to support people experiencing homelessness in Los Angeles. Motivated by the growing crises of homelessness and food insecurity, Ethan asked a simple but profound question: “Why not use robots to help the unhoused?”
[UR2025]
 Exposure to artificial light at night disrupts our internal biological clocks and fundamentally alters brain function, warns Dr. Randy Nelson from West Virginia University.
The post How Artificial Light After Dark Rewires The Brain appeared first on Study Finds.
 Over the past four summers, Antarctic sea ice extent has hit new lows.
The post Antarctic Summer Sea Ice Reaches Record Lows. Here’s How It Will Harm The Planet – And Us appeared first on Study Finds.
 Is the internet’s place in human history cemented as a harbinger of despair? Or is there still hope for an internet that supports collective flourishing?
The post Is There Any Hope For The Internet? appeared first on Study Finds.
 While humans agonize over cancer screenings and medical breakthroughs, turtles have been quietly living their best lives for more than 250 million years — and they get cancer at astonishingly low rates.
The post Why Turtles Might Hold Secrets To Extraordinary Cancer Resistance appeared first on Study Finds.
 We might think that our furry friends are protected from the sun’s harmful rays thanks to their typical hairiness, but in reality, we need to protect them too.
The post Yes, Pets Can Get Sunburned Too. Here’s What You Need To Know appeared first on Study Finds.
 New research suggests that anxiety felt at the start of the workweek may not simply fade with the passing of the day — it could be linked to stress hormone patterns that persist in the body for up to three months.
The post Monday Anxiety Can Leave A Biological Mark That Lingers For Months, Research Shows appeared first on Study Finds.
 Scientists have identified a potentially game-changing treatment approach for ovarian cancer, one of the deadliest forms of the disease that kills roughly 12,740 American women each year.
The post Experimental Drug Pairing Offers Hope For Aggressive Ovarian Cancer (Updated With Author Q&A) appeared first on Study Finds.
 People who believe the world is fundamentally competitive — a "dog-eat-dog" environment where only the strongest survive — are far more likely to respect and even admire harsh, intimidating managers.
The post Is Your Manager Too Soft? Harsh Bosses Are Actually Preferred By Some — Here’s Why appeared first on Study Finds.
 That zero-calorie sweetener making your morning coffee taste just right might be quietly interfering with the tiny blood vessels in your brain.
The post This Popular Zero-Calorie Sweetener Could Impair Brain Blood Vessel Cells, Study Suggests appeared first on Study Finds.
 Two specially trained dogs have proven they can detect Parkinson's disease simply by smelling skin swabs, achieving accuracy rates that rival expensive medical tests.
The post Dogs Can Actually Smell Parkinson’s Disease, And They’re Incredibly Accurate appeared first on Study Finds.
 The cooling pillow market has exploded in recent years, with manufacturers introducing innovative materials and technologies designed to regulate temperature throughout the night.
 The post The 5 Cooling Pillows Most Recommended By Top Independent Testers (Summer 2025 Update) appeared first on Study Finds.
 The devastating flash floods that swept through Texas Hill Country in July 2025 highlight a troubling reality.
The post Many Texas Communities Are Dangerously Unprepared For Floods, And Lack Of Funding Plays Key Role appeared first on Study Finds.
 Even when relationships with adult children improve after losing a spouse, these stronger bonds do very little to reduce the deep loneliness that follows.
The post Losing A Spouse Leaves Loneliness That Few Family Ties Can Fix, Study Finds appeared first on Study Finds.
 Older musicians’ brains process speech more like young adults — hinting that lifelong musical training could help fight age-related decline
The post Musical Training May Hold The Key To Fighting Age-Related Brain Decline appeared first on Study Finds.
 In a discovery that has astronomers scratching their heads, researchers have found a supermassive black hole sitting in the middle of nowhere, literally floating between two massive galaxies like a cosmic hitchhiker that lost its ride.
The post Webb Telescope Spots ‘Infinity Galaxy’ Hosting A Supermassive Black Hole That Shouldn’t Exist appeared first on Study Finds.
 Young Americans feel overwhelmed 17 days out of every month, with social media, screen time, and food choices being the top stress triggers.
The post Gen-Xhausted: Young Americans Feel Overwhelmed 17 Days Every Month, Survey Shows appeared first on Study Finds.
 How much would it take for you to abandon your romantic partner? Break up with the person you love most? According to a shocking new poll, for 43% of Americans, the answer is just $1 million.
The post Would You Leave Your Partner For $1 Million? 43% Of Americans Say They Would! appeared first on Study Finds.
 One hundred years after a Tennessee teacher named John Scopes started a legal battle over what the state’s schools can teach children, Americans are still divided over evolution.
The post Why Many Americans Still Think Darwin Was Wrong On Evolution, Yet The British Don’t appeared first on Study Finds.
 Researchers from universities across three countries studied 137 people to decode exactly when eye contact signals real communication intent.
The post Scientists Discover Eye Contact Trick That Makes You Look More Trustworthy appeared first on Study Finds.
 Yoga has emerged as a sleep superstar, adding about 1 hour and 50 minutes of sleep per night for participants compared to standard care approaches like lifestyle advice or stretching.
The post Struggling To Sleep? Study Shows That Doing Yoga Can Add Nearly 2 Extra Hours Of Rest appeared first on Study Finds.
 Research tracking 102 seniors in Chicago-area retirement communities reveals that increasing walking speed by just 14 steps per minute during exercise dramatically improves physical function in people who are frail or becoming frail.
 The post Walking 14 More Steps Per Minute Can Fight Off Frailty Effects For Seniors appeared first on Study Finds.
 If it feels like rising prices are affecting your dating life or friendships, you’re not imagining it.
The post How Rising Living Costs Are Changing The Way We Date, Live And Love appeared first on Study Finds.
 Most pet owners have caught their dog staring intently at the television screen, but a groundbreaking study from Auburn University reveals that dogs are far more sophisticated viewers than anyone imagined.
The post Dogs Have Distinct Preferences About What’s On TV, Study Shows appeared first on Study Finds.
 Despite being at increased risk for severe COVID-19, nearly one-third of cancer patients skipped their recommended booster shots, and an alarming 62% never received the updated bivalent vaccine.
The post Cancer Patients Desperately Need COVID Boosters, But Most Aren’t Getting Them appeared first on Study Finds.
 Younger Americans are more likely to express belief in witchcraft and luck, as our new research shows.
The post Angels, Witches, Crystals And Black Cats: How Supernatural Beliefs Vary Across Different Groups In The U.S. appeared first on Study Finds.
 That coworker who always seems ahead of the game might have a hidden advantage after all. While you're still sorting through your inbox, they’ve already streamlined their workflow — and artificial intelligence may be the reason why.
The post Millions Of Americans May Be ‘Secretly’ Using AI At Work — Why That Could Be A Good Thing appeared first on Study Finds.
 Buried deep in a French glacier lies a 12,000-year record that reads like a climate thriller, one in which prehistoric Europe endured atmospheric extremes far more intense than anything recorded in modern industrial times.
The post Alpine Ice Core Sample From Last Ice Age Uncovers Ancient Europe’s Forgotten Climate Crisis appeared first on Study Finds.
 Mango lovers might soon find their favorite tropical fruit staying fresh much longer, thanks to a surprisingly simple treatment that researchers say could transform the global food industry.
The post The 10-Minute Mango Hack That Extends Shelf Life For Nearly A Month appeared first on Study Finds.
 Scientists at Google and UC Berkeley have turned ordinary Android smartphones into the world's largest earthquake detection network, reaching 2.5 billion people across 98 countries.
The post How Google Turned Android Phones Into The World’s Largest Earthquake Detection Network appeared first on Study Finds.
 Americans burn more calories daily than people living traditional lifestyles in developing countries. Yet we're also significantly fatter. How can that be?
The post Why Americans Keep Gaining Weight Despite Burning More Calories Than Ever appeared first on Study Finds.
 The technique, called mitochondrial donation, was used to help 22 women who carry faulty genes that would otherwise pass serious genetic disorders – such as Leigh syndrome – to their children.
The post Babies Born With DNA From Three People Hailed As Breakthrough – But Questions Remain appeared first on Study Finds.
 Since the Taliban's return to power in August 2021, Afghanistan has transformed into what security experts now call a "safe haven" for terrorist organizations spanning from Al-Qaeda to the Islamic State.
The post Terror By Marriage: How The Taliban Tied The Knot With Global Jihad appeared first on Study Finds.
 Researchers found that dogs, regardless of their age or experience, showed no meaningful preference for humans who were generous with food over those who were stingy.
The post Do Dogs Judge Human Character? Science Says Maybe Not appeared first on Study Finds.
 People who maintain their resolutions throughout the year are those who manage to find immediate satisfaction in their efforts, not just in the distant outcomes they hope to achieve.
The post Forget Willpower. Here’s The Real Secret To Long-Term Goal Success appeared first on Study Finds.
In this article, we will explore some of the common sections used to create landing pages, what they are for, and how we can quickly create them thanks to the Progress Telerik UI for Blazor controls. I took inspiration from the MIT licensed template in the repository awesome-landing-pages. Let’s get started!
What Is a Landing Page?
A landing page is a webpage designed to convert visitors into leads or customers. Typically, these sites are focused on encouraging users to perform a specific action, eliminating distractions such as banners, links to other webpages or unnecessary sidebars. Another characteristic of these pages is that they often include a contact form, in addition to having a structure tailored for conversion.How to Create Landing Pages with Blazor?
To put into practice what is described in this article, you can create a new Blazor project or add a new page-type component to an existing project. In my case, I will create a project from scratch, for which I followed these steps:- Create a new project by selecting the Blazor Web App template, with an Interactive render mode set to Server, and an Interactivity location set to Per page/component, leaving the option to integrate the sample components selected.
- Follow the installation guide for Telerik Blazor components to integrate them into the project.
- Navigate to the file located in wwwroot |
app.cssand add the following styles at the end of the file:
.landing-container {
    display: flex;
    flex-direction: column;
    min-height: 100vh;
}

.header {
    display: flex;
    justify-content: space-between;
    align-items: center;
    padding: 10px 5%;
    position: absolute;
    top: 0;
    width: 100%;
    z-index: 20;
    background: #171B20;
    width: 100vw;
}

.top-row{
    padding-left: 0;
}

.top-row{
    background: #26b050;
}

.logo {
    width: 50px;
    height: 50px;
}

.nav-links {
    display: flex;
    gap: 20px;
    align-items: center;
}

.nav-link {
    text-decoration: none;
    color: white;
    font-size: 16px;
    transition: color 0.3s;
}

    .nav-link:hover {
        color: #6c72e8;
    }

.hero-section {
    position: relative;
    display: flex;
    flex-direction: column;
    justify-content: center;
    align-items: center;
    min-height: 100vh;
    text-align: center;
    padding: 5%;
    background: url('assets/images/background/dots.svg') center/cover no-repeat;
}

.hero-bg {
    position: absolute;
    top: 0;
    left: 0;
    width: 100%;
    height: 100%;
    background: linear-gradient(180deg, rgba(24,27,32,0.9) 30%, rgba(0,0,0,0.25) 65%);
    z-index: -1;
}

.hero-title {
    font-size: 48px;
    font-weight: bold;
    text-transform: uppercase;
    margin: 0;
    background: linear-gradient(93deg, rgba(233,92,255,1) 12%, rgba(210,125,255,1) 49%, rgba(159,121,255,1) 93%);
    -webkit-background-clip: text;
    -webkit-text-fill-color: transparent;
}

.hero-subtitle {
    font-size: 18px;
    margin-top: 20px;
    max-width: 450px;
}

.hero-buttons {
    margin-top: 20px;
    display: flex;
    gap: 20px;
    justify-content: center;
}

.dashboard-container {
    margin-top: 40px;
}

.dashboard-image {
    width: 100%;
    max-width: 950px;
    min-height: 450px;
    border-radius: 16px;
    box-shadow: 0 4px 6px rgba(0,0,0,0.2);
}

.section {
    padding: 60px 5%;
    text-align: center;
}

.pricing-cards {
    display: flex;
    flex-wrap: wrap;
    justify-content: center;
    gap: 20px;
}

.pricing-card {
    width: 380px;
    margin: 20px;
    padding: 20px;
    background-color: #1d2127;
    border-radius: 10px;
    box-shadow: 0 4px 6px rgba(0,0,0,0.2);
}

.footer {
    display: flex;
    justify-content: space-around;
    padding: 40px 5%;
    background-color: #111;
}

.footer-column {
    max-width: 250px;
}

    .footer-column h2 {
        font-size: 24px;
        margin-bottom: 20px;
    }

.footer-link {
    color: white;
    text-decoration: none;
    display: block;
    margin-bottom: 10px;
    transition: color 0.3s;
}

    .footer-link:hover {
        color: #483cf4;
    }

@keyframes scroll {
    0% {
        transform: translateX(0);
    }

    100% {
        transform: translateX(-50%);
    }
}

.item {
    background: #121418;
    color: rgba(255, 255, 255, .8);
    font: 36px/200px sans-serif;
    text-align: center;
    margin: 0;
    border: none;
    position: absolute;
    text-shadow: 1px 1px 2px rgba(0, 0, 0, .8);
    border-width: 0px;
}

.k-scrollview {
    margin: 0 auto;
    border: none;
    border-width: 0px;
}

.carousel-style {
    border: none !important;
}

    .carousel-style .k-scrollview-nav .k-link {
        background-color: #4B0082;
    }
        .carousel-style .k-scrollview-nav .k-link.k-primary {
            background-color: #3F51B5;
        }
.k-form-label,
.k-form-hint,
.k-label {
    color: #ffffff !important;
}

.k-input,
.k-textbox,
.k-dropdown,
.k-multiselect {
    color: #ffffff !important;
}

.k-validation-message {
    color: #ffffff !important;
}
- In the same stylesheet, modify the following styles:
html, body {
    font-family: 'Helvetica Neue', Helvetica, Arial, sans-serif;
    margin: 0;
    background-color: #181B20;
    color: white;
}
...

.content {
    font-family: "Poppins", sans-serif;
}
- To use the Poppins font, go to
App.razorand add the following line in theHeadsection:
<head>
    ...
    <link href="https://fonts.googleapis.com/css2?family=Poppins&display=swap" rel="stylesheet">
    <ImportMap />
    ...
</head>
Creating a New Page-Type Component
The first step we will take is to create a new Razor page-type component to add the content of the landing page. To do this, right-click on the Components folder and add a new Razor Component. You can name it whatever you like; in my case, I named itLandingPage.razor. We will modify this component by adding an @page directive to turn it into a page and assign it as the initial route of the application. Finally, we will specify the rendermode as InteractiveServer:@page "/"
@rendermode InteractiveServer
<h3>LandingPage</h3>
@code {
}
@page directive of the Home.razor page to a different value, such as:@page "/Home"
Previously, we mentioned that a landing page should not have distracting elements, so we need to remove the navigation menu from the current application.
Creating a Layout Without the App’s Navigation Menu
To remove the app’s navigation menu, we need to create a new layout file that defines how the application will be rendered. Currently, we have a defined layout in the Components | Layout |MainLayout.razor file, which, if you examine, includes elements such as a sidebar.In the Layout folder, create a new Razor component named
EmptyLayout.razor with the following content:@inherits LayoutComponentBase
<TelerikRootComponent>
<main>
<article class="content">
@Body
</article>
</main>
</TelerikRootComponent>
@Body to render the content while removing unnecessary elements like the sidebar. The next step is to go to LandingPage.razor and specify that we want to use the new layout via the @layout directive:@using LandingPageBlazor.Components.Layout
@page "/"
@layout EmptyLayout
<h3>LandingPage</h3>
@code {
}

Now, let’s look at how to add elements to the landing page.
Creating the Header for the Landing Page
The first element we will add to our landing page is a Header that will represent a navigation menu. This is not the same application navigation menu but rather a menu that allows the user to quickly move between the sections of the page. This is useful because the user might have previously visited the landing page and want to navigate quickly to a specific section (like the payment section), so we need to make this task as easy as possible.To create this element, we can use the TelerikAppBar control, which allows us to quickly create a top menu, including spacing between items as shown in the following example:
<TelerikAppBar ThemeColor="dark">
    <AppBarSection>
        <img src="assets/logo/logo.png" alt="Logo" class="logo" />
    </AppBarSection>
    <AppBarSpacer></AppBarSpacer>

    <AppBarSection>
        <a href="#about" class="nav-link">About Us</a>
    </AppBarSection>
    <AppBarSeparator></AppBarSeparator>

    <AppBarSection>
        <a href="#pricing" class="nav-link">Pricing</a>
    </AppBarSection>
    <AppBarSeparator></AppBarSeparator>

    <AppBarSection>
        <a href="#features" class="nav-link">Features</a>
    </AppBarSection>
    <AppBarSeparator></AppBarSeparator>

    <AppBarSection>
        <a href="#company" class="nav-link">Company</a>
    </AppBarSection>
    <AppBarSeparator></AppBarSeparator>

    <AppBarSection>
        <TelerikButton OnClick="@(() => {})">Get Started <i class="bi bi-arrow-right"></i></TelerikButton>
    </AppBarSection>
    <AppBarSeparator></AppBarSeparator>
</TelerikAppBar>
TelerikAppBar component, to which we add sections using the AppBarSection tag. This allows us to include HTML code with the desired content. You can see that in my case, I use links and even a TelerikButton to execute a C# method if needed. The AppBarSpacer and AppBarSeparator tags allow you to add space between the elements of the TelerikAppBar, resulting in a final design that looks like this:
Creating the Hero Section
The first content section encountered by the user is the hero section. In this section, features of a product are typically highlighted, quick action buttons are added, etc. In our case, we are going to add a Slider displaying product images. We will do this using theTelerikCarousel control, which provides an easy and quick way to implement carousels not only of images but also of any custom content you need.The
TelerikCarousel control works by defining a data source with a set of properties that we will display in the carousel. In my case, since I only need to display images, I will add a class with the properties ID and ImagePath, in addition to creating a list with five objects of the created model:@code {
public IEnumerable<CarouselModel> CarouselData = Enumerable.Range(1, 5).Select(x => new CarouselModel
{
ID = x,
ImagePath = "assets/images/home/dashboard.png"
});
public class CarouselModel
{
public int ID { get; set; }
public string ImagePath { get; set; }
}
}
<!-- HERO SECTION -->
<section id="hero-section" class="hero-section">
    <div class="hero-bg"></div>
    <h1 class="hero-title">
        AI Powered<br />Coding Simplified
    </h1>
    <p class="hero-subtitle">
        Lorem ipsum dolor sit amet consectetur, adipisicing elit. Error adipisci corrupti accusamus reiciendis similique assumenda nostrum fuga dicta vitae ipsum.
    </p>
    <div class="hero-buttons">
        <TelerikButton OnClick="@(() => {})" Size="lg" ThemeColor="info">Get Started</TelerikButton>
        <TelerikButton OnClick="@(() => {})" Size="lg" Class="secondary" ThemeColor="light">Learn More</TelerikButton>
    </div>
    <div class="dashboard-container">
        <TelerikCarousel Data="@CarouselData" Width="950px" Height="450px" Class="carousel-style">
            <Template>
                <div class="item">
                    <img src="assets/images/home/dashboard.png" alt="Dashboard" class="dashboard-image" />
                </div>
            </Template>
        </TelerikCarousel>
    </div>
</section>
Now, let’s see how to create a features section.
Adding a Brand Logos Section
Something that builds trust among an application’s prospects is showcasing which companies have relied on them to use their products. For this reason, we will add a dedicated section on our landing page to display logos of some companies, incorporating interactivity to make it a dynamic section.From the Telerik UI library, we will use the Blazor Animation Container component, to quickly add fade-in and fade-out effects to elements by simply wrapping the desired HTML code section, as demonstrated in the following example:
<!-- Trusted Brands Section -->
<section class="section" id="mySection">
    <h2>Trusted by Brands You Know</h2>
    <div style="overflow: hidden; white-space: nowrap; max-width: 800px; margin: 0 auto;">
        <TelerikAnimationContainer @ref="animationContainer"
                                   AnimationType="AnimationType.ZoomIn"
                                   AnimationDuration="1000"
                                   Width="800px">

            <div style="display: inline-block; animation: scroll 10s linear infinite;">
                <img src="https://d585tldpucybw.cloudfront.net/sfimages/default-source/blogs/author-images/progress-blog-default-logo-transparent.png" alt="Progress" style="height:50px; width:50px; margin: 0 20px;" />
                <img src="https://d585tldpucybw.cloudfront.net/sfimages/default-source/blogs/author-images/progress-blog-default-logo-transparent.png" alt="Progress" style="height:50px; width:150px; margin: 0 20px;" />
                <img src="https://d585tldpucybw.cloudfront.net/sfimages/default-source/blogs/author-images/progress-blog-default-logo-transparent.png" alt="Progress" style="height:50px; width:150px; margin: 0 20px;" />
                <img src="https://d585tldpucybw.cloudfront.net/sfimages/default-source/blogs/author-images/progress-blog-default-logo-transparent.png" alt="Progress" style="height:50px; width:150px; margin: 0 20px;" />
                <img src="https://d585tldpucybw.cloudfront.net/sfimages/default-source/blogs/author-images/progress-blog-default-logo-transparent.png" alt="Progress" style="height:50px; width:150px; margin: 0 20px;" />
                <img src="https://d585tldpucybw.cloudfront.net/sfimages/default-source/blogs/author-images/progress-blog-default-logo-transparent.png" alt="Progress" style="height:50px; width:150px; margin: 0 20px;" />
            </div>

        </TelerikAnimationContainer>
    </div>
</section>
div. Additionally, we have configured the TelerikAnimationContainer control with an AnimationType, an AnimationDuration, a Width and a @ref, which is used to control the animation effect. This setup is necessary as TelerikAnimationContainer can be reused for displaying other types of content as needed.To complement the Razor code, we will add a reference to the control in the code section and specify that the animation should start upon page load:
@code {

    private TelerikAnimationContainer animationContainer;
    protected override async Task OnAfterRenderAsync(bool firstRender)
    {
        if (firstRender)
        {
             await animationContainer.ShowAsync();
        }
    }
    ...
}
- Navigate to the
App.razorfile and add a<script>tag at the end of the<body>tag with the following content:
<body>
    ...
    <script>
        window.observeElement = (elementId, dotNetHelper) => {
            const element = document.getElementById(elementId);
            if (!element) {
                console.error("Element with id: " + elementId + " was not found");
                return;
            }
            const observer = new IntersectionObserver(entries => {
                entries.forEach(entry => {
                    if (entry.isIntersecting) {
                        dotNetHelper.invokeMethodAsync('OnSectionVisible');
                        observer.unobserve(entry.target);
                    }
                });
            });
            observer.observe(element);
        };
    </script>
</body>
- In
LandingPage.razor, add the following directive:
@inject IJSRuntime JS
- Finally, within the code section of
LandingPage.razor, modify theOnAfterRenderAsyncmethod and add theOnSectionVisiblemethod:
protected override async Task OnAfterRenderAsync(bool firstRender)
{
    if (firstRender)
    {
        // await animationContainer.ShowAsync();
        await JS.InvokeVoidAsync("observeElement", "mySection", DotNetObjectReference.Create(this));

    }
}

[JSInvokable]
public async Task OnSectionVisible()
{
    await animationContainer.ShowAsync();
}
Now, let’s see how to display feature sections.
Creating a Features Section
The next section we will create is the features section of the product. This section is useful for showcasing all the advantages of the product that set you apart from the competition. Here, you can add content such as descriptions of functionalities, technical aspects, benefits and any other information that can help your customers choose your solution.We need a control that is flexible and allows us to divide content into multiple rows and columns to create the necessary layout. Fortunately, in the Telerik catalog, there is a Blazor GridLayout component, which allows organizing content in a grid format with rows and columns. To use it, simply define the TelerikGridLayout component, specify the rows (
GridLayoutRows) and columns (GridLayoutColumns), and then place the elements in their corresponding positions. Below is an example of its usage:<!-- Features Section -->
<section class="section" id="features" style="width: 1420px; margin: 0 auto;">
<TelerikGridLayout ColumnSpacing="120px" VerticalAlign="GridLayoutVerticalAlign.Center">
<GridLayoutColumns>
<GridLayoutColumn Width="850px"></GridLayoutColumn>
<GridLayoutColumn Width="450px"></GridLayoutColumn>
</GridLayoutColumns>
<GridLayoutRows>
<GridLayoutRow Height="auto"></GridLayoutRow>
</GridLayoutRows>
<GridLayoutItems>
<GridLayoutItem Column="1" Row="1">
<img src="assets/images/home/coding.png" alt="Coding" style="width: 100%; border-radius: 10px; box-shadow: 0 4px 6px rgba(0,0,0,0.2);" />
</GridLayoutItem>
<GridLayoutItem Column="2" Row="1">
<h3>Streamlined Coding</h3>
<div>
<h4><i class="bi bi-check-all"></i> AI Powered</h4>
<p>Lorem ipsum dolor sit amet, consectetur adipisicing elit.</p>
</div>
<div>
<h4><i class="bi bi-check-all"></i> Locally Run</h4>
<p>Lorem ipsum dolor sit amet, consectetur adipisicing elit.</p>
</div>
</GridLayoutItem>
</GridLayoutItems>
</TelerikGridLayout>
</section>

Now, let’s see how to create a section that displays different payment options.
Creating Cards with Payment Plan Details
A section you will likely want to include in your landing pages is the payment options section. Remember, our goal is to convert the user by providing all the necessary information about the product, including payment details.To achieve this, we can use the Blazor Card component, which will make it easy to define content for each card’s header (
CardHeader), body (CardBody) and footer (CardFooter). As an advantage, we can combine the card’s content with HTML code or add other components, as shown in the following example:<!-- Pricing Section -->
<section class="section" id="pricing">
<h3>Simple Pricing</h3>
<div class="pricing-cards">
<TelerikCard Class="pricing-card">
<CardHeader>
<h3>
<span style="font-size: 32px; font-weight: bold;">$9</span>
<span style="font-size: 24px; color: #ccc;">/mo</span>
</h3>
</CardHeader>
<CardBody>
<p>
Lorem ipsum dolor sit amet consectetur adipisicing elit. Ab, explicabo!
</p>
<hr />
<ul style="list-style: none; padding: 0;">
<li>Lorem ipsum dolor sit amet.</li>
<li>Lorem, ipsum.</li>
<li>Lorem, ipsum dolor.</li>
<li>Lorem ipsum dolor sit.</li>
</ul>
</CardBody>
<CardFooter>
<TelerikButton OnClick="@(() => {})">Get Now</TelerikButton>
</CardFooter>
</TelerikCard>
<TelerikCard Class="pricing-card">
<CardHeader>
<h3>
<span style="font-size: 32px; font-weight: bold;">$19</span>
<span style="font-size: 24px; color: #ccc;">/mo</span>
</h3>
</CardHeader>
<CardBody>
<p>
Lorem ipsum dolor sit amet consectetur adipisicing elit. Ab, explicabo!
</p>
<hr />
<ul style="list-style: none; padding: 0;">
<li>Lorem ipsum dolor sit amet.</li>
<li>Lorem, ipsum.</li>
<li>Lorem, ipsum dolor.</li>
<li>Lorem ipsum dolor sit.</li>
</ul>
</CardBody>
<CardFooter>
<TelerikButton OnClick="@(() => {})">Get Now</TelerikButton>
</CardFooter>
</TelerikCard>
<TelerikCard Class="pricing-card">
<CardHeader>
<h3>
<span style="font-size: 32px; font-weight: bold;">$49</span>
<span style="font-size: 24px; color: #ccc;">/mo</span>
</h3>
</CardHeader>
<CardBody>
<p>
Lorem ipsum dolor sit amet consectetur adipisicing elit. Ab, explicabo!
</p>
<hr />
<ul style="list-style: none; padding: 0;">
<li>Lorem ipsum dolor sit amet.</li>
<li>Lorem, ipsum.</li>
<li>Lorem, ipsum dolor.</li>
<li>Lorem ipsum dolor sit.</li>
</ul>
</CardBody>
<CardFooter>
<TelerikButton OnClick="@(() => {})">Get Now</TelerikButton>
</CardFooter>
</TelerikCard>
</div>
</section>

Now let’s add a contact form to the page.
Creating a Contact Form
The last section we will add to the page is a contact form, so potential customers can reach out to us if they have additional questions. For this task, we will use a Blazor Form component, which allows us to easily create all kinds of forms. We’ll start by defining the data model that the form will bind to, with the information we need to collect, as well as define an instance of the model and a method we can use to process the submission of information:private Contact contact = new Contact();
public class Contact
{
[Required(ErrorMessage = "Name is required")]
public string Name { get; set; }
[Required(ErrorMessage = "Email is required")]
[EmailAddress(ErrorMessage = "Enter a valid email address")]
public string Email { get; set; }
// Optional field
public string Phone { get; set; }
[Required(ErrorMessage = "Subject is required")]
public string Subject { get; set; }
[Required(ErrorMessage = "Message is required")]
public string Message { get; set; }
}
private void HandleSubmit()
{
}
TelerikForm, with FormItems configured according to the type of input data, along with a TelerikButton to handle the submission of information, as shown in the following example:<section class="section" id="contact" style="display: flex; flex-direction: column; align-items: center;">
<h3>Contact Us</h3>
<div>
<TelerikForm Model="@contact" Width="500px" OnSubmit="@HandleSubmit">
<FormValidation>
<DataAnnotationsValidator />
</FormValidation>
<FormItems>
<FormItem Field="@nameof(Contact.Name)" LabelText="Name" Hint="Enter your name" />
<FormItem Field="@nameof(Contact.Email)" LabelText="Email" Hint="Enter your email address" />
<FormItem Field="@nameof(Contact.Phone)" LabelText="Phone" Hint="Enter your phone number (optional)" />
<FormItem Field="@nameof(Contact.Subject)" LabelText="Subject" Hint="Enter the subject of your inquiry" />
<FormItem Field="@nameof(Contact.Message)" LabelText="Message" Hint="Enter your inquiry or comment" EditorType="@FormEditorType.TextArea" />
</FormItems>
<FormButtons>
<TelerikButton ButtonType="ButtonType.Submit">
Send
</TelerikButton>
</FormButtons>
</TelerikForm>
</div>
</section>

As you can see, when the application is deployed, we get a nice form that will serve to receive user questions or comments.
Conclusion
Throughout this article, we have explored how to create sections of a landing page, including the navigation bar, the hero section, the customer logos section, features sections, pricing section and a form section. We have also seen how to make use of Telerik UI for Blazor controls to quickly create the sections of the landing page. Now it’s your turn to continue exploring more ideas to create the best landing pages.Try Telerik UI for Blazor
When building an application or website where your end users or employees can log in, you have to make a choice:
Is a password alone enough to secure their access and account details?
If it’s not enough, how do you want to incorporate two-factor authentication (2FA) or multifactor authentication (MFA) into the process to enhance security?
There are a variety of authentication methods you can include when developing the login procedure for your website or app. In this post, we’re going to look at how multifactor authentication works, when to implement it and when to choose 2FA over MFA.
The History of User Identity Verification
Multifactor authentication is a security procedure during login that requires users to confirm their identity using at least two different methods. The goal is to help prevent anyone who is not the user from gaining access to their account.Let’s say you’re building a digital product with a login. For example:
- A mobile banking app
- An ecommerce website
- An applicant/hiring portal
- A social media platform
- An apartment listing website
In 2000, CAPTCHA (Completely Automated Public Turing test to tell Computers and Humans Apart) was created and Google brought it to the mainstream in 2009.
This test often shows a series of letters or numbers or a simple math equation. When the user enters the correct answer or repetition of characters, they are deemed safe to log in or enter the digital space.
reCAPTCHA is an offshoot of CAPTCHA. This test scans letters, numbers and sometimes images from real books. Users again have to provide a correct answer or input to get through the digital barrier.
Then we started seeing this “Verify you are human” checkbox, this one is on the Indeed website and it’s powered by Cloudflare:

Another form of this you may have encountered is an image puzzle. The most common one is the image broken up into 9 boxes. You need to select the boxes that show the image from the prompt.
For example, I just saw this when checking out on the Tesseract Medical Research website:

There are ways to make these kinds of puzzles more complex, like what Zocdoc does here:
Users not only need to drag the puzzle piece into the matching puzzle piece, they have to do it in a reasonable timeframe.
Technically, these are all forms of two-factor “authentication.” The goal, though, isn’t to confirm the user’s specific identity. It’s to confirm that they’re not a bot scammer trying to bypass the login screen through nefarious hacking methods.
But bots aren’t the only ones we’re trying to keep out of our users’ accounts.
Multifactor Authentication Methods We Use Today
Today’s multifactor authentication methods are much more secure than the ones aimed at bot-driven scammers. Today’s MFA methods are designed to prevent a different person from getting into someone’s account.Here are some examples of two-factor or multifactor authentication methods than can be used to prevent unauthorized access to someone’s account:
Security Questions
Although they’re not as commonly used these days, security questions used to be one of the more common forms of MFA used in previous years. Questions would include things like your mother’s maiden name, the street you grew up on and your childhood pet’s name.While you might be hard-pressed to find a website or app that still employs security questions during the login process, they’re still out there. PayPal, for instance, collects this information from users, likely as a backup if their PIN code fails to work.
What’s good about PayPal’s security questions is that they steer clear of the questions we frequently answered in the past. For instance, here are the current questions offered:
- Your first school’s name
- Your first pet’s name
- The hospital where you were born
- The nickname of your oldest child
- Your father’s middle name
- The name of the toy you cuddled with as a kid
- Your first roommate’s name
- Your grandmother’s maiden name
What’s surprising is that security questions aren’t used that much these days. My guess is because it’s seen as too much effort on the part of the users. Whereas with the other methods we’re going to look at, this one requires accessing personal memories and then typing out a response. More modern MFAs can be completed in a few taps (if that).
PIN Codes
With this method, the user first enters their username and password. Then, they’re sent a one-time passcode to one of their designated forms of contact—SMS, phone, email or WhatsApp.Some applications give users a choice during login, like Discover which allows them to receive a text message or phone call.

When the message shows up, it’s typically a six-digit code like this one:

This can be an effective way to verify the identity of a user. However, if someone has stolen their device, this PIN code won’t be able to keep bad actors out.
Authentication Apps
There are a number of authentication apps that users are able to install on their mobile devices. Google Authenticator and Duo are the most popular. In order to use the authentication app, the user must scan a code from the application into it.For example, these are the instructions provided by Instagram in the security center on how to enable MFA:

The user then copies the key (string of numbers and letters) or scans the barcode/QR code into the app. Once entered, the user will retrieve a time-sensitive six-digit code in order to log back into Instagram.
Similar to the PIN code method, this one isn’t foolproof as someone with access to the user’s mobile device can retrieve the authentication code.
Biometric Data
There are typically three kinds of biometric data you can request from users to authenticate their identity:- Face
- Fingerprints
- Voice
When enabled, only the device/account owner’s face or fingerprints will open it up.
It’s not just mobile devices that use this type of MFA either. Mobile apps do as well. That said, it’s very rarely the primary MFA method offered. One of the more likely reasons is accessibility. For instance, it may be easier for less tech-savvy users to input a code rather than figure out how to set up and use their fingerprints to unlock an account.
Considering how difficult it can be to hack someone’s biometrics, I suspect this will become a more common MFA method over time.
Passkeys
Passkeys are one of the newest MFA methods. Sort of. Typically, if passkeys are enabled, then the user doesn’t need to enter a password every time they log in (though a password itself is needed to create the account in the first place).Biometrics are a form of passkey. However, there are other ways to set up passkeys for your application.
One option is to connect the screen lock passkey of the device being used to the application. So, when they log into the app, they enter their device’s code to log in. Canva, for instance, offers this as an option along with biometric scanning.
The user has a choice as to where they save the passkey. It can be through their device. The other option is to save it on a physical security key.
PayPal also offers a physical security token option for users. It’s not easy to find though. It’s tucked away under “Additional Security Features.” However, for users who are extra serious about safeguarding their financial data, using a physical USB device to verify their identity can be a good way to go about doing it.

The biggest risk with this method is losing the security key. Because if you lose that USB device or the unique passkeys associated with your device or account, you could be permanently locked out.
That’s why it’s important to enable multiple factors of authentication and not just one backup to your password. So, if you’re going to use passkeys, make sure to also enable SMS messaging or use an authenticator app.
Choosing Between 2FA and MFA
There are a number of things you need to ask yourself when setting up the security system for your login procedure:- Is MFA necessary?
- If it’s not necessary, do you think some users would still find it valuable to have the option available?
- If you decide to enable it, how many methods are you going to incorporate? And which ones?
So, does it really matter which one you use? Sure it does.
For starters, think about usability and accessibility.
There may be certain methods that users aren’t comfortable using or are unable to use. Think about users who don’t have smartphones or who rarely use them and don’t know how to do something like install Google Authenticator.
This is why it’s important to enable multiple methods that ensure that everyone has the option to add extra protections to their account. And only requiring 2FA or MFA when it makes sense.
Then, you have to consider the user experience.
What is the purpose of your application and what kind of data is stored within the user’s account? If it’s not complex or super sensitive, do you really need to put them through the rigamarole of verifying their identity multiple times or using different devices in order to do it?
You don’t want your users feeling stressed or annoyed every time they have to log in.
Also, take into account the risks.
If you’ve built an application that operates within a highly regulated space like healthcare or finance, strict MFA procedures may be a necessity.
Another way to think about this is by user. Not every account holder may have access to sensitive or privileged data. In that case, it might be beneficial to enable 2FA for lower-risk users and MFA for higher-risk ones.
Why You Should Implement 2FA or MFA
According to CISA, the most popular password used in the United States is 123456.This is just one reason why it’s critical that web developers enable MFA when building apps and websites. While we’d love to believe that users care about their data security and privacy (which endless surveys have demonstrated), we know that many of them don’t take the right steps to secure their accounts.
It’s not their fault, really. Think about how many accounts you have created or logged into in the last month. Does your brain have the capacity to generate a unique password for each of them and then recall it? Probably not.
While there are password generator and storage apps like Zoho Vault and 1password that can help with this issue, many people don’t use them or even know they exist. What’s more, these unique passwords can still end up on the dark web and available for purchase and exploitation.
Because of this, we need to enforce better security practices at login. The early CAPTCHA and puzzle tools helped with the bot problem, but not entirely. And MFA methods like authenticator apps and PIN codes are good for defending against bad actors, but aren’t entirely hack-proof.
To help keep your users’ information safe, equip with your app or website with multifactor authentication. So long as you give your users some choices and that they don’t intrude on their experience much, MFA should actually help you build customer trust over time.
The post CloudCone 美国洛杉矶MC机房 2核/1GB/60GB/2TB流量14美元/年起,支持支付宝 first appeared on VPS侦探.
